Pages

Tuesday, 30 April 2013

Makes My Heart Happy...

Hey!

There are many things in life that make my heart happy & one of those things is coming across customer creations using Uniko Studio products. So I thought I'd share a few of my recent finds with you all...


These first two cards are by Vicki, you can see more of Vicki's creations HERE. Both cards are so Summery and as you may know I'm a sucker for butterflies! On Vicki's second card she has paired the BRIGHT Butterflies with Background Builders: Round In Circles & a sentiment from Pure Florals: Chrysanthemum. Simply perfect sums up both these cards :)


How about some more lovely butterflies? This time from Sue, you can check out more of Sue's creations HERE.


On this first card Sue has paired BRIGHT Butterflies with the Round In Circles Digital Patterned Paper Collection & All Occasion Sentiments #1. Loving the layout & retro squares :) Continuing the circle  & butterfly theme Sue created this awesome easel card...


Loving the soft pastels on this card, reminds me of the beach :)

I have one more card to share, continuing the butterfly theme that seems to have occurred today! This one is by Gillian & you can check out more of Gillian's creations HERE.


Don't you just love the sparkle of those butterflies? Happy sigh! Well, that's all from me today, I hope to find a little inky time later today to create some projects to share with you.

I'd LOVE to see more customer creations just email me a link or photo of your creation, it would make my heart happy :)

Thanks for stopping by

Sunday, 28 April 2013

Flower Fusion

Hey!

Popping in quickly before we head out for Sunday dinner with a card I made this morning using the new Fusion challenge seen HERE and below my card...


I used both the sketch and photo inspiration for my card. I wished I had more of the turquoise colour showing on the card, but hey ho thats the way it goes!


It's been a while since I used the graphic flower trio from Time and I decided to pair it with Flower Power #1 and a super pairing even if I do say so myself! This card is also perfect for the Addicted to CAS challenge HERE, the code word being Flower. 


My tummy is rumbling now so I guess it's time to go! 
Thanks for stopping by today.
Supplies
Card Stock: WPlus9 White
Ink: PTI Hawaiian Shores & Summer Sunrise. SU! Lucky Limeade & Pumpkin Pie. VersaFine Onyx Black
Stamps: Uniko Studio Time & Flower Power #1
Accessories: PTI Satin Ribbon & Sizzix Framelits Circle Dies

Friday, 26 April 2013

Just a note...

Happy Friday!

Popping in real quick for a graphic style floral 'Just a note' card today...


I've had this card sketched out for a while now a found time yesterday to make it. Sorry to have more Chrysanthemums again, but they seem to be my go to set at the moment!


Flowers is the current Addicted to CAS challenge theme seen HERE, so I thought I'd link up to that challenge.

That's all from me today, I'll be back tomorrow with more to share. Hope you all have a lovely day & YAY! for the weekend!

Thanks for stopping by.
Supplies
Card Stock: WPlus9 White
Ink: VersaFine Onyx Black, SU! Going Grey
Stamps: Uniko Studio Pure Florals: Chrysanthemum, All Occasion Sentiments #1
Accessories: Uniko Studio Digital Patterned Paper Collection On The Grid

Thursday, 25 April 2013

Crazy for Circles!

Hey!

I'm back today with some projects featuring circles, to be more specific Background Builders: Round In Circles. 

My first card is one for the guys...


I've used the current Dynamic Duos challenge colours and Dessert Option for making a masculine card, seen HERE and below.


Circles & any geometric to be honest are good staple stamps to have in your stash for creating masculine cards and projects for those guys that are really hard to create for. It's my guys birthday next week and I'll be using Background Builders: Round In Circles for his card no doubt!


Anyway, I enjoyed creating this card so much I thought I'd make another in a more feminine colour scheme and one that seems to be quite on trend lately...


I was also inspired by Taheerah's card HERE which she made & showed on her blog yesterday using the same Uniko Studio set as I have today. This first photo doesn't do the sparkle justice, but this one does...


I used Versamark ink and Powdered Pearls for the gold shimmer and it shimmers beautifully. I was never a lover of gold but it's certainly growing on me!

This set Background Builders: Round In Circles has been one of the top sellers this month and selling out quick, get your set HERE before they sell out. New stock will be added but it takes around 3 weeks for stock to arrive!

Ok, that's all from me today, I'll be back tomorrow with more to share! Thank you for stopping by & leaving such lovely comments :) I read them all and very much appreciate them. I've had to turn moderation on for anonymous commenters as I was getting spammed BIG time!

Until tomorrow!
Supplies
Card Stock: WPlus9 White. PTI Aqua Mist
Ink: SU! Going Grey, VersaFine Onyx Black & Versamark
Stamps: Uniko Studio Background Builders: Round In Circles & Time
Accessories: Sizzix Framelits Circle Dies, SU! 1" Circle Punch, Powdered Pearls - Gold, Button & Enamel Dots from stash

Wednesday, 24 April 2013

Delicate Chrysanthemums...

Hey!

Today I've some delicate vellum Chrysanthemums to share with you...


This card was inspired by the Fusion #3 inspiration photo seen HERE and below. This time I kept the black & grey to a minimum & muted the raspberry pink.


I seem to LOVE playing with vellum at the moment! I had intended to adhere raspberry pink CS behind the vellum strip but really only wanted the flowers to be highlighted having embossed them with  Cosmic White EP. So, reached for my trusty Copic markers and did some more flat colouring to the reverse of the flowers.


Love the effect, colourful yet translucent! Looking at the sketch below my card there are similarities in the layout which weren't intended! Ha! 

There is some wonderful creations in the Fusion Gallery for this challenge HERE. It's well worth a gander even if you've not time to enter the challenge as it ends today. 

That's all from me today, I'll be back tomorrow with more to share and  most likely something other than Chrysanthemums, but I can't guarantee that it won't be! 

Thanks for stopping by today.
Supplies
Card Stock: WPlus9 White, PTI Soft Stone
Ink: VersaMark, VersaFine Onyx Black
Stamps: Uniko Studio Pure Florals: Chrysanthemum, Flower Power #1
Accessories: SU! Vellum, PTI Banner Die

Tuesday, 23 April 2013

Hybrid Chrysanthemums

Hey!

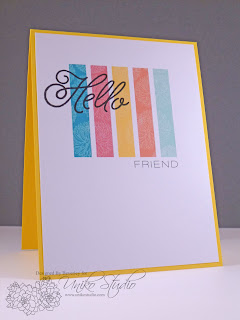
I'm back today with a card to share that I've made using the current CAS(E) this Sketch! I had this card idea in my head as soon as I saw the sketch and had to find a little creative time to make it...


The sketch seen HERE and below certainly got my creative juices flowing & I can see me coming back to this one! 


My card is almost a one layer card, but I decided to mat the main layer with some SU! Summer Sun CS I had left in my stash. I think it helps frame the focus of the card...


I thought I'd put together a photo tutorial of how I created this card too, I'd have done a video tutorial but I am not very good at those... YET! 

I'm working in Photoshop CS5, most Photoshop & Photoshop Elements packages have similar menus.

Step 1 - Create a new document the size of your card panel. Mine is 10 cm x 13.5 cm

File - New - Custom - Enter dimensions - OK


Step 2 - Create a second new document the size that you want your patterned paper strips to be. Mine are 1cm x 5cm

File - New - Custom - Enter dimensions - OK


Step 3 - Open the digital patterned paper files you want to use. I chose a patterned paper design from Pure Florals: Chrysanthemum Digital Patterned Paper Collection.

File - Open - Locate Saved Digital Download - Open


Step 4 - As the canvas size of my card is a quarter of the size of the digital patterned paper I decided I needed to shrink the paper so that more of the design would be seen on each of the coloured/patterned strips.

Image - Image Size - Enter Dimensions - OK


Step 5 - Creating the strips. 

Using the Rectangular Marquee Tool select the top left area of the paper big enough to fit inside the second document in step 2


You now want to copy this section of the paper to paste into the second document. 

Edit - Copy

Step 6 - Go to document 2 (I named mine strip size) and paste the paper into the document.

Edit - Paste 


Step 7 - Before we can copy & paste this paper strip into our first document in Step 1 it needs to be flattened so it is just one layer. 

Layer - Flatten Image - Edit - Copy


Step 8 - Paste patterned strip into document 1 


Roughly move & place the strip where you want it to be. You can play with placement & spacing once you've all you strips on the document. 


Step 9 - You could repeat Steps 3 - 8 with each of the 4 other colours of patterned paper. 

However, I took it one step further and made the process a little more time consuming! I wanted the pattern across all the strips to match as they went across the card front which you can see in my close up photo above.

How I did this... Step 3 - 6 are the same as above. In Step 7 before I flattened my image to copy and paste into the main document I moved the paper to the left by 1cm


Step 10 - Repeat Step 7 & 8

Step 11 - Repeat Step 9 but for the 3rd colour/patterned strip you'll need to move it across to the left by 2cm and by an extra cm for each strip until you've five strips in your document. Which should look like this...


Step 12 - Adding the sentiment. Use the Type tool (T) to do this. Select & change Font & Font Size as required. 


The font I used is Disco 18pt.

Step 13 - Print document, trim to desired size

Step 14 - Stamp 'Hello' sentiment & adhere mat layer to card base

Ta Dah! 


I hope you found the photo tutorial useful?! If not I'm sorry, but I hope you liked my card :) That's all from me today - phew I hear you say after all those photos! Haha! 

I'll be back tomorrow with more to share & thank you for stopping by.
Supplies
Card Stock: SU! Retired Summer Sun, White 160 gsm Printer Paper
Ink: VersaFine Onyx Black
Stamps: Uniko Studio All Occasion Sentiments #1
Accessories: Uniko Studio Pure Florals: Chrysanthemum Digital Patterned Paper Collection

Monday, 22 April 2013

Monday Mums...

Happy Monday!

I'm sorry I left you all hanging over the weekend, I decided to take a  bit of 'time out' to get to grips with  things, mainly my emotions.

So onto a fresh start and new week ahead and lots of projects to share...


I created todays card using the NEW Fusion Challenge combo seen HERE and below. I LOVE the colours in the inspiration photo and had to use them for a lovely bold Chrysanthemum. It was quite a job fussy cutting the bloom out (not for much longer *wink*). 


I added some die cut leaves to for the 'swirl' in the sketch and a simple sentiment from Flower Power #1. 


I've already created another card using the inspiration photo in my head, so you'll be seeing that before the challenge ends! 

Short & Sweet from me today, much to be done since I took 'time out'! Thanks for stopping by & for your comments, they are much appreciated. 

Supplies
Card Stock: SU! Basic Grey, WPlus9 White, PTI Raspberry Fizz & Black from stash
Ink: VersaFine Onyx Black
Stamps: Uniko Studio Pure Florals: Chrysanthemum, Flower Power #1
Accessories: Sizzix Sizzlets Leaf Die. Foam Adhesive

Friday, 19 April 2013

All About Mums...

Today it's all about Mums here at Uniko Studio both the human kind and the floral kind. I have a few cards today & over the next couple of days to share with you using the NEW Pure Florals: Chrysanthemum clear stamp set which was released this month HERE.

One of the reasons I released this set this month was because it was one of my Mums favourite flowers.  But why did I release it this month? I hear you ask...

Well, five years ago today my Mum passed away very suddenly & without any warning. I was concerned that I couldn't get in touch with my Mum, but put it down to the fact she had retired and had time to visit many friends. I asked my brother to check on her 2 days later & thats when our world ended. Being a single Mother my Mum spent a lot of time with us both & that day I'd lost not only my Mum but my best friend too. We shared a passion for crafting & making handmade cards and always talked about starting this business together.

Life has it's challenges in general but a times it's harder when all you want is your Mum, even when your 30+. I always find April a difficult month especially the 19th - 21st and so I thought I'd help ease my grief at this time by remembering my Mum in a good way by releasing Pure Florals: Chrysanthemum containing a flower that she not only loved but I'm sure she would have enjoyed stamping with too! 

How about a cheery card to lighten the mood...


More angles! Normally this trend of angle placement would set my CAS OCD off, in the fact that I usually like everything perfectly aligned! However, I'm really loving this trend at the moment! This card uses simple masking and simple Copic flat colouring.


I've neglected my Copic markers for sometime now as I find colouring time consuming and often don't have the time or patience to sit and colour! The other day I had a little patience to do some simple 'flat' colouring without having to think! It was relaxing, both the colouring & the fussing mask cutting to be able to stamp & overlap the blooms.

That's all I have to share for today, but I will be back tomorrow with more Chrysanthemum creations to share. 
Thanks for stopping by.

Supplies

Happy Everything
Card Stock: PTI Aqua Mist, WPlus9 White
Ink: Memento Tuxedo Black
Stamps: Uniko Studio Pure Florals: Chrysanthemum
Accessories: Copic Markers

Thursday, 18 April 2013

Power Of The Flower!

Hey!

Today I'm sharing a card that I've made for the NEW Runway Inspired Challenge seen HERE and below...


As soon as I saw the inspiration photo my card was already made in my head! I knew exactly what supplies I was going to use and this is how it turned out...


Don't you just love it when a card idea turns out just how you saw it in your head?! I started out by stamping the leaves & stem from Flower Power #1 in a line, overlapping the stems to create a seamless pattern. I repeated the process on both sides of the card.


I then stamped the smallest graphic flower from Time in VersaMark and embossed it in Cosmic Shimmer White EP (Love this stuff!) and fussy cut them out (soon to be a thing of the past *wink*). I also embossed the sentiment onto a die cut banner, adhering this flat to the card. The flowers are adhered using foam adhesive to add some dimension.

This design would look just as FAB in colour as it does in black & white! A little tip for you: To help stamp & overlap the stems I drew a faint pencil line onto my card base.

I hope you've enjoyed todays card as much as I enjoyed making it! Until tomorrow, thank you for stopping by today.
Supplies
Card Stock: WPlus9 White, Black from stash
Ink: VersaFine Onyx Black, VersaMark
Stamps: Uniko Studio Time & Flower Power #1
Accessories: Cosmic Shimmer White EP, PTI Banner Die, Foam Adhesive