Pages

Tuesday, 13 December 2022

Brand Ambassador Inspiration - Stretch Your Stash

Morning All, 

Steph here today. You may remember that last year I used my Uniko non-Christmas stamps to make Christmas cards (see here) and I thought I'd give it a go this year with my Uniko stencils. It's always good to see what other ways we can use our products and stretch our stash with a little 'outside the box' thinking! 

My first card didn't take too much imagination as I thought the fabulous Uniko Layering Stencil - Zesty would fit beautifully as dried orange slices in a Christmas wreath. I teamed this with one of my favourite stamp sets, Uniko Winter Foliage


After a look through my Uniko stencils, I spotted that the Uniko Mid Century Modern Shapes stencil had the perfect shapes to 'build' a Christmas tree! A little stickles added some tree lights and a sentiment from Uniko Simply Said Blocks Christmas stamp set completed the card. 


For my final card I used one of my favourite stencils and certainly not one you would class as a Christmas stencil, but it's perfect for an animal print lover at Christmas time! The stencil is Uniko Tiger Print and I have teamed it with Uniko Sparkling Snowflake die.


The good thing about this card method is you get two for one! Here I have used the die cut snowflake to make a second card. 


I hope you have got your Christmas cards well under way but don't panic if not, all these cards are quick to make (but only if you like fussy cutting in the case of the first card!). 

As this may be my last post pre Christmas, I will sign off by wishing you all a very Merry Christmas!

Much love
Steph x

Thursday, 1 December 2022

Hello December!

Hello & Happy December!

I hope you are all staying warm & well. The weather seems to have turned cold here all of a sudden and this morning, one Bean disappointedly exclaimed, 'where is the snow!' He really was expecting there to be snow today.

But he was soon distracted by asking if Buddy the Elf had arrived...


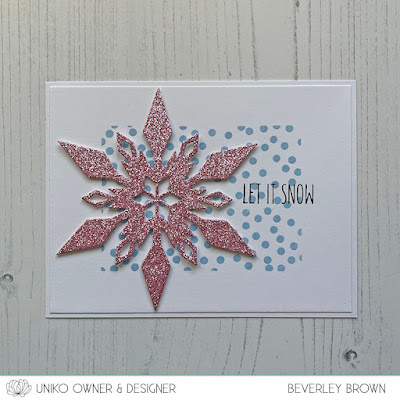
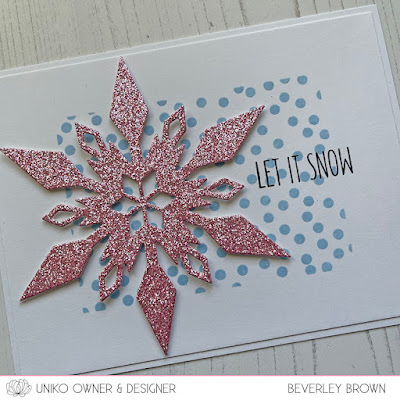
All the talk of snow inspired me and so I decided to create a card in the hope that snow arrives some time soon! 


These photos don't really show the sparkle of the Designer Die Sparkling Snowflake justice, but believe me, it's beautiful and makes my heart happy! 


I kept my card really simple, using the Background Block Scattered Polka Dots stamped in Iceberg ink and then used the Let it Snow sentiment from Christmas Sentiments to finish.

It's been a busy few weeks here in the studio preparing for the start of 2023 and lots of other fun stuff that is under wraps for now. But believe me, it is exciting! So I 'hope' that things will start to calm down and I can share more creativity AND as it is the season of giving, a few giveaways along the way! 

That's all from me today! 
Crafty Hugs 


Monday, 28 November 2022

Brand Ambassador Inspiration - Snowflake Serenade

Good morning

It's Anita here and today I'm sharing some cards using a great Christmas set, Snowflake Serenade Clear Stamp Set.  The main image has so much movement and you also get some extra snowflakes and some fab mixed-font sentiments.

Ok, here's my first card, and my favourite of three I'm sharing today...


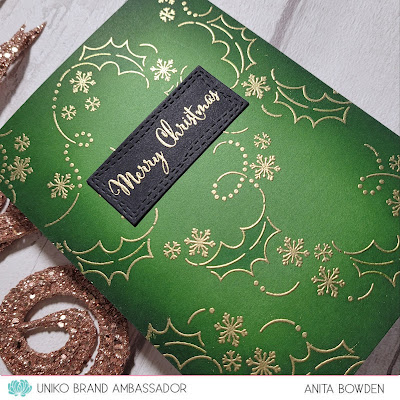
I started with a piece of green cardstock, very unusual for me not to reach for white!  I then stamped and embossed the main large image in gold, before then filling in some gaps to create a full background.  I then ink blended in from the edges of the green panel and faded it out toward the centre.  I then grabbed a green marker and coloured in all the holly images, just to add some tone on tone detail.  I then finished with a gold embossed sentiment from the Rustic Christmas Clear Stamp set, on a black die cut.


My second card...


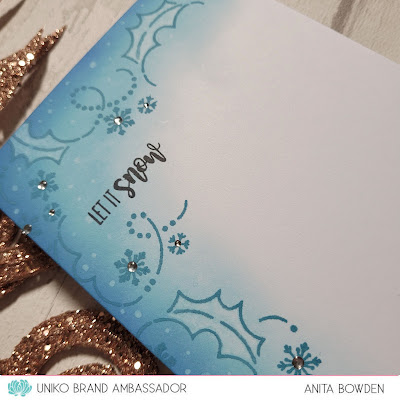
Directly on the card base I stamped the main focal image in blue dye ink.  I then ink blended in from the edges using a few shades of Distress Oxide ink.  Next I 'painted' the holly leaves with water and blotted with a paper towel to remove some colour, this works well with blended Distress and Distress Oxide inks as they react with water.  I also used a wet paint brush to add the 'snow' dots which were also blotted away.  The sentiment, also from the set, was stamped in black ink and I finished with some smooth gems in the centres of the snowflakes.


And my final make...


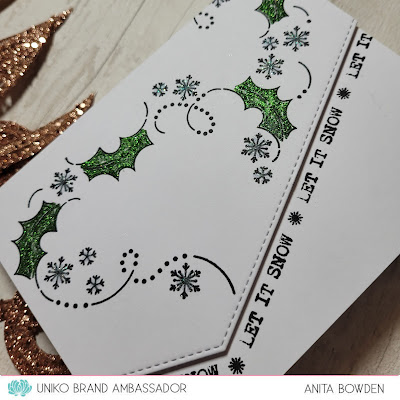
I kept this one fairly simple, just ink and glitter.  I used an angled panel die cut with a stitched border and stamped the main image in black ink.  I adhered this to my card base and then used a glue pen to add glue, first to the holly leaves, which I sprinkled with super fine green glitter, and then added some touches to the snowflakes and sprinkled with pale blue glitter.  I then finished the card by stamping the sentiment, from the Background Builders: Winter Wonderland set, along the edge of the panel.


So there you have it, three very different cards using the same focal image.  I'm still way behind with my Christmas cards this year so I hope this has provided you with some inspiration if you are too!

Thanks for taking a look, I hope you have a wonderful week! 


Tuesday, 22 November 2022

Brand Ambassador Inspiration - Water Coloured Stencilled Christmas Trees

Good morning, Julie here with few festive ideas for quick Christmas makes using the Christmas Pop Trio stencil and the Christmas Pop stamp set.
I've rediscovered my love of water colour these past few weeks as the days shorten, temperatures drop and gardening is on the back burner. It's great to get lost in You Tube and then have a play!!
Here are three cards that started out as three outlines made using the open tree stencil.


In theses two examples, I traced the outline of the tree using the basic outline from the stencil without the trunk, one onto card the other onto watercolour paper. I wanted to see if the technique worked on card and it does! Can you pick out the w/c paper from the card? The one on the right is the one using w/c paper.


The answer here is to be prepared before you start painting. I used water colour paint but I could just as easily have used DIs or reinkers. I made up pools of three shades of green and then painted the outline triangle all over with plain clear water. YES you read correctly WATER! Not too much if you are using card though. 
Before it dried, I dropped drops of colour randomly in the triangle and let the water do it's thing. You don't do the mixing, the water does, no two will ever be the same. This is great for mass production as each one will be drying whilst you do the next! 
I could have stamped the pot from Pattern Building Christmas tree but used a pencil and ruler to draw mine. I filled in the shape as before first water then some red in a couple of shades. The painted panels were then left to completely dry.

When dry I needed to decorate them and decided to use the elements from Christmas Pop with gold embossing powder. To complete, I added stars from the same set and the first tree I stamped the sentiment from Christmas Sentiments in Jewelled Gold EP to match the tree.

For this last card I drew the triangle using the same stencil but this time placed Washi tape around the outline. I used a slightly textured card for this panel and the same pools of green from the other two cards. 


Starting with a pale green, water added to the strongest one, I painted across with size 6 watercolour brush in various thicknesses and angles. When dry I repeated using progressively darker greens, waiting for each layer to dry. Again this would work well for batch making. When dry and before removing the tape, I splattered some Inka Gold over the paint for a bit of festive sparkle. I hadn't used it for awhile and it was set solid in the pot but I broke a few bits into a dish and added some water to make a thin paste for splattering! The pot was done the same as before.
I didn't add a star this time but added the same Christmas Sentiments sentiment in plain gold EP.

So that's it from me, hope I've inspired you to get a little arty but still keeping the designs clean and simple!

Keep safe out there and happy crafting!

Friday, 18 November 2022

Festive Friday!

Happy FriYAY! 


I'm jumping on the early Black Friday bandwagon with our best discount code of the year. Save 30% on all orders of £10 or more, plus shop the sale and save up to 40%. Code is valid until Midnight GMT Saturday 26th November 2022. 

Royal Mail have planned postal strikes next weekend, so get in early to (hopefully) receive your order before then! 

Now onto my inspiration for the day...

Can you tell I am starting to panic that I've not made nearly enough Christmas cards, as usual?! I really need to get the international ones posted and probably the ones for family & friends in the UK ;)

Anyway, back to what I have made today. It's been ages since I inked up Winter Foliage, it's an oldie, but still a firm favourite.


I started off by stamping the holly leaves in Concord & 9th Clover ink. I then stamped the berries in Cranberry ink. The holly leaves are really easy to cut out, so I created a mask for each of them from Eclipse paper, so that when I stamped the pine branches they appear behind the holly leaves.


The pine branches are stamped in Evergreen ink and my chosen sentiment is from Christmas Sentiments and adhered to the card using foam adhesive. 

As I had all the colours and supplies out, I decided to make another quick and simple card using them. The layout is roughly the same, but I started by stamping the sentiment first and then building the cluster around it.


This time I started with the pine branches and I stamped them in both Evergreen and Altenew Espresso ink. The holly leaves and berries are fussy cut and adhered to the card using foam adhesive.


That's all from me today, I am sure you will be seeing more of this set in the coming days/weeks! 

Crafty Hugs 

Thursday, 17 November 2022

Brand Ambassador Inspiration - Warm Christmas Wishes

Bonjour !

It's Izzy here. I echo Bev's post (see HERE) with 3 hot drink inspiration cards. Coffee being also the theme of the last challenge at The Day of the Month Card Club, I had to make a card for my reminder post. So I pulled out Uniko's I LOVE COFFEE stamp and made this card. 


For the background, I used the gorgeous Framed-Holly stamp. I first stamped it with a no-line colouring ink and I coloured it with colour pencils. Once finished, I stamped on top with black ink.
 
I used the I LOVE coffee stamp set to make the cup. I stamped it in red, the sticker in black and I masked the edges to stamp some holly leaves from the Framed-Holly stamp set. I fussy cut it and I foam mounted it on the holly background. 


As this card was originally intended for my reminder message for DotMCC, I added a holly leaf and changed the berries to coffee beans. And to finish, on a black strip, I stamped and I white heat embossed the sentiment coming from Christmas Sentiments set.

While making this first card, another idea came to me and I couldn't help but put it into action by making this second card.


To be honest, this is the first cup I made, but I didn't like it with the holly background. I still found it pretty so it would have been a shame not to use it. To decorate this card, I used the Quilted stencil with a red mechanical pencil. 


This pattern is reminiscent of Nordic Christmas decorations, so I used the set Background Blocks : Scandinavian Christmas to make the background. I simply stamped and white heat embossed it on a die cut red card stock. To remain in the Scandinavian style, I used a double kraft card. The sentiment comes from the Simply Said Blocks Christmas set.

To tell you the truth, the irony is that I never drink coffee. So I also wanted to highlight the very pretty I LOVE TEA stamp set with this last card.


On a slimline white card and using masks, I stamped the cup several times in rainbow colours. Still with masks, I decorated each cup using the Scandinavian Christmas stencil. And I used the Christmas Sentiments set to finish this card.

Having used Uniko's wonderful products for these three cards, I then decided to share them with you in this inspiration post and I finally made another card for the DotMCC reminder post. 


Wednesday, 16 November 2022

Brand Ambassador Inspiration - Foiling - failure or fancy project?

 Hey there

Most of us crafters love a clean card as result of our crafting process. Even most of the things we buy as 'wonky' have clear and straight lines and we can work in a clean style with them.
What are we doing with shifted or slipped stamp or stencil impressions? With a bit of luck it is a small failure and we can put something on top to cover it or there is a part we can use from bigger impressions. But often such a failure is going directly into the trash.

Right now, there is a hype to foiling.
It looks so amazing, when you have details with this special kind of 'bling' on a card!
Sadly, the machines for this technique aren't cheap, the supplies you need in addition also cost their money... Until now I wasn't sure if I want spend as much for this technique as it would need.
I found some simple sheets of foil with an easy instruction to use. Just for a first try.
The instruction said, you simply have to add heat and a little bit of pressure and the foil will be transfered! Sounds simple, right?

For my very first try I planned to use a more simple shape without too many details.
I took the Christmas Pop Trio Stencil and used one of the trees.
Plastic Stencils and direct heat aren't a good combination, so I decided to use Embossing Ink and Heat'n'Stick Powder to fix the foil on my paper. This powder is used like Embossing Powder, but at the end you have a sticky area, not an embossed one. Perfect idea so far!

But then something went wrong!
I used my laminator to reheat the Heat'n'Stick Powder with the foil on top to optimize the transfer of the foil, waited a moment to cool it down and removed the sheet of foil - and there wasn't only foil in the areas of the tree, but also everywhere around!
I finally recognized right now the foil is covered with a temperature activated layer!

Next try with a second paper, another foil and the same technique, but with less heat in the laminator.
The result was a bit better, but still not what I expected!

Disappointed and also a bit angry about these failures, both sheets went to my paper-trash-box.
After a while I took them out again, cause the shimmer of the foil on the papers was so beautiful!
Maybe I can cut or punch out some embellishments?!
The longer they were laying on my table, the more I liked them!

At the end I used them both as they were!
One has exciting pattern around the tree so I let it, the other one I cut out close to the edge of the tree.
I added some metallic rivets as ornaments (to cover some small areas without foil) and a sentiment of the 'Simply Said Christmas' set with Heat Embossing on both cards. (This set is retired but you can add any Christmas Sentiment you love!)


What do you think? What's the solution - trash or create something fun & a bit fancy?

Have a creative day!

Greetings from Wiebke


Tuesday, 15 November 2022

Brand Ambassador Inspiration - Background Blocks Scandinavian Christmas

Morning all, 

Thanks for joining me, Steph, today as I showcase another great festive stamp from Uniko. For this month I decided to use Uniko Background Blocks Scandinavian Christmas because it has been sat in my stash unused and I just knew it would look great with some heat embossing. 

So straight on to my first card:

Who doesn't love a bit of gold and blue?! Here I have heat embossed the stamp using gold embossing powder on dark blue card. I have picked out the details by colouring in shades of blue which has given a really lovely elegant look to the card. The sentiment, from Uniko Festive Sentiments stamp set, is also heat embossed in gold and adhered over the background. I have used a mat of gold mirror card to frame centre panel and I felt a Kraft card base would look rustic, although a white one would work too. 

My second card is similar in layout however I went for red card and clear embossing powder this time.


To add some variety I use various colours for the details this time and felt the sentiment would be better in white.

Finally I had a little play about with my third card.


I heat embossed the Background Blocks Scandinavian Christmas using clear embossing powder on white watercolour card (my original plan was to use watercolour paints but I changed my mind). I then stamped Uniko Background Blocks Diagonal Stripes over the top alternating the colours between red and green ink. I was aiming for a candy cane look! Again the sentiment strip was added and the panel was framed with green card before being adhered to a red card base. 

So, which is your favourite?! 

Hope you are all getting along ok with your Christmas crafting and maybe I just inspired you to dig out the Background Blocks Scandinavian Christmas stamp (or stencil!) and have some fun! 

Much love
Steph x


Monday, 14 November 2022

Merry Mid Century Modern Monday!

Hello & Happy Shiny New Week.

I thought I would kick off the week with a festive Mid Century Modern make. I've had this sparkly Mid Century Modern Squares background made for a while and it has just been sat waiting for the perfect addition.


Then on Saturday it came to me that I hadn't inked up Season Of Beauty for a while and that the layered poinsettias and foliage would look lovey against the dark sparkly background.

It's a little busier than my usual CAS style, but I think the sparkly background adds to the festive feel. What do you think?


I used Gina K Glitz Glitter Gel through the Stencil and I used Concord & 9th inks in Cranberry, Poppy, Honeysuckle, Evergreen & Wheat for the stamping. I kept the card sentiment free as I felt that would have been a bit much, instead I will stamp the sentiment inside the card.

It's a fun and busy week in the studio, lots of designing new products for 2023 and so many exciting things happening for Uniko next year too ;) That's all I can say for now! 

I'll be back later this week.

Crafty Hugs 

Sunday, 13 November 2022

Stencil Sunday - MOD Background Builder

Hello & Happy Sunday!

I'm on a creative roll and I am back today with a couple of cards I made yesterday while I had a few Bean free hours. I couldn't resist inking up the newly released MOD Background Builder. This stencil has been super popular and there are not many left on the shelves as I type.

I have so many ideas using this stencil, I have just two of them today. I will save the others for another post soon ;)

First up is this colourful birthday card. 


I've been itching to use the Gina K Texture Paste through this stencil since I came up with the stencil design! I love how this paste makes adding colour to a darker card base super easy.


The process is a little slow, as you have to wait for the paste to dry and then applying the colour can be time consuming. However, I think you will agree the results are so fun. To finish the card I added a sentiment from Simply Said Blocks and my favourite Nuvo Drops.

Today I really wanted to show the versatility of this stencil and how it can be used with other Uniko products and for a variety of occasions. For my second card I went monochrome and created a sympathy card.


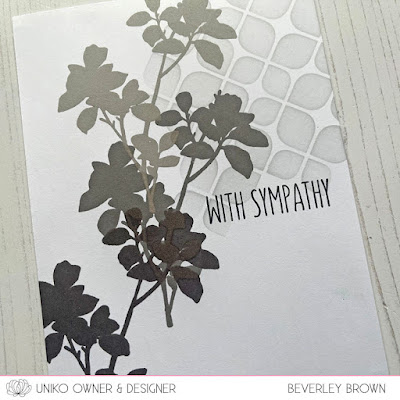
I used a light grey ink to add the MOD Background Builder to the upper left corner of my white card base.  I then chose the silhouette foliage from Just Because to stamp up the side of the card. I used a trio of grey inks and my MISTI to ensure solid stamping. My sentiment choice is from Everyday Sentiments.


That's all from me today & thank you for stopping by.

Crafty Hugs 

Saturday, 12 November 2022

Hello Friends & A Winner!

Hello & Happy Weekend!

Apologies for my delay in announcing the winner for the Stencil Release Giveaway HERE, this week hasn't quite gone as planned, but it's turning around now. I was sure to get some creative time in last night and combined a few stamp sets to create this clean & simple card.


I've said it so many times, it really sparks my creativity when restocks arrive in the studio. Background Builders Round In Circles was part of the batch of restocks that arrived the other week and the single line builder I have used here was calling to be inked up. 

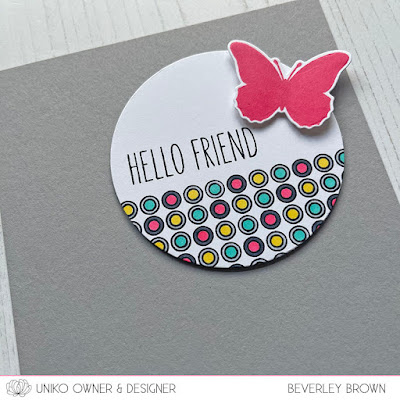
I used my MISTI to stamp the background & used my Copic Markers to colour the circle design. I then stamped the sentiment from Floral Vines before die cutting the circle.


I often neglect this small solid butterfly from English Country Garden Butterflies, but I thought it was perfect stamped in Concord & 9th Honeysuckle. I used the coordinating Designer Die from the English Country Garden Butterflies collection and adhered to the circle focal point. 

So now I've shared my little bit of creativity, how about the winner. I used Random.org to select a winner from those left across all the blogs and social media and that lucky comment winner is...

Carol

Bev, how wonderful to see this new stencil release – so pretty and versatile, covering occasions throughout the year. With all the stencil challenges popping up, these would make for some amazing showcases and entries! Given that it’s snowy and cold here, the snowflake stencil has really caught my eye; a festive, frosty delight!
~carol


Congratulations Carol! Please drop me an email to bev@uniko.co.uk with your postal address by Saturday 19th November 2022 to claim your prize.

Thank you to everyone who joined in on the release fun and for all the lovely orders.

Have a lovely creative day.

Crafty Hugs