Pages

Sunday, 24 November 2024

Simple Festive Stencil Sunday

Hello & Happy Sunday.

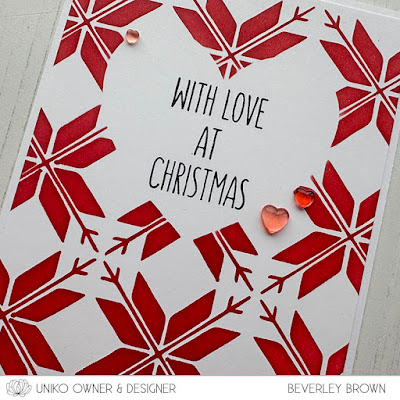
Today has been a tidy up and a little reorganise in the studio. Mainly because I could hardly see my desk or the floor! But I did manage to squeeze in this card as inspiration came to me.


I've been loving vellum again recently. I love how it softens the background a little, but still makes the pattern behind visible. 

I dusted off the Stencil - Christmas Folk Snowflake and I love the design in this striking Cranberry colour. Not wanting to take too much focus from the pattern I added a simple sentiment trio from Christmas Sentiments (back in stock next week). I adhered the sentiments with foam adhesive onto the vellum. Then attached the vellum to my card using double sided tape and hidden behind the sentiments.


I finished the card with a simple holly cluster from Winter Foliage, which has yet to leave my desk. It is definitely one of my favourites for the season. 

That's all from me today, I've a bit more tidying and the roast to sort!

Crafty Hugs


Saturday, 23 November 2024

Saturday Spotlight - Background Builders Round In Circles

Hello & Happy Saturday Spotlight. 

The other day on social media, I asked what crafters would like to see in the spotlight today. One suggestion was Background Builders. So I got to thinking how I could give a Background Builder stamp set the festive treatment and I thought of a card I made many years ago using Background Builders: Round In Circles.


So I decided to do something similar, but up level it with some different techniques, colours and a couple of different sentiment and accent pairings. This is how it turned out...


I started out by die cutting a few circle masks from printer paper. I then adhered them temporarily onto a white card stock base (10 x 14cm) before ink blending with Aqua Sky, Oceanside, Harbour and Blueberry. 

Before moving the masks I splattered some Gansi Tambi Starry Watercolours, I'm on a splattering kick at the moment for some added sparkle! 


I then stamped the circles with the various individual circle stamps in black ink. I added fine liner drawn strings and bows from Mid Century Modern Baubles that were adhered using foam tape. My sentiment choice is from Most Wonderful and a few silver enamel dots finished the card.

The result a fun, festive card that can be done in so many different colour combinations. I know I am biased, but Background Builders: Round in Circles is such a versatile clear stamp set. For more ideas on how to use it, check out the Uniko Pinterest page HERE.

Before I go, I thought I would share a few things from the Uniko newsletter incase you haven't subscribed.  First I have a few Black Friday Bargains HERE on the website.


There are also a few clear stamps available on backorder that are due in the studio on Wednesday 27th November. These include... The two sellouts from the Uniko November Release, Christmas Pop and Framed Fairy Lights. Anniversarie Arts Decoratifs, Background Blocks Pinstripe, Christmas Sentiments, Christmas Wishes and Simply Said Blocks Christmas

A couple of stencil restocks arrived yesterday, these include Ink & Flip Layering Geometric Christmas Tree and Mid Century Modern

Any orders containing a backorder clear stamp set will be posted on 28th November 2024. That's all from me today.

Crafty Hugs


Thursday, 21 November 2024

Brand Ambassador Inspiration - Thursday Tags

Bonjour !

Izzy here. I hope you have enjoyed the last release because today I'm taking this opportunity to show you some more inspirations with it. 

As Christmas is very close, I decided to make, not cards, but tags for gifts. 


The two first tags are made with the Framed - Fairy Lights clear stamp set.

 
I simply die cut a tag in a white card stock, I stamped and I black heat embossed part of the Fairy Lights on as well as a sentiment, then I coloured all the lights with coloured fine liners and I added a red ribbon.


For this one I combined the Fairy Lights with the Jolly Christmas set. 
I stamped and I white heat embossed the lights on a black tag and I coloured them with coloured glitters as I've already done it when introducing this set.
On a piece of white card stock I stamped Santa and I coloured it with coloured pencils.
To finish, I put some glitter on Santa too and I foam mounted it on the tag.


The second set of tags is made with the Background Blocks - Snow Flurry and the Christmas Pop clear stamp sets.


For this tag I used both sets together. I die cut a tag in a Kraft sheet thenI stamped and I white heat embossed the Background Blocks - Snow Flurry on top. 
On Kraft paper, I stamped in black the trees from the Christmas Pop set and I fussy cut them.
I stamped the sentiment (Background Builders - Winter Wonderland) on a black strip and I white heat embossed it.
To finish, I flat adhered the sentiment and the trees on the tag.


Here I combined one of the trees together with the Quilted stencil. I die cut a tag in a Kraft sheet then I used the stencil with white ink.
I stamped and I white heat embossed the tree on a piece of red card stock and I fussy cut it.
To finish, I foam mounted the tree on the tag and I added a red and white thread.


For the last tag I stamped the Background Blocks - Snow Flurry with a ombré blue ink. 
In a glitter white paper, I cut the gorgeous Sparkling Snowflake, and I flat adhered it on the tag.


For the third set of tags, I used the beautiful Pure Florals - Poinsettia. As far as I remember, it is one of the first stamp I ordered at Uniko and I still love it so much !


Here I combined the poinsettia with the Background Blocks - Falling Snowflakes. I stamped it and I white heat embossed it on a piece of Vellum then I used a tag die to cut it. I also cut the same tag in a white card stock to put it behind.
On a Bristol paper, I stamped and I black heat embossed the poinsettia. I used pink Zig Clean Color Real brushes to colour it. 
As the real poinsettia is a large stamp, I cut the center of the flower and I arranged some petals around so that it fits the tag.
On a black strip of card stock, I stamped and I white heat embossed a sentiment.
To finish, I glued the sentiment and the poinsettia on the Vellum tag.


Here I combined the poinsettia with the Background Blocks - Layered Stripes that I stamped on a white tag with Lightening Black ink. 
I stamped the poinsettia on a white card stock, I coloured it in red with coloured pencils and as for the previous tag, I cut the center of the flower and I added some petals that I coloured in green.

And last but not least, I made a tag with the new stamp of the Big & Bold collection.


As the name suggests, Big & Bold - Joy, I wanted a cheerful tag with lots of colours.
So I used here the Wonky Stripes stencil with lots of coloured inks to make the background.
Once dry, I stamped in black the word Joy and two little images from this set and I heat embossed them with glittery embossing powder.

Et voilà ! As you can see, there's a lot to do with the last new release but also with the Uniko products you already have. 
Thanks for joining me today and hopefully I've given you some inspiration to prepare your Christmas all in beauty !

Have a lovely day and thank you for stopping by.


Wednesday, 20 November 2024

Rainbow Wreath

Happy Wednesday 😃

I'm here today to get you over the mid week hump with a Mid Century Modern beauty. This week Mid Century Modern Wreath Builder is the Card Of The Week product with 15% off HERE

This is the card featured on the website.


I couldn't resist inking it up today but in rainbow colours. It was quite grey and overcast here to start, but by the time I had finished this card the sun had come out. 


I used the same technique to create the rainbow of colours that I demonstrated in my video HERE the other day. I love how it turned out.


Once I had stamped the rainbow I then stamped the outline version of the wreath and heat embossed with Stardust EP. I gave the same sparkle treatment to the bow and sentiment also from the set which I fussy cut and adhered using foam tape.


That's all I have to share today, mummy duties have taken priority with a poorly Bean in the house. I'll be back later in the week with more to share. 

Crafty Hugs


Saturday, 16 November 2024

Saturday Spotlight - Multicolour Rays & a Video!

Happy Saturday.

Today I have a fun festive card, multicolour rays and a video to show you how I did the multicolour rays using Background Blocks Rays. I've been asked a few times recently as to how I created this card below. 


So I thought I would record a little how to video to show the process. This can be applied to lots of Uniko's striped products like Background Blocks Horizontal Stripe and even the striped tree from Christmas Pop.

You can watch the video HERE on Uniko's YouTube Channel. 

Here is the finished card.


As you can see for this card I went for a festive twist and just 2 colours of ink for the rays. I also decided when assembling my card to add some sparkle to them by stamping over the top with VersaMark ink and heat embossing with WOW! clear sparkle EP.


I used the same inking technique shown in the video to stamp the tree from Christmas Pop and my sentiment is from Simply Said Blocks Christmas. I finished by adding some Nuvo Glitter Drops in White Blizzard.


I hope you enjoy the video HERE and thanks for stopping by today.

Crafty Hugs


Friday, 15 November 2024

Brand Ambassador Inspiration - Pure Florals Poinsettia

Morning all Julie here with another festive idea. I'm helping out at Sparkles challenges again this month where their theme is Christmas Florals, so I thought I would combine it with a Uniko Brand Ambassador post.
When I saw the theme I knew exactly which stamp I was going to use, the fab Uniko Pure Florals - Poinsettia, so happy that Bev has reintroduced it. I was unsure about what design I would use until I stumbled across a You Tube video by Michelle Short CASEing Therese Calvird and the rest as they say is history! Here's my CASE of a CASE!


In the video, Michelle used some pretty marbled DP but I didn't have any, so decided to make my own using alcohol ink and Yupo paper, I used what inks I had including Valencia, Flamingo, Dandelion and Coral, with a little bit of gold foiling. Whilst the alcohol ink was still tacky, I dabbed a piece of used gold foil over the panel, just enough stuck to give a little added texture. 
In both their cards, the outlined blooms form the front of the card but I didn't go down that route. Have you come across Ardyth's LIMES mnemonic for CASEing, COPY and SHARE everything? Here's a link to her video where she explains her ideas, I found it really helpful.

I loved the bold black outline on white of the blooms, the marbled paper, gold pearls and bold sentiment. I left out the front panel bit but used the layout and a gold on black fussy cut sentiment instead of a die cut one. The rest was pretty simple, two large images, black on white, fussy cut and mounted over the inky panel. The Uniko stamped sentiment was embossed with gold EP on black card before being fussy cut. The sentiment was popped up with foam tape and some silver crystals coloured with yellow Copic marker were added to the centers to complete.

That's it from me for today, hope I've given you yet another idea on how to use this fab stamp set.

Thursday, 14 November 2024

BA Inspiration: Mixed Media Christmas Tree Trio

Hello everyone!

Happy Thursday!


Vinita here! Recently I was going through my stash and rekindled my interest in Silver glitter paste. Because of the paste opacity, a thin layer makes it more opaque and visible the underneath color. Talk about the drama! 

So I thought it would be the perfect use for a new stencil release Christmas tree trio recently at Uniko.


It looked complicated but was easy to make. 

Here are step-by-step instructions with pics:


On a white panel, I placed my Christmas Tree trio stencil and drew the outlined trees one by one as shown in the above pic.


Once again, I put my stencil to ink my solid outlined tree using mowed lawn DI in between all these trees one by one.


It appeared like this as shown in the above pic.


I ink-blended the rest of the space using forest moss, crushed olive and mowed lawn DI. I outlined my trees using a green acrylic marker for more interest.
Now it's time to decorate my trees and the background. I added some confetti using DI.


I used my beloved Posca white pen for snowfall in the sky. Stamped the sentiment from the Pure Florals Poinsettia stamp set. To finish it off I wrapped a thread around the trees. 

Hope you all enjoyed this!

Happy crafting! 

Tuesday, 12 November 2024

Brand Ambassador Inspiration - Fairy Lights

Good morning, 

Following on from the lovely new release from Uniko at the end of Oct, one stamp really called out to me and that was Uniko Framed - Fairy Lights. I have used this stamp for my Brand Ambassador inspiration post this month and found that it teams very nicely with Uniko Mid Century Modern Baubles


Here I have heat embossed the fairy lights using red glitter embossing powder and coloured the lights in using a green alcohol marker and silver and gold gel pens. The bauble and sentiment are also heat embossed. 


This card is similar to the last one but I have used green glitter embossing powder instead and also used the embossing powders for the bauble and sentiment. 


Switching to gold embossing powder and colouring the background in meant I could leave the bauble white to let it stand out. 


Finally I used the fairy lights stamp in a landscape setting and stamped using dye ink. I coloured the lights using alcohol markers and added some shimmer with a Wink of Stella brush pen. 

I hope you loved the new Uniko release as much as I did. Look back on the Uniko blog to see lots and lots of brilliant inspiration from the Brand Ambassadors during the release introductions.


Much love
Steph x

Saturday, 9 November 2024

Saturday Spotlight - Pure Florals Poinsettia

Happy Weekend.

Today I thought I would put Pure Florals Poinsettia in the spotlight. I started colouring this poinsettia during the week and finally I got to finishing it last night. 

As you know I am not an expert at colouring, I'm far from it. But now and then I like to dabble and have a play.


I decided that it would be less daunting to colour if I stamped the poinsettia onto a pink card stock base. So I had a look through my stash and found this old Stampin' Up! card. I'm not 100% sure what the colour is but it's a soft pretty pink. 

I stamped the poinsettia in C9 Cranberry ink and set to colouring using my Prismacolor Pencils. I used PC292 and PC195 and white for the centre. 


After I'd finished colouring, I decided to add a little detail and fussy cut along a few petals. I trimmed the card to fit my white card base and adhered using foam tape.

To finish I added a sentiment combination from the set onto a strip of white card and cut ribbon tails into one end. Lastly adding a few Cranberry enamel dots.


Before I go I thought I would share a couple more cards from the archives and the Pure Florals Poinsettia Pinterest page. 


On this first card I stamped the poinsettia in black onto white card and created this partial fussy cute panel, colouring the centre of the flower with gold ink. I then adhered the panel to the red card base using foam tape.


On this second card I went for a classic red, white and kraft colour combo. I heat embossed the poinsettia on red card and then die cut it using a circle die, layering it with this fun loopy scalloped die which is an old one from Papertrey Ink. Before layering on my card I added a layered ribbon banner. 


Lastly I am sharing this first card from the original release of Pure Florals Poinsettia. Here I simply stamped the flower on two shades of red card. I fussy cut the bottom layer and then for the top layer I partially cut the flower out to add depth and dimension. I finished with another of the sentiments and white gel pen to the centre of the flower.


That's all from me today, I hope you have enjoyed this little spotlight feature on Pure Florals Poinsettia.

Crafty Hugs
Bev


Tuesday, 5 November 2024

You Can Never Have Too Much Joy

Happy Tuesday.

Thank you all for filling me with joy. 

All your lovely comments, support, love and orders, you have truly made this little Uniko business owner feel full of joy. It really is a dream come true to bring you my ideas and designs and to have them received so wonderfully by you. 

My heart smiles every time I see something I design used to make a card, tag or however you use it creatively. So thank you. 

Ok, now to some more inspiration. 


I shared this card late last night on Instagram, it was a fun filled day of order packing, but I did manage to squeeze in this card! I felt I needed to give BIG & BOLD Joy some inky love.


I love an ombre card & this came together pretty quick, even with the fussy cutting! I kept the embellishing simple with the little foliage image stamped in Evergreen and Parsley. The joys were stamped in Ballet Slipper, Poppy and Cranberry.


I had so much joy making this card, I went ahead and made another one today, which makes up for not giving this set the love on release day! 


Again I went for clean & simple, but I couldn't resist adding the Christmas sparkle. Once I heat embossed the sentiment I embellished with some stamped holly from Winter Foliage.


I hope these two cards bring you joy today. 

Crafty Hugs