Friday 17 May 2024

Stencil Restock & NEWS.

Hello & Happy Friday! 

Thank you for all the birthday wishes earlier this week and for all that have kept me busy order wise, taking advantage of the discount code I offered. 

If you've not signed up for Uniko's newsletter, I do recommend it as it's the main way I let you all know about codes, restocks and new releases. I do by best not to send too many emails, 2-3 a month, depending on how busy the month is! You can find the sign up at the bottom of the website homepage. 

Talking of the website. 

I'm super excited to share with you that I have a brand new website launching soon. I'm so excited to have a fresh design and new features.

Unfortunately, I am unable to take your account information over to the new website. So if you would like to save any information for your personal records, such as order history and wish list. I encourage you to do so by Sunday 19th May 2024

If for any reason you are unable to do this or you would like some assistance, please drop me an email (bev@uniko.co.uk) with your account email and I can save and forward you the information. 

Stencil Restocks.

I apologise for the HUGE delay on stencil restocks. It's been a bumpy road with manufacturers. My original manufacturer is flying high with their business and was struggling to accommodate my needs. So as good as the manufacturer is of my stamps, their quantity for older designs is a bit too much, so I've been testing out new small business suppliers and I have hopefully found the one who can accommodate me. 

Anyway, I am pleased to say I have a small number of the following restocks, that landed in the studio today...


Clear Stamp Restocks.

I will be updating the website this weekend with expected clear stamp restocks and make them available for backorder. These are due in the studio 29th May 2024. 


Now, I couldn't let the day go by without making a card, so I dusted off the Quilted stencil as it's been a highly requested and anxiously awaited by a few crafters...


Unusually for me I opted for some softer pastel shades, Nectar and Powder. I love the quilted pattern and white spacing, so kept my card pretty free of colour other than the stencilled design and background mat layer.


Pure Florals Cosmos has been neglected a bit and so I opted to ink it up and pair it with the Thank You sentiment from Everyday Sentiments


That's all I have for today. Now back to work on the new website.

Crafty Hugs


Tuesday 14 May 2024

Brand Ambassador Inspiration - Seeing Stars and More

 Good morning, Julie here with a little inspiration featuring the  Background Builders Seeing Stars and Seeing Stars stencil and a few sentiments from Reach for the Stars, You Are Yes You, Everyday Family Sentiments and Floral Vines.

I was inspired by the new challenge over at Cardz4Guyz where the theme is Stars and or Stripes. I know many of you find masculine cards difficult so I thought I would share a few ideas that would work equally as well for a female recipient.

As my Grandson loves a rainbow, I thought I would use that as a starting point too to create a couple of examples. My first idea uses just three Distress Inks and the stencil to create a background for the sentiment, you could also use star stamps from Background Builders Seeing Stars .


Using Mustard Seed, Salty Ocean and Picked Raspberry, I inked through the stencil onto an A6 panel of white card, moving it around so that all the white space was covered. The card was roughly divided into 3 sections and where the colours overlapped, it created 3 more colours! Initially I kept the inking light but as I moved the stencil around the panel, I added stronger colours, but kept the edges subtle and ensuring only 2 colours overlapped to prevent a muddy look. Once happy with the coverage, I turned to the sentiment.

On a panel of white card, I stamped the STAR from Reach for the Stars in black, and then fussy cut it out, leaving a white border. On some black card from the scrap box, I stamped the sentiments and then cut them into strips. The STAR was added with foam pads and the strips were glued flat. A few sequins or gems would certainly make it more feminine but as I was making a masculine card, I left them off.

This second card is simpler to create, this time I added a light inking of the 3 Distress Inks and then added the stars with a heavier hand and the same three inks, filling in extra stars where required. 


The sentiment is as before but the Happy Birthday replaced with a simple Dad. This time I trimmed the panel down to leave a slight border when added to an A6 base card. I've a feeling this one will be used by my Grandson to give his Dad on Father's Day. If you think it's a tad bright then why not change to a plainer colour scheme such as shades of blue and green just like this card!


This time I used the Seeing Stars Background Builder stamps and kept the whole card one layer. Although the main stars are from the BB Seeing Stars, some smaller ones came from some Uniko Christmas sets. After the stars were stamped in a range of DIs, Twisted Citron, Mermaid Lagoon, Salty Ocean and Peacock Feathers, I stamped the sentiment from Reach for the Stars in black and added some white dots of white puffy paint. 

That's all from me for today, hope I've given you a little bit of inspiration for those difficult masculine makes.

Happy crafting.
Saturday 11 May 2024

Brand Ambassador Inspiration - Stencils and Stripes

Good morning all, 

Steph here today with my Brand Ambassador Inspiration. My coloured card scraps contain a lot of strips of various thickness so I was looking for a good way to used these. I came across a lovely video by Jennifer McGuire so I created my Uniko Brand Ambassador cards using her method as inspiration.

So here I have laid down my strips of coloured card before attaching the Uniko Party Confetti stencil, taping along the top to create a hinge. I then inked each strip with an ink in a darker shade of the card, masking the strips of card above and below so as not to stray into the next strip. You could achieve a similar effect using a watermark ink like Versamark but I don’t think you would get the depth of colour as seen here. I added a die cut frame and sentiments from Uniko Mid Century Modern Birthday and Uniko Mid Century Modern Everyday Sentiments stamp sets.

I followed a similar technique for my next card but used white ink all over instead, which was obviously quicker to make! 


I think this could work well with a small snowflake stencil or stamp too. Both cards turned out well and surprisingly different despite using very similar techniques. Which is your favourite?


Much love

Steph x

Friday 10 May 2024

Abstract, Just Because and WINNERS.

Hello & Happy Friday. 

I hope those in the UK are finally enjoying the sunshine ☀️ it's certainly about time it arrived. For me it has lifted my spirits and sparked creativity. 


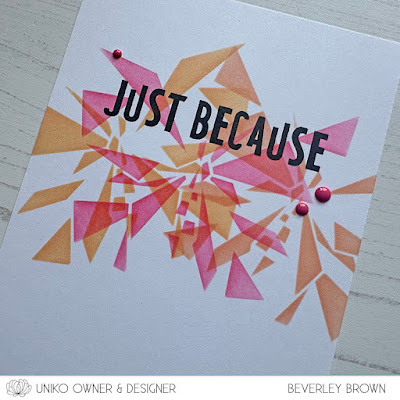
When I was in Port Sunlight demoing the newest Ink & Flip Geometric Butterfly Layering Stencil, I had this idea to create an abstract background. I've tried it previously with the Ink & Flip Geometric Heart Layering Stencil, the heart section being a little more uniformed with the triangles.

The butterfly is a bit more butterfly shaped and wasn't sure how it would work out, but I gave it a go and I think it looks pretty good.


I decided to make it a one layer card and added the Just Because sentiment from Mid Century Modern Everyday Sentiments and finished with some enamel dots. 

Now, onto some winners. 

I realised I have been VERY slow in announcing some winners from the Ink & Flip Geometric Butterfly Layering Stencil Hop HERE and I can't remember announcing a winner for the Spring Botanicals Revisit Hop HERE. 

So, without further ado the winners (randomly selected) are...


Denise Bryant, you are the lucky winner of the new Ink & Flip Geometric Butterfly Layering Stencil. 

and

Andrea H, you are the lucky winner of a £15 eGift Code.


Congratulations 🎉
Please send an email to bev@uniko.co.uk to claim your prizes. 


That's all from me today.

Crafty Hugs


Thursday 9 May 2024

Brand Ambassador Inspirations: Modern Mid Century Aesthetic background murals

  Hello to all!

Happy Thursday!


Vinita here! Today's cards are inspired by Modern mid-century abstract designs and are perfect for man cards as well! Uniko has such a great collection!


To create my background, I used rusty hinge, aged mahogany, scorched timber and lost shadow distress inks through Mid Century Modern shapes stencil.
Then I inked my beautiful blooms III using versafine Onyx black and stamped according to my needs.
The dots are from the Balloon Bash stamp set and I finished it with My Life is Better sentiment.


The second card is in a neutral boho color style!


This card is created using Mid Century Modern Florals stamp set with such beautiful elements.
It looks like a wall hanging. It is in boho style neutral colors. I used rusty hinge, scorched timber, saltwater taffy distress inks along with onyx black ink.
You inspire me sentiment with some black enamel dots finished it perfectly.

Hope you are inspired by both!
Have a wonderful day!

Craft hugs!

Saturday 4 May 2024

Two Ways With Background Builders Round In Circles

Happy Weekend.


And Happy Bank Holiday weekend to those in the UK, I hope some of you are enjoying some sunshine, it's been rather grey, wet and dismal here in the North East 😒 Though, at least I feel like I've not missed it with being poorly (again). Seriously, my immune system is rubbish and even more so when the boys bring the bugs home from school, hence my quietness this week.

Anyway, I'm slowly getting better after lots of rest and sleep. I actually found some energy to finish these two cards I started a few days ago.


I've said it so many times, but restocks always inspire me to create, especially when they've been out of stock for a while like Background Builders: Round In Circles. 


Do you ever have moments where you think your creativity might run out? That you'll be unable to think of something 'new' to create using a much loved stamp set, stencil or die? I do, quite often, but then I end up surprising myself like I did with this duo! 


I started by using the open dot builder strip to stamp the background. I then crazily spent ages colouring the dots in a rainbow of colours! It was super time consuming, but I think the end result was worth it. 


I then die cut the 3 circles before adhering to my Pebble base card, stamping the circle designs inside and adding the sentiment from Mid Century Modern Everyday Sentiments

With the background taking so long, I couldn't let the die cut circles go to waste, so I created a second card using them.


I placed the die cuts exactly onto my card base as they were die cut from my first card by using the above panel as a template before I adhered it onto my first card. 


I love many things about clear stamps, one of those things is the ability to shape the longer stamps. Just like I did with this one. Again I added a sentiment from the Mid Century Modern Everyday Sentiments. 

I'm delighted this clear stamp set, along with a whole host of others are back in stock. Though a few of Uniko's newer and most popular designs have sold out already at the shows! Restocks shouldn't be too long. 

Anyway, that's all I have today. 

Crafty Hugs 
Bev