Monday 30 September 2019

Stamping and watercoloring on Pattern Paper - Rahmat

Hello blogger peeps Rahmat here, its been a while since I had posted anything in the last few weeks. I am still on a crafting break, and both my Design teams have been have been very kind and patient with me being away for this long.

Well life had been pretty busy with our relocation to another country, and settling my daughter in her university. Now I have an empty nest with both kids in their universities, and the new nest is still not set up as of yet.

But I have a lot of free time as I am staying in hotels and no other work to do, and its been a week since we got back after settling my daughter. I had been doing some watercoloring nowadays, as I have very few supplies on hand here in the Philippines. My craft room is enroute to India along with our house stuff.

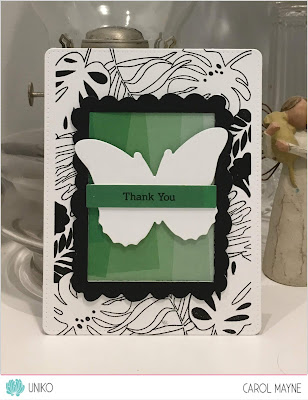
I thought of sharing one of the projects I made in these past few days.
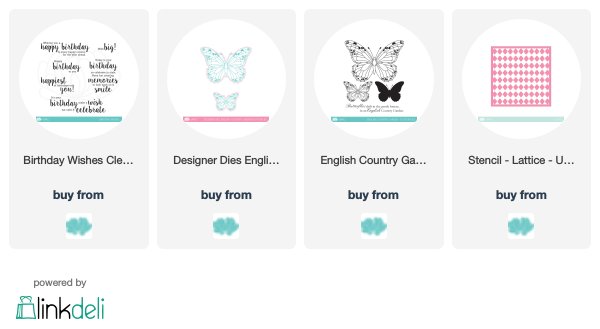
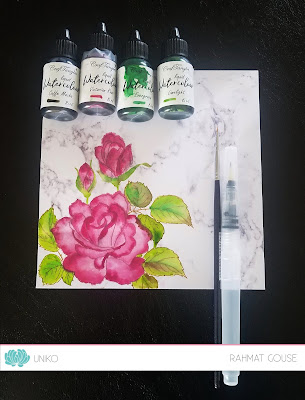
I bought this marble themed pattern paper pack while I was in Sydney, Australia recently. I used Uniko Pure Florals - Rose stamp here.
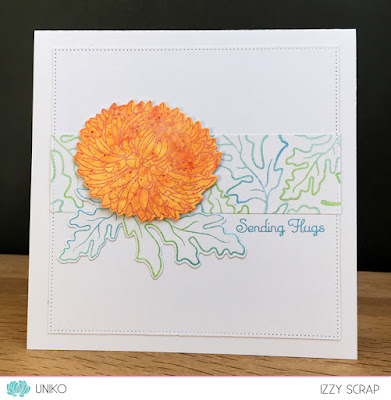
 I did some stamping, masking and watercoloring on it. It came out looking good. There is a tiny bit of bleeding of the inks  but it doesn't spread a lot, and it has given the rose petals more realistic look. You can see below.

 I 
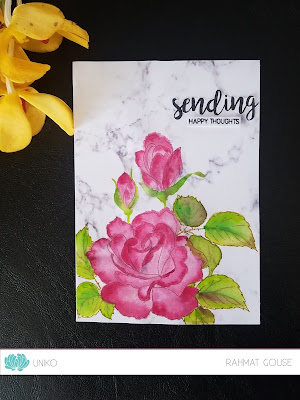
had trimmed the panel to add to a card base, the sentiment is from Pure Floral Peony set, I fussy cut the bold one and added both with foam adhesive.
I have no other embellishments on hand, so nothing else is added to this card.


I hope you do try out the watercoloring on the pattern papers if not tries already.

Do let me know your thoughts on this project.


         Thank you for stopping by, I really appreciate your kind  feedback :) Have a great day!
                                                                     
Save


Saturday 28 September 2019

DT Inspiration - Where do you get your inspiration?

Good morning and welcome.
It's Julie here today with an idea on how to use your Uniko stamps and dies.
How do you kick start your mojo? I must admit that sometimes I need to make a card for a DT and I have absolutely no idea what I'm going to make. Sometimes I might go look around on Pinterest but mostly I look to challenges to kick start my thoughts. I have my favourites that I bookmark and usually I manage to find something that starts the synapses firing. If I can link a few together then all to the better, I love it when one idea sparks off another.
It was a colour challenge that gave me the first clue, I knew what my palette would be, then when I saw a photo challenge featuring butterflies, I knew I should get my English Country Garden set out!
Here is my finished card.


The picture I had in my mind of the finished card was of a spotlight technique, with the colourful butterflies popping up against the grey background, but how to do it?
I started by inking up both the small and large detailed butterflies with Altenew's Limestone and stamped an A5 panel of white card. I then die cut the centre away with a pierced rectangle die.
Because I wanted to use my Zig watercolour brush markers to colour, I needed to make the out lines waterproof, slight problem.
To solve this, I decided to die cut some blank butterflies in both sizes using the matching dies and then stamped and heat embossed them. I could now place the die cut rectangle back into the panel and use the pale grey butterflies as a guide to place the now watercoloured die cuts. Once Happy with the placement, I popped each butterfly and part butterflies up with foam pads. When stuck, I removed the centre panel and trimmed away the excess, glued the large panel onto a slightly smaller piece of white copy paper then adding back the die cut rectangle. This secures the loose panel and the front could then be added to a base card. A small strip of black card was stamped with Happy Birthday from Birthday Sentiments and heat embossed with fine white EP and placed to one side of the design.

So that's it from me, hope I've inspired you to get out your stamps and dies. If you are in need of a kick start why not check out the Uniko challenge?

Thursday 26 September 2019

DT Inspiration ....... Quick and Easy Christmas cards using Uniko Stencils

Happy Thursday ........

I hope you're having a great week.
It's Linda here, with a little festive inspiration for you this morning.

I can't believe we're nearly at the end of September ..... the festive season is going to be here before we know it (and I still haven't been on holiday yet!)

Have you made all your Christmas cards?  Or are you like me, still thinking about ideas?
Need something quick and easy but still want fabulous results?
Well, how about using your Uniko stencils.   Team them up with some texture/stencil paste, and a few different finishes, for some fun, all over, festive designs


I started with some coloured cardstock cut slightly bigger than the Uniko stencils.  I then used white texture/stencil paste through each one of the designs and added a different finish.

In the Forest, on the green card, I sprinkled over the top of the paste, whilst it was still wet, with some Platinum Embossing Powder and set this to one side to dry.


Once it was dry, I used a heat tool in the usual way to melt the embossing powder.  I love the texture that came through.


I cut off the edges around the stenciled design, and inked around the piece using Forest Moss Distress Ink to add a little shading.
I then cut the panel into two pieces so that I could stretch the design to fit on the front of my 7x5 inch cardblank


I added my sentiment into the gap I'd created, and added a few dots of glitter glue here and there.


Let it Snow on the blue card, was the paste sprinkled with Crystal Glitter this time, again whilst the paste was wet, and then left to dry.
Depending on your texture paste, and the temperature of your room, drying time will vary.


Once everything was dry, I brushed off any excess glitter and then cut the panel as before in, only this time I cut on a sort of diagonal ......


I added a sentiment and a few sparkly sequins ......


The Scandinavian Christmas on the red card I did leave overnight to dry.  The reason for this was I wanted to hot foil it.


Now I'm not sure if this will work with all brands of texture/stencil paste ...... I do know it works beautifully with the Sweet Poppy one though.

So, once it was dry I covered the stenciled design with some pretty gold foil, then with it in between pieces of copier paper I ran it through my laminator on a hot setting.


The results are gorgeous!

I cut the panel down as before, inked around the edge (Aged Mahogany Distress Ink) and then cut it into two sections giving me space to add my sentiment.


Three designs, all done in the same way, but each one with a different finish .... which one is your favourite?


Thanks for popping by ..... enjoy the rest of your day.

Cheerio until next time ......


Tuesday 24 September 2019

Uniko Studio Design Team Inspiration...Creativity Re-Boot

Hello,

Carol here! Welcome to my Uniko Studio DT showcase, where I bring out a few Uniko favourites for a play date.  

I'm sure we've all had the 'lost mojo' experience and seek various ways to end the start-something/give up cycle. When this happens to me, I 'challenge myself a challenge' - a creativity re-boot -  which is precisely what I've done with the trio of cards I'm sharing here.

My challenge: 

  • focus on one key die/stamp combination: English Country Garden Butterfly Collection
  • use a limited palette: black/white + green (inspired by the image at TIME OUT Challenge #144, which you can see here)
  • use one 6 x 6 sheet of designer paper (sometimes we need to use that stash *grin*). I selected a various shades of green sheet from Pinkfresh Studio
  • one occasion: Thanks (sparked by our upcoming Canadian Thanksgiving, but shifting from fall colours/images)
  • three cards, inspired by at least two/three challenges (TIME OUT Challenge #144, Freshly Made Sketches #403CAS(E) this Sketch #340). I've missed entering in a couple, but that's okay...it's the 'doing' that counts! 
  • go CAS! 

So...here are my results:

Card 1: 
Sentiment from All Occasion Sentiments
Inspired by CAS(E) this Sketch #340);


 Card 2: 
Sentiment from Simply Said


Card 3:
Large butterfly die only from English Country Garden Butterfly Collection
Sentiment from Simply Said
Background from Tropical Paradise
Inspired by: me *grin*


I'd love to know how you re-boot your creativity!

Thank you for dropping by!
~c

Sunday 22 September 2019

Stencil Sunday

Hi!
 It's Jane here today with another Stencil Sunday at Uniko.

Here's a pic of the three cards I created using the same stencil and stamp sets -  Lattice, English Country Garden Butterflies + its matching die and Birthday Wishes


For my first card I masked off a central portion and then inked through the stencil with distress oxide inks. I removed the mask and stamped the birthday quote sentiment and then added a couple of die cut small butterflies.


My second card uses embossing paste through the stencil plus a home made circle stencil. I then popped the larger die cut butterfly over the top and added a sentiment banner.


My final card uses the negative monoprint of the stencil with brusho powders.  I stamped both the large and small butterflies over the top using a matching pink ink which I spritzed with water to echo the watercoloured look of the background stencilling.


Here's a final look at all three cards and the Uniko supplies I used. 
Links to the shop are at the top of this post.


Do you have a favourite technique from these three cards? I'd love it if you left a comment to let me know.

Thanks so much for looking today. And keep crafting!

Hugs,
Jane
x

Saturday 21 September 2019

A Funky Farewell...

Hey & Happy Weekend!

It's time for another of those posts that I find hard to write and put all my feelings into. It is with sadness that we at Uniko are saying farewell to one of our FABulous Design Team members Sarah Gray from Funky Fossil Designs.


Sarah has been a member of the Uniko DT since March 2015, taking a break in 2017 to return in 2018 as part of the Uniko Stencil Design Team.

For over 4 years I have had the honour and pleasure of having Sarah as part of the Uniko family. It seems longer than 4 years as before Sarah was a member of the DT, she was a regular customer too! Seeing the inspiration and creativity flow when Sarah works her magic with Uniko products is simply amazing.

Some of you may know that Sarah launched her own business in the paper crafting industry in 2018, Funky Fossil Designs. Initially specialising in Stencils, Sarah now offers a range of clear stamps and MDF pieces. You can checkout and purchase all the fabulous goodies HERE.


Running a business is not an easy task, especially when you have a family and another job to juggle, so Sarah has taken the hard decision to step down from the Uniko team to focus and grow her own business.

It wouldn't be right to say farewell to a fellow creative, without making a card...


In honour of Sarah's growing business I have combined a Funky Fossil Stencil - Brick Wall with  the foliage image from Uniko's Just Because clear stamp set.

I've had this design sketched out for ages and simply hadn't found the time to sit down and create it, until now.


It was hard to select just one sentiment to the card, so I decided to use three instead! These sentiments are from Simply Said Blocks and Simply Said Blocks II.

Uniko's Brand Ambassadors Jane and Izzy have joined me today to say farewell. Jane has also created a card combining Uniko and Funky Fossil products...


Jane has used Uniko's Background Blocks Pinstripe with Funky Fossil Folksy Christmas clear stamps. 

And this is how Izzy has combined Funky Fossil with Uniko...


Izzy has used Funky Fossils Circle Burst Stencil combined with Uniko's BIG & BOLD Happy clear stamps & Designer Dies.


Thank you Sarah for all that you have done for Uniko, YOU ROCK! As one friend to another and as a small business owner to another, I wish you ALL the success with your amazing, creative business within the paper crafting industry. 

Hugs


Friday 20 September 2019

Uniko Challenge #55 Anything Goes + optional twist Autumn

Hey!

Welcome to the September/October 2019 Uniko Challenge.


We have that all time favourite theme of Anything Goes for this new challenge, but if you'd like to challenge yourself a bit more then go with our twist of Autumn.

We're really delighted to have Myra as our Guest Designer for this challenge. I think this must be a first for Uniko a Guest Designer who is only 8 years old! She is following in her mum, Anushree's footsteps and sharing her blog to showcase her wonderful talent.


Such a gorgeous card and an assured future in crafting for sure!

I'm not sure if the Uniko DT started out this early, but they certainly have some awesome cards to share with you today.

Bev


Are you ready to play?

Well, just in case you need some more incentive to play along with the challenge here are the details of the prizes.
  
THE PRIZES
  • Main Winner Chosen By the DT - £25 eGift Certificate
  • Random Twist Winner - £5 In Stock Clear Stamp Set of Winners Choosing
  • Random Uniko Stamps Winner - £5 In Stock Clear Stamp Set of Winners Choosing
  • Top 3 Chosen By DT - 150 Loyalty Reward Points

You've got plenty of time to play along with this challenge. 
The deadline for submission is midnight (GMT) on Friday 25th October 2019.


Hugs,

Saturday 14 September 2019

DT Inspiration - Playing with Background Builders Stars & Triangles

Hello there, it's Sarah P here and massive apologies as I seem to have been AWOL for the whole of summer BUT at last I'm here with another DT Inspiration post.

Whenever I've not been crafting in a while I struggle to focus; not knowing where to start ... do you have that issue?

My preferred option for getting back into it is to pick up a couple of stamp sets and ink colours that I love and jump right in. That's what I've done with these!!!

I hope you like them!

My GO TO stamp sets were the Background Builders Triangulate, Background Builders Seeing Stars, the latest Sentiments Outlined set, released in July plus another of my favourite sentiment sets; Birthday Wishes.

Up first with my stars trio, just basic stamping with a masked area, on these first 2 to insert the sentiment, and to finish a couple of enamel dots ...


Then having created the stars one in the colour combo above, using promarkers I decided I'd carry the colour scheme through with my triangles!


I do hope you like my cards and I'd love to know how you get back into a creative frame of mind following a break.

Thanks for calling by and catch you again soon.