Wednesday 31 January 2018

Uniko's 6th Birthday Stamping Retreat!

Hey & Happy Hump Day!

If you follow Uniko on social media or subscribe to the newsletter, you might have seen my recent advert for Uniko's 6th Birthday Stamping Retreat!

Please note, that since my first advert there has been a change in date from Saturday 10th Feb, to Saturday 24th Feb for various reasons.

Anyway, I thought I'd pop by and share a little about the day...


{Click Photo For A Closer Look}


Having had a successful first Stamping Retreat back in December 2017, I have planned another to celebrate Uniko's 6th Birthday!

Here are a few photos from the first Stamping Retreat, with thanks to Wiebke for taking some as well..


A peek at the kits and the Uniko Tote Goodie Bags.


Some had taken a break, whilst a few crafted on!


The technique station was based around Uniko Stencils and Distress Oxide Inks.


The venue of the Retreat is The Station House at Wynyard Woodlands Park...


Set in a beautiful woodland park is this old station house, which most recently was a visitor centre. As you walk in you are greeted with a space filled with character and warmth. With a spaces perfect for a hive of creativity. 


Why is it called a Stamping Retreat? I hear you ask! 

Simply because the focus of the day is on stamping with Uniko clear stamps and retreating to this wonderful location! 

I didn't want to call it a class, as that sounds to formal. The day is about being relaxed and enjoying the creative process. Whether you are an expert stamper/crafter, beginner or somewhere in between, this is the day for you. 

What is involved/included?

If you ever attended one of my previous 'classes' at The Paperlane in Northallerton, the overall structure is similar, but I have added in some NEW things too ;)

I will be designing a collection of cards using the NEW Uniko February Release, which is based around Spring, Florals, Music and Birthdays! You will receive a 'kit' that will contain all the instructions and materials to make 7 - 8 cards throughout the day at your own pace. I will be there to help and guide individuals as needed and I will demonstrate any techniques to the whole group at the beginning of the day.

Along with the kit there will be one or two individual project / technique stations for each of you to take turns, have a go and make during the day. 

Along with all this you will receive a Uniko Birthday Gift! This will contain a FREE clear stamp set from the February Release and a few other goodies. Gift value will be between £10-£15. 

There will also be a Uniko pop up shop of all the items available on the Uniko website along with the unreleased February Release. You will receive 10% off any purchases made during the day! 

Does this sound FUN or what?! I can hardly wait ;) I do hope that some of you will be able to come and enjoy this day with myself and Uniko! 

For more details and to book your place pop on over HERE to the website. 

Hugs 


Tuesday 30 January 2018

CAS Colours & Sketches #257 Timeless Tuesday AKA The Double!

Hey!

I am back THIS week and again as your hostess for the last of the January challenges over at CAS Colours & Sketches. I loved seeing how you were all inspired using last weeks sketch. This week is Timeless Tuesday, AKA The Double!

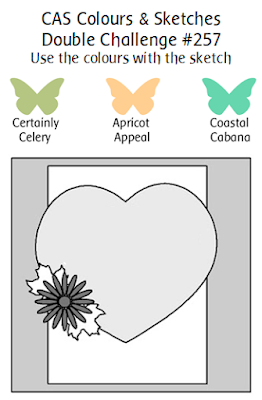
Here is the sketch and colour combo, remember you need to use both to be considered for the weekly winners at CC&S!


And here is how I was inspired...


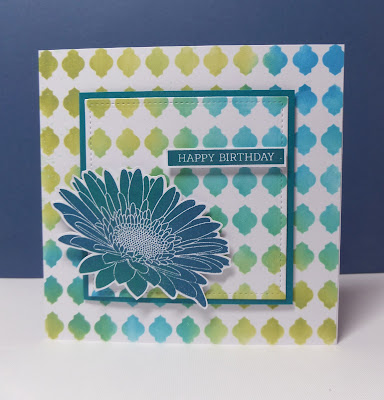
I decided to use the heart wreath again from Originally Organic Additions as it was still out on my very messy desk! 

I stamped the wreath in Stampin' Up! Certainly Celery ink and I also used my MISTI to stamp it a couple of times to get a good crisp impression. The flowers are stamped using a Costal Cabana marker and I used my closest match to Apricot Appeal which is So Saffron.


I decided to double mount the middle panel for a little bot more interest and also the Costal Cabana strip of card didn't look quite right against the card base. The wreath is fussy cut out and mounted using foam adhesive. I used a rectangle die for the sentiment and fussy cut an individual flower for extra added interest too!

I hope thatI have inspired you to join in on the challenge?! If you need a little more inspiration, pop on over HERE to see what the CC&S Design Team have created.

Thanks for stopping by!
Hugs

Sunday 28 January 2018

DT Inspiration - Silver, Teal & Gerbera Combo

Hi friends, it's SarahP here sharing a little Sunday Design Team inspiration using one of my favourite all-time Uniko sets! The Pure Florals Gerbera stamps and dies, has to be a regular 'go to' set for me.

Today I was in the mood for Teal colours and I've two 'almost' ONE layer clean and simple cards to show, teamed with two layered/embellishment heavy examples. All four cards using the same supplies and colours ... so here goes


These first 2 use both the Gerbera stamps and die set in both outline and block stamp versions. I've gone with the same design for both; the first one a textured panel of teal cardstock and the second one showcasing one of the newly released stencils from Uniko: Wonky Stripes. The silver accents are created using WOW Silver Sparkle embossing powder with the 'Happy' sentiment from the Festive Sentiments collection and the 'Birthday' from simply said.


Next up my 'clean and simple' variations with the same colour combos but using the stamps only with a little masking along the way. I stamped the corner flower heads first, rotating my cardstock in the Misti before masking and stamping the middle ones. The sentiments are heat embossed with the same WOW embossing powder and a little shimmer pen to the flower centres. The 'Thank You so Much' sentiment is from the recently released freebie set and the 'Congratulations' on the second card from All Occasion Sentiments #1


I hope you enjoyed these teal creations and feel inspired to craft the day away!

Thanks for calling by 

Sarah P


Thursday 25 January 2018

WINNER of the January 2018 Design Team Blog Hop & Giveaway!

Hey!

I am popping in tonight to announce the WINNER of the January 2018 Design Team Blog Hop HERE.  Random.org helped me pick the lucky comment 272!


In order of the hop the lucky commenter is...

Oh so sweet, and pretty!

Congratulations Kirsty!

Please send me an email to bev@uniko.co.uk by Thursday 1st February to claim your £15 eGift Certificate code.

Thanks to everyone who hopped along and commented.
Hugs

Wednesday 24 January 2018

DT Inspiration - 5 stencils, 5 ways to use them

Bonjour !

Izzy here. I echo Sarah's beautiful post of last Sunday with a series of cards using stencils.

There are 5 stencils (until now !) in the Uniko's collection, so I wanted to show you 5 different ways to use them.

1. Inking through with ink


For this card I simply masked the border of the double white card, then I layed down my stencil and I blended the different Distress inks through the Scattered Polka dots stencil. I drew black lines with a fine liner and I stamped and black heat embossed the sentiment. 

Supplies:

Stamps : Uniko "Festive Sentiments" (happy) and "Happy Succulents" (Birthday).
Inks: Distress "Picked raspberry, Spiced marmalade, Mustard seed, Mowed Lawn, Salty ocean, Wilted violet".

2. With embossing paste (or whatever paste or gel)


Embossing paste is a great way to give dimension to your card.

On a soft pink shimmery cardstock I layed down the Lattice stencil and I spread a layer of embossing paste. I let it dry and then I adhered it onto a white double card.

On the same pink cardstock, I stamped the rose with Versamark and I heat embossed it with silver pearl EP. I added some dimension with pink coloured pencil and I fussy cut it. 
I die cut some foliage in a white shimmery cardstock and I stamped the sentiment on a strip of this cardstock too. 

To finish I mounted the sentiment, the foliage and the rose with Glue Dots over the stencilled panel.

Supplies:

Stamps : Uniko "Pure Florals: Rose" and "Flower Power #2" (sentiment).
Die: Uniko "Originally Organic"
Others: Faber-Castell Polychromos "#119", Wendy Vecchi "Embossing Paste", WOW "Silver Pearl" EP.


3. Using Brushos


This technique is a first for me and I'm rather happy with the artsy result. You never know what you will obtain with Brushos, and that's the funny part ! I put the Doodle Flower stencil on top of a mixed media paper, I sprinkled the Brushos over the stencil, sprayed with water, and I quickly removed the stencil and I let it dry.
On a heavy weight cardstock I stamped and black heat embossed the sentiment. The hardest part has been to fussy cut it but it worths the work because we can see the lovely stencilled pattern through it !
To finish, I adhered a black cardstock to the back of the stencilled pattern before mounting it on the double card. Then I glued the sentiment on top of it.

Supplies:

Stamps : Uniko "Big & Bold - Hugs"
Brushos: "ost. red"
Others: Hero Arts "Black" EP.


4. Inking through with Versamark


I love this technique since it enables you to use your stencils as a stamp to after heat emboss with embossing powder. 

I made this pattern panel in three steps. First I put the Broken Lines stencil on top of a white cardstock and I sponged it with Versamark. I took it off and I white heat embossed.
Secondly I put the stencil back on top of the cardstock but I previously give it a turn so that the lines are once horizontal and the other time vertical. And I started again : sponged with Versamark and white heat embossed.
Thirdly, I inked the embossed panel with Distress ink and I die cut part of a circle.
Then, on a double white card I stamped and black heat embossed the sentiment and I foam mounted the stencilled panel. To finish I glued some sequins.

Supplies:

Stamps : Uniko "Pure Florals: rose" and "Big & Bold - Hugs"
Inks: Versamark, Distress "Wilted violet, Ripe persimmon, Spiced marmalade, Mustard seed"
Sequins: Neat & Tangled "Pumpkin Mix", Little Things from Lucy's cards "Candyfloss & Magical".


5. Dry embossing


It's also a great way to use your stencil and it gives as good a result as with an embossing folder. 

I put the Wonky Stripes stencil on top of a white cardstock and I ran it through my die cutting machine. On another cardstock, I used this stencil and I inked through with 3 Distress shades. I cut wonky stripes of them and I stamped and black heat embossed the sentiment on one of them. I also inked 3 flowers that I die cut with the matching dies.
To finish I foam mounted the embossed panel on a double white card and I adhered the wonky stripes and the flower on top of it.

Supplies:

Stamps : Uniko "Flower power #2"
Die: Uniko "Flower Power #1-#6 Collection"
Inks: Distress "Peacock Feather, Spiced marmalade, Mustard seed".

I hope you liked the different ways shown here to stretch the use of your stencils and use them a lot more ! This list is not exhaustive and there is surely other way to use the stencils !

Thanks for stopping by and have a fabulous day !

Izzy xx


Tuesday 23 January 2018

CAS Colours & Sketches #256 Sketch

Hey!

I am back THIS week and again your hostess for the January challenges over at CAS Colours & Sketches. I loved seeing how you were all inspired using last weeks colours. This week is sketch week and I have this to inspire you (hopefully)...


Cute stamps are not my 'go to' when it comes to purchasing or using and I haven't really designed that many either! However, when I saw the Stampin' Up! Sale-A-Bration Party Pandas, I couldn't resist and they landed in my recent order ;) 


Having seen the current challenge HERE over at "Less is More" I decided to ink one up for my one layer card using my sketch.


I thought she could be holding a Valentine's envelope in her paws, so I decided to ink a masked die cut heart and added some Uniko love sentiments from Simply Said Blocks and Pure Florals: Rose.


A pretty quick CAS card and not much waffle from me today, I've a Ben Bean day today and there is much playing and learning to be done! 

I hope thatI have inspired you to join in on the challenge?! If you need a little more inspiration, pop on over HERE to see what the CC&S Design Team have created.

Thanks for stopping by!
Hugs

Sunday 21 January 2018

Stencil Sunday

Hello!


Sarah G on the Uniko blog today to share some cards that I have made featuring the lattice stencil from Uniko's latest release which is.....awesome :)


On this card I inked through the stencil with versamark and embossed it in a combination of white and gold embossing powder to create a variegated and slightly distressed look. I then inked with a range of distress inks in shades of blue.  I gold embossed the mandala from Marvellous Mendhi in gold on navy cardstock and fussy cut it out and popped a sentiment from Block Sentiments over the top.  I think this card has a Moroccan feel to it :)


Here, I found a piece of watercoloured cardstock spritzed through the stencil with a range of blue inks.  The beautiful snowdrop is stamped on acetate and I painted on the back with acrylic paints.  When I fussy cut it out, it looked lovely against the vibrant blues.


On my third card I inked through the stencil with a range of distress oxides in blues and greens and then die cut a square from the centre to create a raised panel.  I combined it with the striking gerbera which is large enough to stand out against the patterned background.


Finally for today, I inked through the lattice stencil lightly with Antique Linen distress ink.  I wanted to create quite a distressed look with a subtle fade out.  I then inked through a leaf stencil with some rich browns and oranges and combined with a dragonfly (free with a magazine) which has been gold embossed on vellum.  A few splatters and a sentiment from Originally Organic complete the design.

I hope you like the different looks that the lattice stencil can create.  Whether bold and vibrant or subtle and distressed, it provides a lovely backdrop for lots of stamps and sentiments.  

See you again soon for another stencil sunday x


Friday 19 January 2018

Uniko Challenge #45 - Something Old, Something New, optional twist LOVE

Hey!

Welcome to the January/February, 2018 Uniko challenge - the first challenge of this New Year. As last year each challenge will be FIVE weeks long, giving a total of SIX challenges again this year.

This month we have the following challenge...


Challenge Guidelines:
* You can use any products/stamps to enter the challenge, but we do LOVE to see you use your Uniko products. Plus, there is an extra chance to win a prize if you do ;)
* Email entries welcome, just email a photo of your card to bev@uniko.co.uk and I will add it to the Uniko Flickr gallery and link up!
* Share the challenge graphic in your post and link back to the challenge if possible ;)


This month we have the winner of Challenge #44 the awesomely talented Anita joining us as our Guest Designer.

Here's her amazing card:


Just too delicious and totally awesome! Be sure to pop on over to her blog HERE and leave her some love.

The Uniko Design team also have some inspiring card ideas to share, be sure to follow the links to their blogs to find out more and I am sure they'd love a nice comment too ;)


 CLICK HERE to see more from Beverley


 CLICK HERE to see more from Carol

Happy Birthday - photo by Deborah Frings - Deborah's Gems


CLICK HERE to see more from Deborah


 CLICK HERE to see more from Izzy 


CLICK HERE to see more from Jane


CLICK HERE to see more from Lindsey 


CLICK HERE to see more from Rahmat


CLICK HERE to see more from Sarah P


Such a wonderful bunch of inspiration for you all! Are you ready to play along?

Well, just in case you need some more incentive to play along with the challenge here are the details of the prizes.
 
THE PRIZES
  • Main Winner Chosen By the DT - £25 eGift Certificate
  • Random Twist Winner - £4 In Stock Clear Stamp Set of Winners Choosing
  • Random Uniko Stamps Winner - £4 In Stock Clear Stamp Set of Winners Choosing
  • Top 3 Chosen By DT - 150 Loyalty Reward Points

You've got plenty of time to play along with this month's challenge. The deadline for submission is midnight (GMT) on Friday 23rd February 2017 (7.00pm EDT).

Hugs,

Wednesday 17 January 2018

DT Inspiration - Stamp and Go

Hi! Today I'm here today to share some simple quick and easy to recreate cards. 

Although it's fun to try out different techniques, use die cuts and multi media with Uniko stamps we don't always have the time and Uniko stamps look just as stunning when simply stamped. So that's why I'm calling this post 'Stamp and Go!' Because sometimes that's just what you want!


A fun way to say hello to someone and brighten their day using just three colours of ink and two Uniko stamp sets - what could be simpler than that? Stamping off the edge is a great way to add extra stamping without spoiling the CAS look of a card.

Supplies:
Stamps: Uniko, Fun Flowers & Simply Said Blocks
Inks: SU, daffodil delight, tempting turquoise, melon mambo


Well how about two ink colours and two Uniko stamp sets?


By using an ink pad with multiple colours it's easy to achieve a hand coloured look. And doesn't that Pure Florals Gerbera look totally amazing showcased on its own?

Supplies:
Stamps: Uniko, Pure Florals Gerbera & Simply Said Blocks
Inks:  Kaleidacolor, desert heat; Memento, tuxedo black

Keeping a similar theme going my last card uses two ink pads and two Uniko stamp sets again. The multi coloured stripes are so easy to achieve using a Kaleidacolor pad, but a similar look could be achieved by using two ink pads and overlapping them in the middle. The Simply Said Blocks were simply stamped on top - bit of a favourite go to greeting set.


I'm thinking this card could be used for Valentines Day and as it's so quick to create you could be a big tease and send several!

Supplies:
Stamps: Uniko, Background Blocks Horizontal Stripe & Simply Said Blocks
Inks: Kaleidacolor, baby powder; Memento, tuxedo black

Thank you so much for looking at my ideas for Stamp and Go cards using Uniko stamps. I hope I may have sparked an idea to get you in the creating mood. And as always keep crafting!

post signature

Tuesday 16 January 2018

CAS Colours & Sketches #255 - Colour

Hey!

I am back THIS week and again your hostess for the January challenges over at CAS Colours & Sketches. I loved seeing how you were all inspired using last weeks sketch. This week is colour week and I have this combination to inspire you (hopefully)...


I should really be super organised and create my cards way back when I come up with the colour combos, as I had so many ideas when I did, but when it came to making my card recently I couldn't think of what to do! 

It was only whilst commenting around blogs I realised that I needed to send a friend a hug in an envelope and this is what I made...


I love the boldness of this hugs sentiment from BIG & BOLD Hugs and I really should do more bold focal sentiment stamps ;) This time I decided to pair it with the heart wreath from Originally Organic Additions and a smaller 'Sending You' sentiment from Simply Said II.


As I don't have the SU! inks for Soft Sky and Wisteria Wonder I used my SU! Markers and MISTI tool to ink the stamp and repeatedly stamp it using the MISIT until I had a image I was happy with! The hugs sentiment is stamped in Perfect Plum, fussy cut out and adhered to the card using foam adhesive. 

Short an sweet today from me, I've not much time before one Bean goes to nursery and on stays home with me! No rest for this mummy today or tomorrow and I've a HUGE list of things I need to do as well as keeping him busy. Nothing like multitasking at its best! 

I hope thatI have inspired you to join in on the challenge?! If you need a little more inspiration, pop on over HERE to see what the CC&S Design Team have created.

Thanks for stopping by!
Hugs