Showing posts with label Birthday Wishes. Show all posts

Tuesday, 9 July 2024

Technique Tuesday - Blackout with Uniko Stamps

Hello & Happy Tuesday. 

In between our new furry addition, Cali (the Calico kitten) playing and napping, I've managed to record a new video for you all and it's now available to watch HERE on the Uniko YouTube Channel.

Last Wednesday I shared THIS card over on the website blog and social media. I used the Stencil - MOD Background Builder for the same technique. 


I then realised that you might not know this technique, or you might. But all the same I thought it would be a fun video. 

Here's a look at the card I made in the video... 


I thought I would use this weeks Card of the Week products, Background Blocks Splatter, Balloon Bash and Everyday Sentiments

Have you seen the new feature on the website? 

Every Monday I upload a new card and all the products used are 15% off until the following Monday.


For the background colours I used Honeysuckle, Sorbet, Creamsicle, Sea Foam and Oceanside. For the balloons I used Peacock and Dragonfruit. 


I do hope you'll pop on by to watch the video. 

Crafty Hugs


Thursday, 31 August 2023

Brand Ambassador Inspiration - Fantastic Foliage


Good morning, crafters

Anita here, and today I have two cards for you, both using different Uniko foliage sets.  I've had these sets in my stash for a while but this is the first outing for both of these!  Two very different stamps and two very different cards.

First up, I've used a beautiful stamp set which is part of the Framed series, Framed - Floral Vines...


I chose to use a pale grey cardstock for my main panel.  I began by stamping the image in Antique Linen Distress Ink.  This is the ink colour that I always use for this technique, where I want to colour the image and then re-stamp and emboss after, as it is pale enough to disappear under the final embossed lines.  So after stamping I coloured the leaves and flowers with Copic markers.  Then, with the stamp still in the same position in my Misti, I re-stamped in VersaMark ink and heat embossed in white.  I added the sentiment in black, which is from the Birthday Wishes clear stamp set, before trimming down the grey panel and also the card base to fit the ratio of the framed image.


For my second card I've used the Large Background Sketched Foliage stamp...


This is a technique I've not used in a while - layered emboss resist.  A little time consuming but you can create some great effects with it.  I just used one layer on this example but you can use multiple layers if you choose inks with varying depths of colour, starting with the lightest.  I began with a white cardstock panel and roughly ink blended using Distress Oxide in Twisted Citron and Mowed Lawn.  I then left it to dry before stamping the image in VersaMark and heat embossing in clear.  The clear embossing powder ensures that the ink shades you've applied on the first blend are trapped under the embossing.  I then ink blended with the darker shade, Rustic Wilderness, over the entire panel.  The embossed areas then just need a buff with a soft cloth to wipe off any ink being resisted.  For a little interest I added some water droplets and blotted these away to remove some of the colour.  The panel was die cut with a stitched rectangle and I added a strip using a sentiment from the Simply Said clear stamp set.


I can't believe it will be September tomorrow, it doesn't feel like we've had summer yet here in the UK.  I'm not quite ready to start with the autumnal projects yet so let's hope September will bring summer back, at least for a little while!

Thanks for popping by today.  I have a little time off work next week so I may be back sooner with more inspiration for you.


Wednesday, 26 October 2022

Brand Ambassador Inspiration - Clean and Simple with Metallic Accents

Good morning

Anita here and today I'm sharing the style of cards I love to make the most...clean and simple.  I thought I'd add some metallic elements and for both cards I've focused on Uniko dies.

 
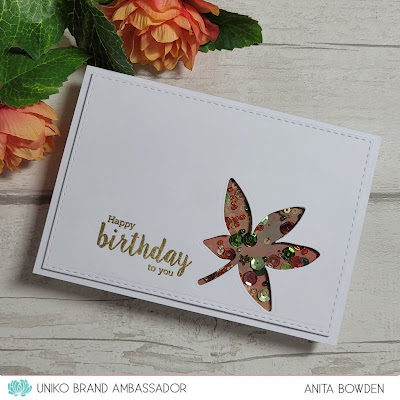
I'll get straight to it and first up is a shaker card.  Often shakers can be thought of as quite fussy cards but they really don't have to be.  For this one I've used a die from the Designer Dies Passiflora Collection as my starting point...


I started with a die cut panel and used the leaf die from the collection to create an aperture for my shaker.  Before creating the shaker I stamped a sentiment from the Birthday Wishes Clear Stamp Set and heat embossed in gold.  On the card base I masked off a section where the aperture would be positioned and ink blended with three shades of Distress Oxide ink.  I then created the shaker by adhering acetate to the reverse, surrounding the area with foam tape and then trapping a mix of sequins in autumnal shades.  The panel was then adhered to the card base on more 3D foam tape.


For my second card I used the Flower Power #1 Clear Stamp Set and a die from the co-ordinating Designer Dies Flower Power #1 - #6 Collection...


On a white die cut panel I die cut the flower head to create an aperture and then stamped the stem/leaves and the sentiment.  I adhered some textured gold cardstock to the reverse of the aperture.  Then using the die cut, I stamped onto it using VersaMark ink and heat embossed in copper.  This was then adhered, offset, over the aperture.  The panel was then adhered to the card base on 3D foam and I added a single black gem to the centre of the flower.


I really wanted to go back to a true clean and simple style with these and I hope you've got some inspiration from them.  Now I need to shift my focus from autumn to Christmas as time isn't slowing down and I've not even started...yikes!

Enjoy the rest of your week and sending crafty hugs,


Friday, 24 June 2022

More BA Inspiration using some of the June release

 Hi, Julie here with a few more ideas using the fab new Sunshine and Rainbows stamp set and the Raindrops stencil. I had so many ideas about the new Sunshine and Rainbows set, that I just had to make a few more cards to share with you all. I've teamed it up with the new Raindrops stencil as well as including the older Rainbow and Cloud stencil, which pairs up rather nicely with both.

Here's my first card using Sunshine and Rainbows stamp set. I've used the rainbow stamps but the reverse of them to give a different look.


To begin, I taped off a section of an A6 panel of white card and stamped a couple of the rainbows, then moved the tape and stamped below them and above them.


Having a MISTI makes it easy to get good coverage, overlapping each arc also gives a more blended look to the finished rainbow. Here's the finished panel. The only problem with using the wrong side of the stamps is the smallest arc which is solid, so I cut a mask to create the white center. The inks were a selection of Altenew and DI.


My sentiment panel was stamped on vellum with Altenew Obsidian and heat embossed with clear EP. My first attempt smudged as the Obsidian ink is very slow drying and just sat on the top of the vellum, by heat embossing I eliminated that problem. I used a slim rectangle frame cut using an Altenew die from white card which allows the vellum to be attached to the finished panel without the glue being visible.

My second card combines the stamps with both stencils.


On a panel of pale blue card, I inked through the raindrops stencil with Versamark and embossed with clear EP. I wasn't completely happy, so added a layer of Salty Ocean DI over the top, buffing away any excess ink. Using the clouds on the second stencil, I added white texture paste roughly to give the clouds some added texture. I had to do this in two parts as the stencil doesn't allow you to use more than a couple at one time. Using the right side of the rainbow stamps, I created my rainbow, then cut it out and added it to a strip of matching white card to which I had stamped the greeting. I trimmed the stenciled panel down, and added the rainbow and sentiment on pads.

My final card was made for my daughter's birthday, which was yesterday, using the correct side of the stamps. Each rainbow was stamped randomly over an A6 panel of white card, adding the heart from the same set in the arc.


The gaps between the rainbows looked a tad empty, so using both sets of small dots from the Floral Vines set, I randomly stamped using a pale grey ink. I picked up on the grey for the mount and sentiment panel, stamped using Doodle Flower and heat embossed with white. The white frame was made using two stacked square dies. The finished card is a 5 x 7inch.

So that's all from me for the moment, hope I've given you some more ideas about how to use the stamps and stencils. Stay safe and keep crafting!

Sunday, 23 May 2021

Mini Uniko Logo Stencil - Guest Designer Tara Cardwell

 Happy Saturday! 


Did you see that the Mini Uniko Logo Stencil that was the FREE gift for our 9th Birthday celebrations is NOW available to purchase on the website HERE.


Today I have a Guest Designer joining us with some inspiration using this mini stencil. Please give a warm welcome to Tara Cardwell one of the lovely owners of my favourite craft stores, Seven Hills Crafts! 


Hello Everyone, Tara here. I've been playing with the new floral stencil today but when I saw it, I saw not a flower, but a butterfly - and here's how I did it.


I die cut a circle from cream card and taped the stencil in place and used a detail blending tool to ink in shades of brown, red, orange and yellow to give a sort of "red admiral" feel.


Once I was happy with my first stencil shading, I took it off, cleaned it, flipped it over to get a mirror image and inked again with the same colours.   That left me with the following "wings" and a couple of brown bits in the middle.   I used the brown bits to help me pencil draw a thorax to connect the wings.  I then just used a couple of markers to shade the thorax.   I drew the antenae with a brown fine liner but a brown pencil would work too.


To give more butterfly like detail I added a few dots of stickles in red and crystal.  


I mounted the circle onto a square kraft base card and used more crystal stickles to add a flight trail and then stamped a sentiment either side of the trail using stamps from Big & Bold Happy to finish the card.


Hope that gives you some ideas how to stretch yours stash beyond the original design!


I hope you have enjoyed todays feature and a big THANK YOU to Tara for inspiring us all. 


Crafty Hugs
 

Wednesday, 20 May 2020

Brand Ambassador Inspiration- A Masculine Birthday Card

Good morning folks, Julie here with another Brand Ambassador post.
Today I would like to share this masculine, CAS card with you and the steps I used to create it.


I don't know about you but I'm starting to run out of my favourite cardstock, so I decided that I would use some of my odds and ends that I save from other projects and some larger A4 sheets that have been in the stash for more than 7 years! So I started with a small panel of white card from the scrap box, which I taped under my abstract triangles stencil.


I found it easiest to stick it from the back with masking tape, so needed to add a little talc to stop the sticky tape from catching on my MISTI when stamping. The stencil was then placed in my MISTI and I then stamped the largest of the sentiments from Birthday Wishes set repeatedly through the stencil with black ink. As the ink will sit on the stencil, take are not to smudge the residue when moving your stamp around. 
I carefully removed the tape from one edge of the stencil and placed a panel of scrap paper under it and carefully rubbed away the excess ink with a cloth. The stencil was still attached by one side so it acted like a hinge allowing the stencil to remain in place. After carefully removing the scrap paper, I placed the stencil back over the inked panel and replaced the tape and inked through with Salty Ocean DI. Once dry I carefully removed any excess ink from the stencil before placing the Scattered Polka dot stencil over and securing.


Blueprint Sketch DI was then added through the two stencils to create yet another layer.


The photo above shows what the panel looked like after the polka dot stencil was removed.


Finally, the Abstract triangle stencil was removed to reveal the finished panel.

When using small patterned panels, I find a piece of copy paper cut to size very useful, allowing you to position each of the elements before adding to the final base card. You can roughly plan the final design without ruining your base card.
I trimmed a panel of textured card to create two panels, adding two strips of scrap card inked with Blueprint Sketch and stamping Happy Birthday from Simply Said in black before popping up them over the stenciled panel on the copy paper with fun foam. The base card was made from the same textured white card.


The instructions sound quite complicated but I do encourage you to have a play, use up your scraps like me. 

That's all from me for the mo, so stay safe and well until next time.


Thursday, 27 February 2020

Brand Ambassador Inspiration: Two more birthday themed cards

Morning all.
Julie here with some more cards to keep the birthday party running here at Uniko.


As you may know, we're celebrating Uniko's 8th Birthday.  We've had the Birthday Linky Party .....


...and there's the amazing Birthday Giveaway where one lucky winner will receive a fantastic prize.


Today I have a couple of birthday cards to share, one feminine and one more unisex.

Here's my first card using the recently released Hello Lovely and a sentiment made up from elements from both Birthday Sentiments and Festive Sentiments stamp sets. Yes I said Festive, Happy is not just for Christmas!


I thought I would include some pics of the make for this post, I usually forget until I have almost completed the card but this time I made a special effort, not so much for this card but for the second!

 Here are my elements, the peony cluster stamped and heat embossed with white EP, watercoloured and then fussy cut, a 5 x 7 white base card and a 61/4" x 4 1/4 " panel of matching card with an oval cut out.


I arranged my spray around the aperture and then placed the panel over the base card and traced the outline of the opening with a pencil. I then placed my base card in my MISTI and added the sentiment, stamping in black Memento. You need to rub the pencil out now!


To finish I popped the panel up on pads over the base and added a few sequins.


Now for my second card. 
(Just to warn you, this is a photo heavy description)
It's an interactive one, inspired by this this video on You Tube.


I started by inking a 9.5cm x 14.2cm white card panel with the Scattered Polka Hexagons stencil in bright colours, then cut a slot in it 11/4" x 1/4" as shown below. I also cut a strip of card 1" wide from A4 and scored at 2" and 21/2". From some scrap card I also die cut some balloons and inked them with bright colours. You could of course use coloured card if you have it.


You need to ensure that your central balloon is the largest and you have a slightly smaller balloon in the same colour.
Now comes the assembly, looks way more complicated than it is.
The die cut balloons were added onto the stenciled panel, mainly around the edge and trimmed back to the edges of the panel. 
On the 2" end of the long strip I added some strong double-sided tape and then the smaller of the pink balloons which was stamped with a sentiment from the Anniversaire Arts set, the edge of the balloon is just touching the fold. I did have to trim the excess white card away, you can take away but never add!


On the large balloon, I stamped the sentiment from Birthday Wishes and then added it over the top of the first onto the 1/2" space on the strip with just the widest part hanging over the fold.


Now its time to add this mechanism to the card. 
The long section of the folded strip was slipped through the slot and secured to the base with more strong tape, just on the edge of the smaller balloon, making sure the large balloon was central on the panel.


Flipping the panel over I added more tape, keeping it away from the mechanism.


Then added it to an A6 black card which I had trimmed down by 1cm so that there was room for the pull element in an envelope.


By pulling the end of the strip the top balloon flips back to reveal the hidden sentiment.
I trimmed the excess card from the mechanism and added a pull instruction, some hi-lights with a white gel pen onto the balloons and some strings for the balloons with a black fine-liner.


And breath, told you it was a photo heavy post!
Well you may need a lie down in a darkened room after that but hope I've inspired you to have a go and perhaps join in with our birthday theme, you've only got a few days left!

Thanks for stopping to read until the end, see you back soon.

Saturday, 14 September 2019

DT Inspiration - Playing with Background Builders Stars & Triangles

Hello there, it's Sarah P here and massive apologies as I seem to have been AWOL for the whole of summer BUT at last I'm here with another DT Inspiration post.

Whenever I've not been crafting in a while I struggle to focus; not knowing where to start ... do you have that issue?

My preferred option for getting back into it is to pick up a couple of stamp sets and ink colours that I love and jump right in. That's what I've done with these!!!

I hope you like them!

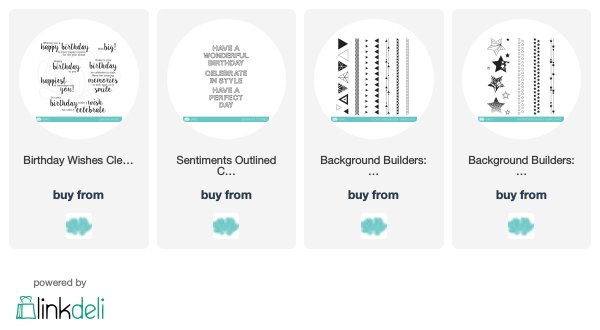
My GO TO stamp sets were the Background Builders Triangulate, Background Builders Seeing Stars, the latest Sentiments Outlined set, released in July plus another of my favourite sentiment sets; Birthday Wishes.

Up first with my stars trio, just basic stamping with a masked area, on these first 2 to insert the sentiment, and to finish a couple of enamel dots ...


Then having created the stars one in the colour combo above, using promarkers I decided I'd carry the colour scheme through with my triangles!


I do hope you like my cards and I'd love to know how you get back into a creative frame of mind following a break.

Thanks for calling by and catch you again soon.