Showing posts with label Embossing. Show all posts

Friday, 6 October 2023

Introducing... Framed - Snowflakes

Welcome to Day 4 and the final day of the product introductions for our October Release. 

Today I am introducing a new addition to our Framed Series and hopefully a clear stamp set that fills a snowflake gap in the Uniko clear stamp line up! 

Just like the other sets in the Framed Series, this clear stamp set features a main frame stamp filled with new pretty snowflakes with a gap left for your chosen sentiment. There are also 4 individual snowflake stamps perfect for adding details and creating your own beautiful backgrounds.


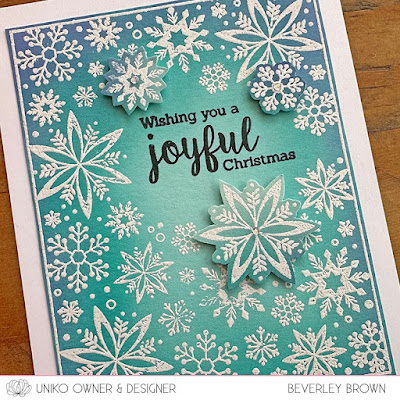
For my first card today I started with an Aqua Sky card panel. I then used Distress Oxide Ink in Peacock Feathers and Wilted Violet to create a spotlight effect for my sentiment. After my ink blending was dry, I left it overnight, but you could heat set. I then went to stamping the frame in VersaMark ink and heat embossing in white.


I then stamped my sentiment from Most Wonderful before fussy cutting the frame out before adhering to my white card base with double sided tape. I also stamped a trio of individual snowflakes, heat embossed and fussy cut them to adhering with foam adhesive.


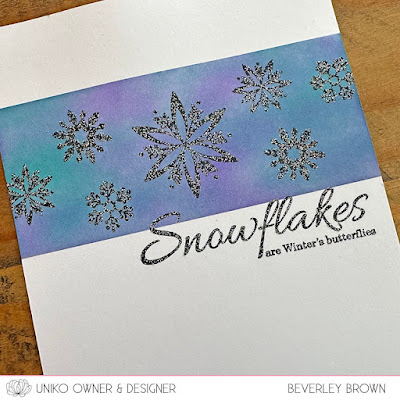
For my second card today I wanted to feature the individual snowflakes for a clean & simple design. I started by masking off a section on my base card and then ink blended Peacock Feathers and Wilted Violet.

I then stamped the snowflakes and my chosen sentiment from Stunning Snowflakes in Nocturne ink & heat embossed with Stardust embossing powder. Simple, but with lots of sparkle!


That's all I have to share just now, but I will be back this afternoon with more to share & this weeks instalment of our 12 Days of Christmas Inspiration & Giveaways! I do hope you will pop back then to see what I am making and watch my video to find out about this weeks prize.

If you missed Day 1, Day 2 and day 3 product introductions, you can catch up HEREHERE and HERE. So that's all the introductions, which means tomorrow is release day. They will be available 9pm BST and we will have our usual Brand Ambassador Blog Hop & Giveaway at 9am BST here on the blog.


Crafty Hugs

Monday, 7 June 2021

Mixed Media Monday - Guest Brand Ambassador Trish Latimer

 Happy Monday & Shiny New Week! 


Today I am bring a new feature to the blog and a theme that from an Instagram poll not long ago revealed that many of you would like to see more of, Mixed Media. As you know I lean towards clean & simple, but it is a style I dabble in now and then. More so when I was lucky enough to have a feature in Craft Stamper magazine. This of which leads me nicely to introducing our Guest Brand Ambassador to kick off this feature. Please give a warm Uniko welcome to Trish Latimer.


I'm Trish Latimer, full time mixed media artist. Former editor of Craft Stamper, current addict of all things painty! You can usually find me in my studio covered in paint, glue and very occasionally glitter too......


For this art panel, I scraped some texture paste through the Wonky Stripes Stencil and let it dry. Creating the rainbow is great fun, although a little messy! I used acrylic inks, but paint will work too. Simply add a small dot of colour, then spray with water. The colour will move around, giving a washed out look. The important thing to remember is to make sure each colour is dry before adding the next, otherwise you'll end up with a muddy mess. 


Once the rainbow was done, I added splats of white paint and the stamped words. This panel was glued to a wooden box frame, but of course this effect can be done as a flatter project, in an art journal or as a greetings card front.


Another art panel, but a totally different look! This one is a much more pastel affair. I painted pieces of card in my chosen colour scheme (of course you can use ready coloured card!) and then white embossed lots of designs all over them. I drew a scallop shaped template, and used this to cut down my card. Each identical scallop nesting underneath the next. 


I used the diamond shaped stamps from Background Builders Delightful Diamonds as the flower 'petals', white embossing those, cutting them put and then gluing them together. The flower stem was created by wrapping white cord around a bamboo skewer, then trimming to size. 


Again, I put this panel onto a wooden box frame for display, but the idea is another than can be easily transferred to cards!


WOW! Are you picking your jaw up off the floor like I am right now? 

Trish had no idea what products I was sending and has created two fabulous mixed media projects with completely different feels and I am inspired by them both. I am loving the rainbow colours and dimension of the first card and texture paste is something I always neglect to use but the results like Trish has achieved is amazing. Then we have the soft pastel shades with beautiful white embossing and creative flower making on the second. 

I hope you have enjoyed todays feature and a big THANK YOU to Trish for inspiring us all. 


Crafty Hugs


Saturday, 19 December 2020

Countdown to Christmas Day 19 - Sparkle Saturday

 Happy Sparkle Saturday!

I'm a little later than I originally planned, but didn't want to get behind again. This evening we had a family film night and I introduced the boys to Willy Wonka & the Chocolate Factory (Gene Wilder) the classic. It started off well, then they got a little bored! BUT then they loved it, but the chocolate factory is the best bit! 

Anyway, the card I am sharing today is one I really had to get out of my head! Occasionally I will envision a card idea in my head, often when I am designing stamps, but this time probably about a week or so ago. So while the boys were watching something on You Tube before bed I sat down to make it.


Who remembers and even owns Christmas Sparkle? 

This little gem of a set retired a few years ago now, as much as I love all the stamps I design, a few years ago I needed to make room for newer designs and unfortunately this one got the bench. 

As it's retired I haven't used it for a very long time as I try to use just current and in-stock products. Anyway, today I am making an exception and as you have seen in the recent past, some retired stamps get a little re-introduction ;)


Anyway, how beautifully ornate does this gold beauty look?

Doesn't the Sparkle bauble pair with Framed - Holly wonderfully? Like it was designed to ;) I dusted off my Encore Gold pigment ink and also added gold heat embossing to add to the shine of these stamps. 

I really love how this turned out. 

That's all I have to share with you all today. I will be back tomorrow with another Stencil Sunday instalment, but until then, thank you for stopping by & I hope I have added a little sparkle to your day after the devastating news we were issued regarding Christmas. 

Sending Love & Crafty Hugs Bev x


Sunday, 19 April 2020

Brand Ambassador Inspiration - Daffodil experiments

Hello!

Wiebke here to show you some versatile spring flower cards!

Although Easter time passed by, there is still time for spring botanicals, right?
In my garden they just started to bloom...


Sometimes I love creating cards without a sentiment!
So I can use them for many different occasions: (easter), birthday, get well or just for you....
I only have to grab a sentiment I like to finish the card just in the moment when I need it!

You have the choice to put a small sentiment on the front on a little banner or in a block-optic or also a bigger sentiment on the inside of the card.
That's so much more flexible and you always have cards for many different occasions in "your stash".


Can you imagine how I created these beautiful Daffodil-impressions? 
Cause: Uniko has stamps,stencils and dies... but no embossing-folders in their product list yet... 

I created my own Embossing-panel with a stamp and 10 layers of Embossing Powder!

Jennifer McGuire showed this technique in the newest Online Card Class "Spring Card Camp".
I'm not sure who developed this technique - she herself or someone else and when it was used first time (new or old technique?)
But I think, everybody has tried to score a stamped image by tracing stamped lines with an embossing ball-stick before... that's almost the same technique, but to create thick layered images and emboss with them and a cutting machine is a much more elegant and also more accurate way to get almost the same result!

And you can repeat the embossing process again and again...
That's woth the work you have to invest with layering 10 times embossing ink and powder and heat it up every time. I recommend a stamping tool for this process - it's so much easier to get a good layering with one of them!


The first card I made with an impressed embossed flower.
I coloured the impressed lines of the flower with Zig Real brushes and added some water for a good colour gradient to the areas beside.

A still missing (small) sentiment will be placed right between the green ribbons on the right side of the flower or (when I'll use a bigger one) on the inside of the card.
I hope I can use it as a birthday card and don't need many get well cards soon. (Nobody should be in the situation to need one during the next weeks! So please stay save!)


Look how detailed the embossing is!

The second card is made with an invers impression of the embossing panel.
I softly added some Distress Oxide inks (mowed lawn and  fossilized amber) with a blending tool. The colours outside of the expressed lines make such a soft colour effect!

This card is very simple and a bit plain right now. When I know who will get it, I think I will add a banner or rectangle piece of paper with the sentiment in the left bottom third of the flower layer.
Probably with the Simply Said Blocks in one of the two Oxide Ink colours I used for the flower.


Look how detailed the embossing is - also as expression!

Hope these cards inspire you to try this technique too!

When you use an embossing powder that doesn't "want" to layer thick enough - don't give up! Use this first try, colour it as usual and make a card out of it.
And then make a second try of the layering with another embossing powder (and maybe another brand of paper).

My first one was clear powder from Ranger - and it stayed flat. Why? I still don't know!
The second try was with a white powder from efco (one of my oldest powders in the box) on a different paper. And this turned out great!
I will use it some more times to get impressions and then I will use it as "normal" embossed image on a card - so nothing is wasted! :-)

Have a good time, stay at home and healthy and be creative!

Hugs from Wiebke

Friday, 23 June 2017

The 2017 Summer Coffee Lovers Blog Hop!

Hey & Happy Friday!

YAY! It's time for another Coffee Lovers Blog Hop, I'm super happy to be a little organised this time and have a project made to enter on day 1!


Uniko is honoured to have been invited again by the lovely Amy from Tsuruta Designs to sponsoring another fun blog hop and challenge, you can check out all the details over on the Uniko Website Blog HERE, I have blog candy there too ;) AND more details HERE over at the hop!

Anyway, onto my card...


At the moment Summer to me = Tropical! Hence my decision to pair I LOVE Coffee with Paradise clear stamp set.

I was inspired by a couple of challenges for the ink blended panel and layout of my card. Firstly the challenge over at AAA Cards HERE is the resist technique. 


I stamped the outline Hibiscus flower and solid leaves using VersaMark and heat embossed them with clear EP. I then blended two of my favourite distress inks over the top. 

The second challenge I was inspired by was the new CAS(E) this Sketch! layout seen HERE and below.


I continued the Hibiscus flower theme onto the Coffee cup, keeping it simple by stamping it in Lawn Fawn Merman ink and adding a touch of Stampin' Up! glitter for some Summer sparkle! 


The sentiment is a combination from Simply Said and I LOVE Coffee. I added a trio of Stampin' Up! Glitter Enamel Dots to finish the design off.

Ok, that's all I have to share with you today, but be sure to check out my post HERE with the Uniko Sponsor details, more inspiration and BLOG CANDY


Sunday, 8 January 2017

Make a Wish...

Hey & Happy Sunday!

I do hope you are all having a lovely weekend and have found some time to craft. I had a little bit of unexpected 'bean free' time yesterday afternoon, so I took advantage and after a little power nap (it has to be done) I set to making a card just for fun.

I came across THIS card on Pinterest by Maile Belles. I love the layout of the card, the stamped roses from behind the angled panel. It reminded me of the rose image from Flower Power #6


I saw the new challenge over at "Less is More" HERE too, which this week is a colour week and they have chosen ombre. I was looking through my supplies and decided I would give my Copic markers a dust off to create my ombre background.


I chose a trio of pinks, RV10, RV13 and RV14. I used the chisel edge of the pen and worked from light to dark and then back to the lightest. It was a reasonably quick process. The roses are stamped in VersaMark ink and heat embossed with detail white EP. The mini rose and leaves are from Background Builders: Vines and the sentiment from Pure Florals: Cosmos. The complete supplies can be found at the end of the post.

Did you see the return of a past feature HERE on the blog yesterday? Design Team Inspiration is back and Rahmat started things off again for us. Other members of the Design Team will be popping in through the month with various projects to inspire you too. I hope you are pleased to see the return of this feature! I have plans to reintroduce others from way back yonder too ;)

Ok, that is all from me today. I hope to find some crafty time tonight to unwind as I am on my own with the beans today as daddy is doing some extra work to pay for Christmas! Lol! 

Thanks for stopping by.
Hugs
Supplies:
Ink: VersaMark
Card: Stampin' Up! Whisper White
Accessories: Copic Markers RV10, RV13 and RV14. MISTI. Detail White Embossing Powder. Foam Adhesive.

Thursday, 1 December 2016

CAS Colours & Sketches #202

Hey & Happy December!

WhooHoo, the countdown to Christmas has begun! Thanks to my bestie Kerry, we have started a new tradition, like many households with kiddies... Elf on the Shelf! I'm not sure if the beans will enjoy it as much as me ;) but this is Buddy the elf waiting to greet the beans after breakfast. Buddy is sat on the TV stand, as I usually let them watch Peppa Pig so I can eat my breakfast in peace - LOL!


Talking of peace, lets get to todays card! This month over at CAS Colours & Sketches we are looking back at all the challenges of 2016, choosing one and making it FESTIVE. THIS week we would like you to look at the 2016 Colour Challenge Archive and choose a colour combo and use it to make a festive card.


I decided upon Challenge #196 from October...


You can check HERE to see how I used them last time, this is what I came up with this time...


With the recent Uniko Release all the stamps are still currently on my desk, so I reached for Rustic Wreath and paired it with a Stampin' Up! die cut sentiment, which is heat embossed with Copper EP. As are the pine cones and then I finished the sentiment off with a partial sentiment from Pure Florals: Poinsettia


For the layout of my card I used the current Freshly Made Sketches sketch seen HERE and below. Such a fun and versatile sketch and one that worked perfectly for using Rustic Wreath ;)


Ok, that's all from me for now, I hope I have inspired you to give these colours a go and join in on the challenge this week. Be sure to stop on over HERE and check out what the rest of the CAS Colours & Sketches DT have done using the colours and I hope to see you in the gallery.

Thanks for stopping by today.
Supplies:
Ink: SU! Real Red, Garden Green. VersaFine Onyx Black. VersaMark.
Card Stock: SU! Whisper White
Accessories: Personal Impressions Kettle Copper EP. SU! Christmas Greetings Thinlits Dies


Thursday, 2 June 2016

CAS Colours & Sketches #176

Hey!

I'm excited to say that for this month over at CAS Colours & Sketches I am the hostess, which means I have picked the colour combos and drawn the sketches to *hopefully* inspire you all. I do hope you like them and I really look forward to seeing you join in :)

Ok, so it's the first of the month which means it's a colour challenge. I think I have started things off with a pretty fun and simple combination...


With Summer just around the corner (for some of us & supposedly us in the UK!) I thought florally inspired combination would be fun.

Though I decided to go with butterflies for my card...


This set English Country Garden Butterflies is due back in stock over the weekend (available for pre order now along with other clear stamp sets) and so I thought I would dust my set off and give it some love.

I was also inspired by the current Freshly Made Sketches sketch seen HERE and below for the layout of my card. 


Iv'e been wanting to get some more ink blending practice in and so I masked a rectangle off and started blending the Rose Red to Blushing Bride and then to So Saffron, going back & forth between the colours blending until I was happy with the result! I still need a little more practice I think but I am enjoying the results.


The butterfly is stamped in VersaMark onto vellum and heat embossed with detail white embossing powder. After I fussy cut the butterfly out I decided to add some Wink of Stella to it for a little subtle sparkle. The sentiment also from the set is stamped in VersaFine Onyx Black ink.

I do apologise for being absent on the blogs recently, just when I think I am getting back into the swing of things I come down with a hacking cough and snuffles :( It's half term too which means all the playgroups we go to are closed and it's been a tough week keeping the beans entertained! 

Ok, that's all from me today, I do hope you will pop by the CAS Colours & Sketches blog HERE to check out the rest of the Design Team & Guest Designer Fiona's inspiration. I look forward to seeing you in the gallery & have fun!

Saturday, 28 May 2016

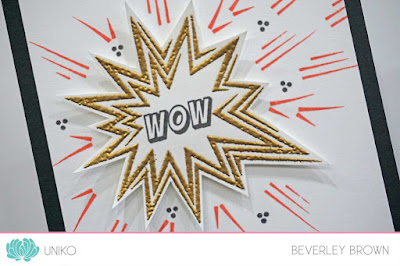
Gold Explosion!

Hey!

I hope everyone is well and enjoying the weekend, it's been a lovely day here in the NE of the UK, with the sun shining and reasonably warm outside too - YAY! 

We've had a fairly usual Saturday with the boys, but I have to say the highlight of my day was seeing the Red Arrows (RAF Jets) fly over our house a few times and I could see them doing various parts of their display at Durham Tees Valley Airport just a few miles from our house. I remember seeing them many times as a child and it brought back many memories. 

The beans got up off their nap just in time but after seeing them fly past the once, they were not that bothered the second and third plus times! This is a photo hubby and I snapped of the beans before we had to wake them up...


It still amazes me when they sleep in the same positions! Anyway, enough waffle, how about a card...


This is one of the clear stamp sets being restocked next week, Explosion! So when I saw the new sketch over at CAS(E) this Sketch! seen HERE and below, I couldn't resist using it! 


I also decided to use the new ColourQ challenge colours seen HERE and below...


This close up photo below shows off the shimmer of the gold embossing on the explosion. I stamped the explosion sparks in Calypso Coral and added a few trio of dots using the holly berry stamp from the retired Label Love: Christmas! 


Ok, thats about all from me today, I've spent a couple of hours this evening (once the beans went to bed) in the garden too, so it's now time to relax a little ;) 

I hope to be back tomorrow with more to share, until then, thanks for stopping by today.


Thursday, 24 March 2016

CAS Colours & Sketches #166

Hey!

It's new challenge day over at CAS Colours & Sketches :) Our hostess this month is Jane and she has come up with yet another FABulous sketch HERE and seen below for you to try this week...


This is what I came up with...


I decided to combine the sketch with the Spring Coffee Lovers Blog Hop HERE which Uniko is proudly sponsoring. You can read more about the hop HERE and I have a giveaway too ;)


I started by stamping and embossing in white the coffee cup from Uniko's I LOVE Coffee clear stamp set. This set along with a couple of other is NOW back in stock HERE

I then trimmed some white CS to create the panels which are 4.5 x 2cm, which are stamped with the mini Uniko flower logo in my favourite Spring colours. The sentiment panel is a combination of a sentiment from the I LOVE Coffee set and Simply Said. I adhered the panels to the card using foam adhesive.


Ok, that's all from me just now, it's a busy one here at Uniko HQ with the restocks in and pre orders to pack! Plus I have the mini April Release goodies in my hands ;)

I hope to see you in the CC&S gallery HERE and be sure to check out what the DT have come up with using the sketch this week.