Showing posts with label Design Team Inspiration. Show all posts

Wednesday, 13 November 2019

Brand Ambassador Inspiration - Stenciled Shadow-techniques

Hello!

I always love to discover new ideas how to use my supplies!

When  I saw some cards with a stamped off-set technique I got the idea to try this also with stencils.
So there we go!

:-:-:-:-:-:-:-:-:-:-:-:-:-:-:-:-:-:-:
 

For my first card I used the "Christmas Folk Snowflake Stencil" (was released one year ago).
I added the light grey pumic stone Distress Oxide Ink with my blending brush.
Then I moved the Stencil a bit, adhered it again with the tape and added the red fired brick with another brush.

To finish the cad I cut my stenciled paper fitting to my cardbase, adhered both ends of a piece of ribbbon on the backside, Then I added the stamped sentiment from the new released "Festive Sentiments Outlined" Set on a smaller piece of cardstock, I cut it in a size, fitting to the snowflake pattern. 
In this sentiment I coloured two of the letters with a marker and added an almost white (kind of creamy) enamel dot.
The layer is adhered on the cardbase with a 2 mm dimensional tape.
 
Stenciled shadow with "Folk Snowflakes"
Stenciled shadow with "Folk Snowflakes" - Detail
:-:-:-:-:-:-:-:-:-:-:-:-:-:-:-:-:-:-:
For the other card I used the technique with a little switch.
I stenciled the snowflakes of the "Let it snow" Stencil in tumbled glass Oxide Ink - again I used my brushes. Then I added Distress micro Glaze on the same position with a small blending tool (I store this one in the glaze container).
Removed and cleaned the stencil, put it back with a little movement and fixed it on the paper again. Then I added the darker shade blueprint sketch Oxide Ink.
The shadow is now more "behind" the first layer of colour.
To finish the card I framed my snowflake layer with a light blue paper and added a strip of the same colour in front with the stamped sentiment of the "Stunning Snowflakes". I also added some white snowflake sequins.


Stenciled shadow with "Let it snow"
Stenciled shadow with "Let it snow" - Detail
:-:-:-:-:-:-:-:-:-:-:-:-:-:-:-:-:-:-:
Hope you like this techniques and give them a try soon!

Hugs & greetings from Wiebke


Tuesday, 8 October 2019

Brand Ambassador Inspiration - Last chance to buy before retiring Sweet Baby

Bonjour !

Izzy here. Today I'm echoing Jane's post from last Saturday, as she explained, some stamp sets have to be retired to make room for the new ones. For this occasion, they are on sales with 50% off, so I'm here today to give you some inspirations on how to use the Sweet Baby stamp set.


As all the Uniko stamp sets, this one is very versatile, you can not only make Babies'cards but also cards for other occasions and that what I'm showcasing in this post.

The first trio are Babies cards using not only the Sweet Baby set but combining it with other Uniko stamps.

My first card uses the ducks of the Sweet Baby set together with the So Much set. I simply stamped the ducks, masked them and then I stamped the flowers. I coloured them with Kaleidacolor inks and a blender pen. I stamped the sentiment and I die cut a frame (x3) and glued it on the card base around the image.


Stamps: Uniko, Sweet Baby & So Much - Die: MFT, Stitched square scallop - Inks: Kaleidacolor, Baby Powder & Altenew, Industrial Diamond


My second card uses the onesie that I stamped in pink on a pattern paper. I made the background with the Scattered Polka Dots stencil and Catherine Pooler inks that have the same shades than the pattern paper. I matted this dotted background onto pink and then onto the card base. I die cut a scallop circle that I embossed with a dotted embossing folder. I then foam mounted the onesie on it. I stamped the sentiment onto a banner and I also foam mounted it.


Stamps: Uniko, Sweet Baby - Stencil: Uniko, Scattered Polka Dots - Die: Spellbinders, Classic Scalloped Circles Small & No brand, Tags and Labels - Inks: Catherine Pooler, Party Dress, It's a girl, It's a boy, Daydream & Versafine, Onyx Black.


My third card of this group is very simple and quick to make. I stamped the duck on a white cardstock, I coloured it with colour pencils then I fussy cut it. I glued a white feather on the double white card and I adhered the duck with a glue dot. To finish I stamped the sentiment.


Stamps: Uniko, Sweet Baby  & Simply Graphic, Planche Petit TrĂ©sor (sentiment) - Colour pencils: Faber-Castell Polychromos, #107, 108, 113.


Now with my second trio of cards, I show you how you can make cards for different occasions with this set. This time I used the teddy bear for the first two ones.

My first card uses the bear of this set and I combined it with the Background Blocks : Party Confetti and the Designer die BIG & BOLD Happy Collection. I stamped the party confetti block on a white cardstock then I die cut a square that I foam mounted on the double white cardstock. I stamped the teddy bear in brown on a scrap of paper and I fussy cut it. I die cut a party hat, I coloured it then I glued it on teddy's head. The teddy is glued on the background and foam mounted on the card. To finish I die cut the Happy word in black cardstock and I adhered it on the background. The rest of the sentiment is stamped.


Stamps: Uniko, Sweet Baby  & Birthday Sentiments (stamped sentiment) - Die: Uniko, BIG & BOLD Happy collection & Create a Smile, Cool Cuts Magical Frame - Inks: Kaleidacolor, Desert Heat & Cappuccino Delight - Promarkers: Lipstick red & Cardinal red.


The second card used again the bear but this time for a Christmas card. I combined it with the sets Background Builders: Vines Winter, Rustic Wreath and Simply Said Christmas. This is a One Layer Card. I stamped the bear in brown and I coloured it with colour pencils. Then I stamped the sentiment in black. At the bottom I used stamps from the Background Builders: Vines Winter and from the Rustic Wreath sets.


Stamps: Uniko, Sweet Baby ,  Background Builders: Vines Winter, Rustic Wreath & Simply Said Christmas (sentiment) - Colour pencils: Faber-Castell Polychromos, #103, 132, 189, 230, 231 - Inks: Distress, Mowed Lawn, Festive Berries, Vintage Photo.


And finally, for the last card I used the Sweet Baby set together with the Spring Botanicals Snowdrop to make a Spring card. I die cut a rectangle in a friendly watercolour paper, I stamped the duck once with Distress ink, I masked it and I stamped another one that I also masked. Then I stamped the snowdrops also with Distress ink. To colour this scene I used Zig Clean Colour Real Brushes. To finish I stamped the sentiment and I matted the image on a double card.


Stamps: Uniko, Sweet Baby & Spring Botanicals Snowdrop - Zig Clean Colour brushes: #050, 051, 052, 041, 045, 302, 303 - Inks: Distress, Mustard Seed & Shabby Shutters.


As you can see this stamp set is very versatile, useful for baby cards but also nice to be used for other occasions. So if you want to have a chance to get it before it is retired, you can find it HERE.

Thank you very much for stopping by and have a great crafty week !


Tuesday, 24 September 2019

Uniko Studio Design Team Inspiration...Creativity Re-Boot

Hello,

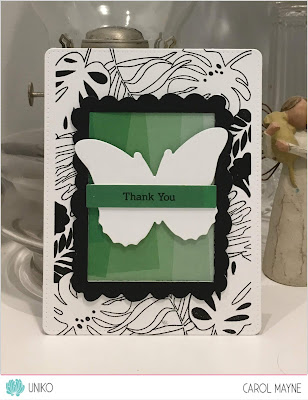
Carol here! Welcome to my Uniko Studio DT showcase, where I bring out a few Uniko favourites for a play date.  

I'm sure we've all had the 'lost mojo' experience and seek various ways to end the start-something/give up cycle. When this happens to me, I 'challenge myself a challenge' - a creativity re-boot -  which is precisely what I've done with the trio of cards I'm sharing here.

My challenge: 

  • focus on one key die/stamp combination: English Country Garden Butterfly Collection
  • use a limited palette: black/white + green (inspired by the image at TIME OUT Challenge #144, which you can see here)
  • use one 6 x 6 sheet of designer paper (sometimes we need to use that stash *grin*). I selected a various shades of green sheet from Pinkfresh Studio
  • one occasion: Thanks (sparked by our upcoming Canadian Thanksgiving, but shifting from fall colours/images)
  • three cards, inspired by at least two/three challenges (TIME OUT Challenge #144, Freshly Made Sketches #403CAS(E) this Sketch #340). I've missed entering in a couple, but that's okay...it's the 'doing' that counts! 
  • go CAS! 

So...here are my results:

Card 1: 
Sentiment from All Occasion Sentiments
Inspired by CAS(E) this Sketch #340);


 Card 2: 
Sentiment from Simply Said


Card 3:
Large butterfly die only from English Country Garden Butterfly Collection
Sentiment from Simply Said
Background from Tropical Paradise
Inspired by: me *grin*


I'd love to know how you re-boot your creativity!

Thank you for dropping by!
~c

Sunday, 8 September 2019

DT inspiration - Getting inspired with challenges

Bonjour !

Izzy here. I hope you are all well after this summer break. Here, a new school year has just started last Monday and so the weekly routine too !

Anyway, I had some time to play in my craft room and today I wanted to share with you the cards I made with the English Country Garden : Butterflies set and its matching dies.

Last month I showed you how I get inspired by the things that surrounded me. This time, for my choices of designs and/or colours, I've been inspired by several currently underway challenges. It's a game I love to play with : to combine several challenges together.

The idea of my first card comes from the Time Out challenge and the word "Rainbow" in their quote...


I stamped all the butterflies in different colours and I cut them with the matching die. Then I place them on my card. Once happy with their placement, I fixed them together with masking tape doing a grid that I placed in my Big Shot with an oval die on top. 

With the masking tape, all the little bits stay attached so I turned them upside down to put adhesive foam behind. Once all covered, I placed them back on the double white card, pressing a little bit to be sure they all adhered well. Then I took off the masking tape and I cut along the edges the parts that go beyond.

The sentiment comes from the Beautiful set.

This results in the second card with the remaining parts of the cutout of the first card...


For this card the sentiment comes from the Simply Said II set.

For my third card I get inspired by the AAA Cards sketch and the colours of the Addicted to CAS challenge...


Once again the butterflies were stamped and cut with the matching die, then I adhered them with glue dots. The sentiment comes from the Flower Power #8 set

My last card is a combo of the Freshly made Sketch and the Colour Throwdown challenges...


For this card, I used the Pure Florals : Peony set to make part of the sketch. I stamped the peony in dark blue over an an iridescent cream card. And this time I used the bigger butterfly of the set.

I stamped it with Versafine blue ink over the same iridescent cream cardstock. The only colours I had in my stash to match the ones of Colour Throwdown were Distress inks. So I tried to use them on this paper as watercolour. And I'm so happy they reacted perfectly with this kind of paper and it even gives a beautiful shimmer to the colours.

You may have a better look on this picture...


For this card, I used a sentiment from the Simply Said Blocks set. 


Et voilĂ  ! That's another way to get inspired for making cards. You will find more details on the inks used on my blog. 

Thanks so much for popping by and have a fabulous day !


Tuesday, 28 May 2019

DT Inspiration...Anti-Colouring Cards

Hello,

Carol here. Welcome to my Uniko Studio DT showcase, where I bring out a few of my Uniko Studio products to give them some extra love.  

Many of you, I'm sure, have seen the new 'trend' of pairing coloured backgrounds with focal images left black-and-white.  I decided to create a pair of *Anti-Colouring cards*, as coined and inspired by Carissa from Sprinkled with Glitter.  These were a joy to make, especially since the delicate lines and details of the English Country Garden butterfly and Originally Organic stylized florals stand beautifully just as they are. 

I paired these pretties with a rainbow version of Background Blocks: Mid-Century Modern 1.


I hope you've enjoyed my *anti-colouring cards* and will give this technique a try!

~carol

Saturday, 23 February 2019

Wonky Candles

Hello!

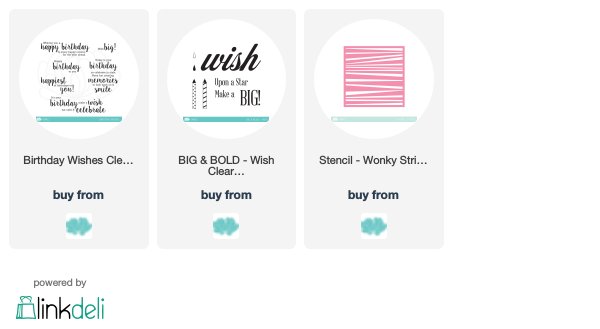
I hope you have had a good week.  It is Sarah G on the Uniko blog today sharing a card that I have made using the fab Wonky Stripes stencil.  I was inking it up in a rainbow of colours to create a border but when I took the stencil away I thought that the inked image looked like a row of candles:


I stamped the flame that comes with the Big and Bold Wish stamp set and drew a black line to create the candle wicks.  The sentiment is from the new Birthday sentiments set that Uniko released this month.


A simple card which shows that, if you use parts of your stencils you can make them the focal point of your card.


See you again soon!

Sarah x

Thursday, 17 January 2019

Simple Stamping and Stenciling~Uniko Studio DT Inspiration

Hello,

Carol here, 'giving some love' to a variety of my Uniko stamps and stencils today; hopefully, my trio will make you smile and, perhaps, even offer a bit of inspiration (which would thrill me to bits and pieces!).  Nothing super-duper fancy, as you'll see; rather, just a whole lot of inking, a bit of dry embossing and a curved panel die cut.  Clean and simple; the kind of card to make when time is at a premium.

As all three share the same design, I'll just dive in with the basic ingredients and 'how-to'...

Card 1
Lower panel: base of Tattered Rose Distress Oxide 
(I used Bristol cardstock for this section; Michael's heavy weight cardstock for the top portion)
StencilNature's Treasures II; Tea Dye Distress Oxide
Sentiment:  Simply Said


Card 2
Lower panel: dry embossed (hard to see in the photo, but definitely there)
StencilFun Flower
StampFun Flower; stenciled with Ripe Persimmon Distress Oxide; leaves with Versafine Clair)
Sentiment:  Simply Said


 Card 3
Lower panel: base of Distress Oxides - Tumbled Glass, Stormy Sky, Chipped Sapphire
StencilLet It Snow; Stormy Sky Distress Oxide
StampStunning Snowflakes; various ME pigment inks (I love pigment inks...just sayin')
Sentiment:  Simply Said; and 'Winter' from Stunning Snowflakes


So...I'm ready with two birthday cards and one 'just because'! Easy to recreate! If you decide to give these techniques/styles a go, do let me know! I'm always on the lookout for dazzling inspiration and ways to elevate the way I use my Uniko stamps, stencils and dies!

Have a wonderful day!!


Sunday, 13 January 2019

DT Inspiration - stenciled resist technique

Hello, Wiebke here to share some inspiration with you!

For today I made a colourful "sound card" with a stenciled resist technique.
The Uniko products I've used are the Equaliser stencil and a combination of the stamp sets Life is a Song & Most Wonderful.
:-:-:-:-:-:-:-:-:-:-:-:-:-:-:-:-:-:-:-:-:-:-:
Magic of Music
Magic of Music - Detail
:-:-:-:-:-:-:-:-:-:-:-:-:-:-:-:-:-:-:-:-:-:-:

About this card & technique:
For the stenciled resist technique I first applied a clear embossing paste through the Equaliser stencil onto the paper. After it was complete dry I started adding the colours - this time I used Zig Clean Color Real Brushes and blended them with a moisturised cloth and a brush and some water.
(When you don't have clear embossing paste you can also use clear embossing powder - apply the embossing ink through the stencil and then add the powder - don't forget to use a antistatic powder tool before!)

The embossed areas will stay white / in the colour of your paper and pop out of any colourful background!
Some colours tint clear products - if you want it really clear you need to check the combination of your materials before!
In this case it was ok for me to get some staining, it reminds me more to the old "Winamp Music tool"! ;-)

I cut down my paper in the shape of the equaliser blocks (with a similar edge around) and adhered it to my cardbase. The sentiment is a combination of two different Uniko stamp sets - Life is a Song & Most Wonderful,
To repeat the clear part of the background I used clear embossing powder for the first part of my sentiment "believe in the magic of" and white powder for the "music" and the note.
To add some sparkle, I drew a slim line around the sentiment with the amazing Sakura Gelly Roll - clear star pencil.

The headphones are a die cut (sorry, I have no brand name). I combined a normal black and a pearlescent black paper to get some optical dimension. The shells are adhered on the card with some 3D pads, for the rest I used a strong fluid glue.


To get the full list of all used supplies please hop to my blog.
:-:-:-:-:-:-:-:-:-:-:-:-:-:-:-:-:-:-:-:-:-:-:-:-:

Musical greetings from Wiebke.


Friday, 26 October 2018

Re-Introducing... Background Builders: Christmas AND Jolly Christmas

Hey!

Welcome to the first day of the October 2018 Release product introductions.

This is the fun part, you now get to see all the sneak peeks in action. The Design Team have worked their socks off and created an abundance of inspiration to share with you over the coming days :)

Today we are re-introducing Background Builders: Christmas AND Jolly Christmas clear stamp sets. These two clear stamp sets were first introduced WAY back in October 2013 HERE and HERE. You can also find more 'old' inspiration using the clear stamps HERE and HERE on Pinterest.

How about a fresh look at what these stamp sets offer in their creativity potential...


First up a colourful card using 6 out of the 8 building strips from Background Builders: Christmas. I simply repeat stamped the strips on white card to create a pattern and then die cut stitched squares to create a quilt style design. The sentiment is from Simply Said Christmas.


There are a few fun features to this building set and one of my faves is the two step stamping holly strip :) I also LOVE adding glitter to the outline tree centres! 

Next up we have Jolly Christmas and I have used my favourite image from the clear stamp set for both these cards...


The card on the left I shared HERE for my CAS Colours & Sketches DT card, so you can find all the details about it there. 

For the card on the right I created a background using Uniko Stencil Scattered Polka Hexagons and sparkly paste. I coloured and fussy cut Jolly Santa out applying glitter to the brim of his hat and the cuffs on his coat. The sentiment is from Most Wonderful.


As usual my AWESOME Design Team have created projects to share with you all too. Be sure to hop along, commenting along the way. You never know, I might just pick some random comments to WIN some prizes this release ;)


WOW! That was an inspirational hop, so many new ideas of how to use these re-released clear stamp sets. I hope you enjoyed the hop & will come back tomorrow for the next product introductions. 

Hugs


Thursday, 24 May 2018

May 2018 Release In Review Day 4

Hey!

Welcome to the May Release in Review Day 4.

Yep! I'm behind schedule again :( Good job I have a wonderful Design Team who continue to post and inspire :)

Anyway, as a couple of the Design Team didn't receive their goodies in time for the countdown and release day festivities, I thought it would be nice to have them be in the limelight and have a release in review week.

For day 4 they created some more inspiration using the Uniko Designer Die Collections released this month...


And here is some new inspiration using them from Carol and Rahmat. Be sure to click on their links for all the details and more inspiration on their blogs....


Click HERE to see more from Carol


Click HERE to see more from Rahmat


I will be back soon to share links to Day 5!

Thanks for stopping by! 

Hugs