
Tuesday, 11 May 2021

Two For Tuesday - Hello Lovely

 Happy Tuesday!


It's been a little while since I did a Two For Tuesday and as the weather at the weekend was absolutely dismal I spent some much needed creative time in the studio to cheer myself up! 


I was inspired to dust off Hello Lovely and a few of my Distress Oxide inks as it has been a while since I have used both! 


With Hello Lovely being such a large detailed stamp with a bold statement it can be used in so many ways. You know I am not an expert when it comes to colouring AND these days its a tie between not having enough patience OR being needed for something! So opting for a quick colour solution is always welcomed - haha! 


I didn't time myself making these cards, but at a guess I'd say they took me 15 mins each, so half an hour max. I think the longest part was the masking. 


On this first card I masked a rectangle in the centre of my card base. There are lots of masking type stencils out there, but I don't have a rectangle and I have a roll of Post-it tape that works wonderfully. It can sometimes be a little over sticky and take off card with it (see the bottom right corner of this card) when removed, but only if I forget to go slow.


I used Distress Oxides in Worn Lipstick, Festive Berries, Picked Raspberry and Abandoned Coral from top to bottom to create this beautiful background. I then simply stamped the Hello Lovely peony cluster in black ink over the top. I added a sentiment also from the set and my current favourite accent stamp, the trio of circles from Floral Vines.


This lead me onto my second card today...


I wanted to keep my colours and layout the same, so for this card I created ink blended stripes and I absolutely love how it turned out. Again I used Post-it masking tape and it worked really well. I took it slow to peel off this time ;)


I'm loving this colour combo of pinks and reds too, I think this card shows each of the colours off better and it's more striking. 

What do you think? Are you a fan of red and pink together?

That's all from me today, its a busy week in The Studio this week with some restocks coming - yay! Plus it's my birthday on Friday AND I get my first Covid vaccine on Saturday so I am trying to get ahead a little. 

Thanks for stopping by.

Crafty Hugs
 

Sunday, 9 May 2021

Stencil Sunday - Party Confetti

 Happy Sunday!


Before I get to my cards & post today I'd like to wish a Happy Mother's Day to those celebrating today. I wish you all a wonderful day.


It has been a while since I have done a Stencil Sunday post and I think it is partly because I overthink things and especially when it comes to using stencils. As you know from following me at Uniko all this time I am naturally a clean & simple card maker. I find 'mixed media' a challenge. 


Having said this, I have listened and taken note of the polls I do over on Instagram and I will be sharing some of 'my style' mixed media on the blogs.


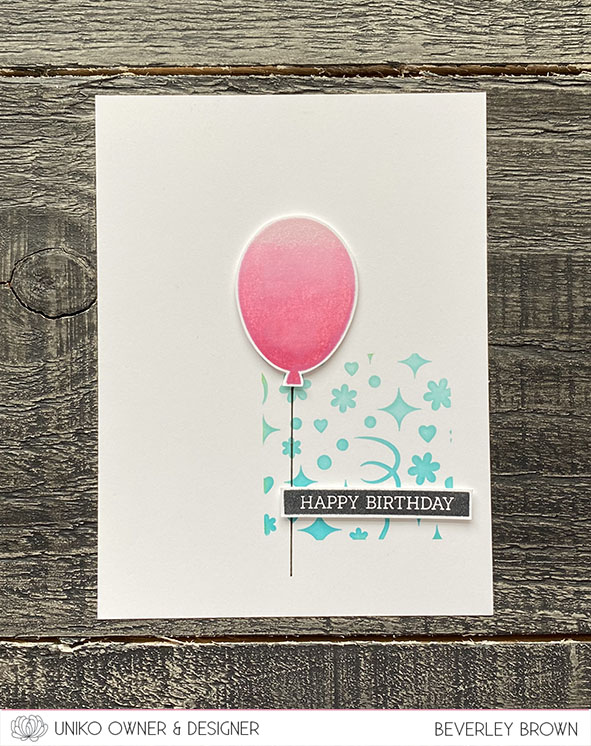
Anyway, back to my cards I created for today. So instead of over thinking things I selected my Uniko products, Stencil - Party Confetti, Balloon Bash and Simply Said Blocks. I then selected my colours, pinks & aqua and I had also selected a couple of card making challenges to play along with. 


For this first card I used the sketch over at Freshly Made Sketches seen HERE and below. Often when I see the elements on a sketch I am drawn to use similar products. However, stopped myself and kept to my birthday card theme.


I used Post-it masking tape to tape off a small square. I then used 3 shade of aqua ink to stencil through the Party Confetti design. I added an ombre pink stamped & fussy cut balloon from Balloon Bash and finished off with the Happy Birthday from Simply Said Blocks.


With my card being so CAS I went on to make a second card. This time I used the challenge over a AAA Cards seen HERE and below. As you can see I chose not to use the optional twist! 


For this card I kept all the colours the same and simply inked through the Party Confetti stencil so it filled the top 3rd of my card. I added another ombre pink balloon and the same sentiment. 


No overthinking and much more creativity! 


That's all I have to share with you today. I will be back later this week with a Two For Tuesday, plus a restock announcement AND a Birthday Special offer, so keep an eye on the blogs & social media ;) 

Have a wonderful day.

Crafty Hugs


Friday, 7 May 2021

Friday Focus - Floral Vines

 Happy Friday! 


It's been the longest shortest week for me, like the week has gone pretty quick, but I am feeling tired at the same time! 

Anyway, I managed to squeeze in some creative time yesterday and decided to create a couple of cards using Floral Vines.


I've my usual CAS style for these cards today and chose summery colours to shine through these Spring showers!


I started with simple design using the Floral Vine focal image along the side of my card with a simple 'smile' sentiment. I added trio of circles to emphasise the sentiment and add a little finishing touch.


This lead to my second simple card design...


This time I used a little masking and then used a border / building stamp from Background Builders Arts Decoratifs and the 'Just For You' sentiment. 


As you can see I kept the colours the same as my first card for ease and continuity. I really love how this simple duo turned out.

Thats all from me today, I hope you have enjoyed this little Friday Focus on Floral Vines today.


Crafty Hugs


Tuesday, 4 May 2021

Brand Ambassador Inspiration - A Trio Of Mini Slimline Cards

  Hey!

It's Jane here today with a trio of mini slimline cards.


Have you tried the new craze for slimline cards yet? Well today I've made three mini slimline cards - an even more recent and current trend.

Each finished mini slimline card measures 3.5" x 6", so I started with card toppers measuring 3.25" x 5.75". 

This first card uses the new oxide colour kitsch flamingo - thought I'd start with another new! I die cut two sizes of circle and added kitsch flamingo ink to the larger one and stamped using Uniko's Background Blocks Mid Century Modern onto the smaller circle.


I then stamped the images from Passiflora and used the matching dies to cut them out. Finally I stamped a greeting from Simply Said Blocks II and matted it onto the card base.

I've used exactly the same layout and stamps for my next two cards. First my favourite monochromatic look......


..... and finally a Kaleidacolor ink pad to get an ombre effect. I inked up the larger circle using two of the colours from the pad.


All the stamp sets I've used were back in stock as I write this post, so hopefully if I've inspired you they will still be available to purchase.

Thanks so much for your time today.

Stay safe and keep crafting!

Jane
x  

Friday, 30 April 2021

Uniko Challenge #64 Winners

  Hey!

I'm here today to announce the WINNERS of Challenge #64 Signe of Spring, optional twist Easter

A huge thank you to everyone who played along with this challenge.

First we have our overall WINNER chosen by the Design Team. 

#58 Cardogram


Congratulations Dhruvika!

Here's your winner's badge


You have won a £15 eGift Certificate to spend in the Uniko store. Please contact me at bev@uniko.co.uk by 14th May 2021.

We would also love to have you join us as our Guest Designer for a future challenge. If you are interested please contact Jane at jane.taylor52@btinternet.com by 14th May.

 Next up is the random winner who twisted with us....


Congratulations Valerie !

You have won a £5 Egift Certificate to spend in the Uniko store. Please contact me at bev@uniko.co.uk by the 14th May 2021.

Here is your winners badge:


Then we have our randomly selected winner who used Uniko products on their creation...


Congratulations Sadia!

You have won an £5 Egift Certificate to spend in the Uniko store. Please contact me at bev@uniko.co.uk by 14th May 2021 to claim your prize.

Here is your winners badge:


Now for our Top 3 chosen by the DT and in entry order:

#8 Claire


#84 Mugdha


Congratulations to you all & here is your Top 3 badge:


You have all won 150 loyalty reward points.

Please contact me at bev@uniko.co.uk


Congratulations to ALL the winners & EVERYONE who joined in with the challenge!

The next Uniko Challenge starts on Friday 21st May.

Hope to see you come back and join in with the fun :)


Saturday, 17 April 2021

Brand Ambassador Inspiration - Birthday cards

 Bonjour !

Izzy here with inspiration cards combining products of the last release as well as older products. 

April is for me the busiest month in my agenda in terms of birthdays. I have at least one birthday to celebrate each week, so I really need to make cards !

As I still had all the products of the last release on my desk, I played with them again.


For my first card I used the Framed- Floral Vines set that I really love, it is so versatile. On a white card stock I stamped the frame and I heat embossed it with gold embossing powder. Then I coloured it with markers. 

When I wanted to mount this panel on the double white card, I found that something was missing so I played with the little circles from the Floral Vines set and I stamped and gold heat embossed them on the double white card and I coloured them with colour pencils. 

I foam mounted the framed panel on the double card. I stamped and gold heat embossed a little frame on a piece of Vellum. I fussy cut it and I glued it on the panel. To finish I stamped and I heat embossed the sentiment from Simply Said Blocks and I adhered it on top of the Vellum.


I went for a masculine look for my second card. If you know me, you know how much I love blue. So when I received the last release, I couldn't resist and I stamped the Background Blocks Solid Wonky Stripes in shades of blue. And of course I immediately saw some waves and I knew that I wanted to combine it with the Nautical Treasures sail boat. 

To make a visual game with lines, I also stamped some thin stripes on the sails with the Background Blocks Pinstripe. 

To finish my card, I stamped and white heat embossed the sentiment (from Simply Said). I foam mounted the wonky stripes background on a double card and I also foam mounted the sail boat previously fussy cut.


For my last card, I opted for old goodies : the Spring botanicals Tulip stamp set and the Broken Lines stencil.
Some time ago I received a gift card for a Art Supplies shop and I finally bought the Minc foil applicator machine. Only recently I bought some gel to use it with stencil. I decided to try it as a background for these beautiful tulips, and I really love the result.

I used the no-line colouring technique for the tulips and I played with my colour pencils to give them some dimension. The broken lines background is foam mounted on the double red card and I adhered the tulip with little adhesive foam squares.

Now here is a sneak peek of the birthday card I made for the Less is More challenge that starts today...


I hope that my cards will inspire you to make your birthday cards stash growing and/or to come and play along at Less is More.

Thanks so much for visiting today. Have a fabulous weekend, stay safe and get crafty !


Monday, 12 April 2021

Merry Monday - BA Inspiration

 Good morning folks, Julie here with a little bit of BA Inspiration. 

In keeping with my aim to create all my Christmas cards before the end of November, I'm back with some Merry and Bright Christmas inspiration for you.


For my inspiration, I used the latest challenge over at CAS Christmas, where their cue word this month is RAINBOW. Rather than use the larger stamps from our Christmas sets, I used some of the smaller ones and used them in unusual ways in a rainbow theme.

My first card uses the tiny tree from Christmas Pop and stamped it in a rainbow pattern following the line of my die cut snowdrift. 


I first cut a snowdrift from some scrap card and traced a line in pencil as a guide for my stamping, then starting roughly in the center and working outwards, I added my rainbow of trees. After stamping the sentiment from Festive Sentiments onto the snowdrift, I glued it onto my card, as simple as that.

My second card is probably my favourite of the three. When I was teaching, many years ago, Rene Magritte was one of the artists that we used as inspiration, especially the paintings where he paints features of the face but without the actual face being there, such as Les Belles Relations and The Paysage de Baucis. The features are in the correct anatomical place so your brain fills in the gaps. This card is a little like that, this time it's Rudolf!


The antlers are from Background Builders:Vines, Winter Additions, the baubles are stamped with the small flower center from Wonderful Day and his nose is the flower center from Kindness Blooms. His eyes were drawn freehand with a black fine liner and his nose was made shiny by the addition of some Glossy Accents. A few hand drawn lines for the strings and the same sentiment from Festive Sentiments completes.

My final card was a little trickier to make and had a bit of a shaky start!


My first attempt ended up in the bin as I managed to get an inky splodge in the bottom corner after I had completed it, this is the second attempt, after an initial dry run on some scrap paper!
I doodled some lines in the rough shape of a tree in pencil before adding the bulbs from Background Builders Christmas 2018. Once the ink was dry, I drew over the pencil lines with a black fine liner then left it again to dry before rubbing away  the pencil lines and coloured the bulbs with my Zig watercolour markers. To give the bulbs more impact, I gave them a coat of Glossy Accents, the same sentiment completes.

Well that's about it from me for the moment. I hope I've inspired you to use those tiny stamps that sometimes get forgotten and to think outside the box when it comes to your cardmaking. 

Keep safe out there.