Thursday 27 September 2018

Four designs from one piece of stamped card

Happy Thursday ......

Good morning ... it's Linda here.  I hope you're having a great week.

I've got a technique for you today which is my take on a Jennifer McGuire video which she called the Edge Stamping Trick. 
The difference is, I did my stamping onto one piece of cardstock and then cut it into separate pieces to make four cards.  Jennifer created two cards stamping two pieces of card together.

Here's what I mean ......


The finished cards are 6 x 4 inches, great size for note cards, or little Thank Yous.
This technique is great for using those larger stamps but as you can see, you can also get great results using your smaller stamps too.

I started out by cutting a piece of white card stock to 6 x 8.5 inches and I drew pencil lines down the middle, both top to bottom and side to side, to find the centre
I then stamped my image across where my pencil lines meet, and over all four corners.  This pretty floral is from the So Much stamp set


I quite like having my designs on the diagonal, on opposite corners, but if you wanted to you could also stamp your image across the pencil lines on the edges and create more of a frame.

I then cut the card into four pieces ..... and coloured in the flowers using ZIG markers
I now have the start of four cards ..... all the same, but each one different if you know what I mean


Next, I stamped and embossed my sentiments/greetings in the centre of each piece.
There's lots of fabulous words and greetings in the Uniko range. 
I've used stamps from All Occasions Sentiments #6 (one of my favourites)


teamed with Simply Said Blocks


The next one is from Spring Botanicals Daffodil ...... love this saying


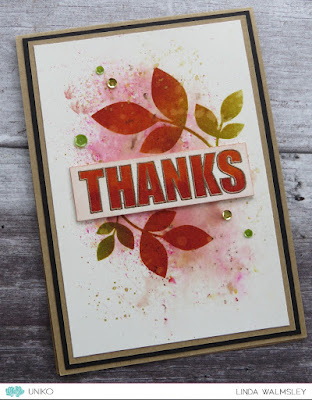
The Thank You is from the So Much set .......


And the last one comes from Happy Succulents  ...... I love how all the stamps just go together so well


I added a few ink splatters here and there .......


and a few dots of glitter glue to add some sparkle.


I created a bit more interest to the backgrounds by adding a little bit of stenciling using the Broken Lines stencil across the bottom half of each card


It's nice to use your stencils as little accents on your cards, you don't always have to use the whole of the design.

Thanks for popping by ..... enjoy the rest of your day.

Cheerio until next time ......

Tuesday 25 September 2018

CAS Colours & Sketches #291 - Sketch

Hello!

I'm back from my family vacation and almost back on UK time! I'm here today with my CAS Colours & Sketches DT card. This month Samantha is our hostess and has hosted some fabulous challenges this month, along with this weeks sketch HERE and seen below...


I was sitting at my desk wondering what stamps to use and then it came to me that Christmas is fast approaching and I've hardly given it a thought! So, I reached for my Stunning Snowflakes clear stamp set and put it to good use! 


I've used a trio of Altenew inks to stamp the snowflake trio, which I have then fussy cut and adhered to a white mat layer using 1mm thick foam adhesive. This layer is also adhered using foam adhesive to a Coastal Cabana card stock base. The sentiment is also from the same stamp set and I added some little sparkly rhinestones to finish the design off.


That's all from me today, I hope thatI have inspired you to join in on the challenge?! If you need a little more inspiration, pop on over HERE to see what the CC&S Design Team have created.

Thanks for stopping by!
Hugs

Monday 24 September 2018

Winners WINNERS!

Hey!

I am back from my family vacation, just about back on UK time and almost recovered from the jet lag! Now is the task of catching up on all my outstanding jobs, including announcing lots of WINNERS!! 

Apologies that this has taken me so long :( 

Anyway, first up I have the WINNER of the August 2018 Release Blog Hop. With the help of random.org the lucky comment is...


Wonderful cards, Izzy. I love what you did with the Framed Florals and your last card is absolutely stunning!
Congratulations Marianne! Please send me an email to bev@uniko.co.uk no later than 15th October 2018, along with your postal address and I will get your prize in the mail to you!

Next I have the WINNER of the September 2018 Design Team Blog Hop. With the help of random.org the lucky comment is...

Karthikha said...
Wonderful work :) So colorful :)

Congratulations Karthika! Please send an email to bev@uniko.co.uk no later than 15th October 2018 and I will email you your £20 eGift Certificate.
Thank you to everyone that joined in on both the blog hops and left such lovely comments. I will be having more giveaways soon on Social Media, so keep an eye out!! 
Hugs

Uniko August stamps Release in review

Hello everyone Rahmat here.
I am up with a few cards using the August release stamps, I was away and I didn't had the chance to be part of the release hop.
I am using the Big and Bold Hello, Framed Florals and Beautiful stamp sets.
I have stick to the same color schemes for my projects.

For the first card, I first stamped the Framed florals in Versafine watermark ink and then I used the versafine onyx black ink for the bold hello.
Then I used the markers to color the florals.
I then trimmed the framed part, and mounted it on a patterned pre-cut base. To finish off, I added a few black jewels.


For the second one, I have used another pre-cut base.
I stamped the flowers on a white card stock and watercolored using zig clean color markers and Staedtler Marsgraphic markers, fussy cut only the top, and added using foam adhesive.
I added a black strip at the bottom of the card. The sentiment is stamped on the base, a few black jewels to finish off.


     Thank you for stopping by, I really appreciate your kind  feedback :) Have a great day!
                                                                     

Friday 21 September 2018

Uniko Challenge #49 - Wonderful World, Optional Twist THANKS

Hey! 

Welcome to theSeptember/October, 2018 Uniko challenge. 

This month we have a super easy theme for you - Wonderful World, with the optional twist of THANKS. And although the graphic features Autumn leaves there are many other ways to interpret this theme. Just take a look around you when you're out and about and be inspired!


We've the wonderfully talented and awesome Hannelie from desertdiva joining us as our Guest Designer for this challenge. I'm sure you all know her blog and it's always a delight to pop by and say hello to her - HERE. Here's her gorgeous card:


And the first half of the Uniko DT have also made cards to inspire and encourage you to play along.

Carol


Izzy


Jane


Julie B


Linda


So are you ready to play along?


Well, just in case you need some more incentive to play along with the challenge here are the details of the prizes.
  
THE PRIZES
  • Main Winner Chosen By the DT - £25 eGift Certificate
  • Random Twist Winner - £4 In Stock Clear Stamp Set of Winners Choosing
  • Random Uniko Stamps Winner - £4 In Stock Clear Stamp Set of Winners Choosing
  • Top 3 Chosen By DT - 150 Loyalty Reward Points

You've got plenty of time to play along with this challenge. The deadline for submission is midnight (GMT) on Friday 26th October 2018 (7.00pm EDT).


Hugs,


Wednesday 19 September 2018

DT Inspiration - One year

Bonjour !

Izzy here. Today it's been just a year and a month since I joined the wonderful Uniko team. In fact I wanted to do this post a month ago but it was the day of the new release.

To celebrate this I revisited some products that I particularly love and that were released in this period of time.

I'm starting with my favourite one I think the Kindness Bloom combined with the Birthday Sentiments set.


I played with the smaller stamps of this set, inking them randomly in different colours all over the double card front. I stamped the bold birthday wished on a die cut scalloped white square. This was then foam mounted onto the double card.

On a separate white card stock I stamped the blooms and I fussy cut them. Then I foam mounted them on the scalloped square corner. To finish, I glued some jewels.

My next card uses the marvellous Bee Happy stamp paired with the Beautiful stamp set and the Stylised Floral stencil.


On a square white card stock I used the stencil with Twisted Citron Distress ink that I blended softly to make a gradient. Once done I cut a part of it and I matted the two parts onto a black double card in order to reveal a black stripe. 

I stamped the adorable bees on a separate card stock, I coloured them with colour pencils and I fussy cut them. I assembled the Bee Happy and the Beautiful sentiments together in order to make one single sentiment. Finally I stamped the dotted spiral to give mouvement to the foam mounted bees. 

For my third card I used the Doodle Flower stencil together with the BIG & BOLD Hugs stamp set.


As you know, Distress Oxide spread like butter and blend so beautifully together that it is a pleasure to play with them ! That's what I did with this lovely stencil on top of a square white card. Then I stamped and heat embossed in black the sentiment on a white card stock and I fussy cut it.

I love how the black bold sentiment pops up on top of it with the stitched scalloped frame.

The fourth card is in fact a twofer of the third card...


I've seen in different blogs how to use the Distress oxide inks left on a stencil after blending them through. I wanted to try and I LOVE the result.

They give a much softer look and the negative of the stencil. When I saw the result I immediately knew that I would combined it with the Sweet Baby stamp set.

I also used the Distress Oxide inks to stamp the bold sentiment and the adorable bear. I fussy cut them and foam mounted them on the card.

My final card today uses one of the gorgeous stamp from the Pure Florals collection, the Rose. I love to combine it with the Lattice stencil.


On the card base I used the Lattice stencil in Spun Sugar distress ink. Then on a separate white card stock I stamped the outlines of the rose and of the leaves. I then coloured them with Promarkers and I fussy cut them.

I die cut a stitched border that I matted onto the card base and I adhered the leaves and the rose on top  with glue dots. A lovely sentiment from the Flower Power #1 set is black stamped to finish the card. 

And voilà ! That's all for me today. As you can see, Uniko products all go pretty together, you can combine them in such different ways. There have been many other products during this period of 1 year that deserve your attention as well, so stay tuned, I'll be back soon ...

Thank you for stopping by and have a great crafting day !

Izzy xx


Saturday 15 September 2018

September 2018 Design Team Blog Hop & GIVEAWAY!

Hey!

It's time for another Uniko Design Team Blog Hop & GIVEAWAY - Whoohoo!! For those of you who are new around these parts I will explain what this post is all about...

Here at Uniko HQ it is just myself behind the screen, blogging, designing, packaging stamps & orders through the Uniko online shop, customer service and all the things in between. I *usually* release new product every other month for a number of reasons, but mainly so I can keep up with everything!

On non - release months like this month I like to set myself and the Design Team a challenge to look back at a previously released product and give it some more love. 

Usually I choose just one product that was released the previous year or a once favourite that hasn't seen much air time. However, this time I couldn't decide on the product and as a team we randomly selected a stamp set and then I went a little polka crazy and added in some popular sentiment sets too...


Simply Said Blocks


Simply Said Blocks II


These clear stamp sets and stencils are perfect for all sorts of backgrounds for all sorts of occasions that the Design Team will show you. They are a perfect addition to anyones crafting arsenal!

Anyway, lets see how the design team have been inspired to use the products and be sure to comment along the hop for your chance to win a Uniko £20 eGift Certificate. You have until Midnight (GMT) until midnight BST Saturday 22nd Sept 2018 to comment.