Showing posts with label Let it Snow stencil. Show all posts

Friday, 24 July 2026

Brand Ambassador Inspiration - Christmas in July and a FB VIP reminder

 Hi, Julie here with a quick reminder that there is still time to enter our FB VIP Challenge on the theme of Christmas!

I was thinking what I could use for my inspiration when I can across some Gelli plate prints I made some time ago and it got me to thinking, what could I do with them? I had also recently seen a video on You Tube by Ardyth making a swing card, so I thought I would have a play. Here is my end result.


The Gelli print was made using the Let it Snow stencil and Distressed Oxides in Picked Raspberry and Seedless Preserve which I pimped up with an extra layer in White Gold watercolour paint.

I made a 41/4" square base card from white card and then trimmed my Gelli panel to 33/4", glueing it around the edges only, the reason will become clear next! I die cut a circular aperture using a circle die from The Greetery and removed the two layers. As I hadn't glued the center down, I could use the center of the panel for the middle of my card! To make it stand out against the other panel, I added more Seedless Preserve DOx and then die cut a slightly smaller circle from it, this was then glued to my white circle.

To create the center of the card, I cut a panel of white card 4"x 8" and then scored it at 21/2", 41/2" and 61/2". The rest of my Gelli panel was cut into 2 strips 33/4" x 13/4" and glued them to the two middle panels.

The largest panel was glued to the right of the center fold of the card and the smallest to the left of the front panel. If you follow the link Ardyth explains it so much better!


I cut a Snowflake using the Sparkling Snowflake die but it was too large to fit through the opening, so I trimmed it down and added it to my pink circle. The sentiment from Pattern Building Christmas Tree stamp set was stamped in Picked Raspberry DOx and added before I glued the the die cut onto the inner panel. Again Ardyth explains it wonderfully!

Ardyth says that she is obcessed with this design and I must admit I am too!!

So if you haven't joined in over at FB why not have a play and join us there?!

Happy crafting! 


Tuesday, 16 July 2024

Brand Ambassador Inspiration - Christmas in July

Good morning, 

As it’s July, I’ve chosen to go with the Christmas in July theme for my Uniko Brand Ambassador inspiration. Uniko has lots of wonderful Christmas stamps and stencils (matching die sets available too!). 

For my cards I have focussed on the Uniko Let It Snow stencil. 


For my first card I have used Versamark ink through the stencil and heat embossed in white embossing powder, directly onto the Kraft card base. I then die cut a smaller rectangular piece of white card and used the inner word die from the Uniko Big & Bold Snow die set to cut the word snow towards the bottom of the panel. I used a separate piece of white card to stamp and heat emboss the snowflakes and 'let it' sentiment all from the Uniko Big & Bold Snow stamp set. 


For this card, I started with a panel of white card and used glitter paste to create a fabulous background (so sparkly!). On a smaller piece of white card I heat embossed the sentiment and snow swirls from the Uniko Big & Bold Snow stamp set. 

My final card uses a 'smooshed' background created using Picked Raspberry and Broken China Distress Oxide inks. Once dry I used Versamark ink through the stencil and heat embossed in white. On a spare piece of smooshed card I die cut the inner word die from the Uniko Big & Bold Snow die set and white heat embossed the smallest snowflakes from the Uniko Big & Bold Snow stamp set. I die cut the inner word from white card two more times and adhered them behind the smooshed one to create dimension. I adhered this to the outer word die cut from white pearl card, before adhering directly to the card front. Finally I added the rest of the sentiment from the Uniko Big & Bold stamp set, stamping this in Pickled Raspberry ink. 

Which one catches your eye?

Much love

Steph x

Sunday, 22 October 2023

Stencil Sunday BA Inspiration - One design Three stencils

Bonjour !

Izzy here with a Stencil Sunday for my Uniko Brand Ambassador inspiration. As my dear teamy Steph was mentioning it in her last Brand Ambassador Inspiration post, Christmas isn't all that far and I then realised that I don't have a lot of Christmas cards in my stash !

If my mojo is very low at the moment, Steph, with her gorgeous Christmas cards made me want to play with my Uniko stencils. So I took off my stash my favourite Uniko's stencil when it's about Christmas and I made this first card.


I love the In the Forest stencil, since it has been released, I have used it every year for my greeting cards. Here I used it directly on the double white card and I brushed two shades of green and a bit of black. The result was nice but I wanted even more firs. So I turned the stencil and I brushed another layer of the same inks.

On a piece of white card stock I stamped Santa from the Jolly Christmas set, I coloured it with coloured pencils and I fussy cut it. I die cut a square of Vellum paper on which I stamped and I black heat embossed the sentiment coming from the Background Builders Christmas 2018.

To finish my card I foam mounted Santa on the Vellum. I turn the Vellum and I put squares of foam tapes behind before adhering it on the card base.

As I loved how we can see through the lovely design made with the stencilling, I kept this design for my two other cards.


For this second card, I used the Winter Foliage stencil that Bev recently used for her beautiful card (see HERE). With a small brush, I applied the different colours.

On the Vellum, I stamped and I gold heat embossed the sentiment coming from the Christmas Wishes set. I stamped the foliage from the Winter Foliage set and I die cut each piece with the matching dies.

I assembled the card in the same way as the previous one.


For this last card I brushed non-traditional colours through the Let is Snow stencil to make my background. 

After looking for what I could put on the Vellum, I tried these little trees from the Background Blocks Scandinavian Christmas set.


I coloured them with Promakers, I fussy cut them and I foam mounted them on the square of Vellum on which I previously stamped and black heat embossed the sentiment from the Christmas Sentiments set.

To finish my card and to make these little trees even brighter I put some Stickles on them.

Well, that's all the Jolly, Bright and Merry I have to share with you today. Have a lovely Sunday and thank you so much for stopping by.


Tuesday, 17 October 2023

Brand Ambassador Inspiration - Snowflakes

Good morning everyone, 

Steph here today with my Uniko Brand Ambassador Inspiration for this month. 

We seem to be having a mix of weather in the UK from heat waves to all of a sudden very cold and autumnal weather and then back to warm weather again. So I thought I'd throw in a few snowflakes just to remind us that Christmas isn't all that far away...yes I'm trying to ignore that fact too! 


My initial idea was to have three beautiful inked panels peeking through a die cut aperture of the snowflake but I really didn't like it once I had done so I resurrected the remainder of the panel and inset a beautiful silver snowflake instead. Here I have used Uniko Let It Snow stencil with white ink and Uniko Sparkling Snowflake die. The sentiment is from the Uniko Christmas Sentiments stamp set. 

My next cards are slightly different as I didn't have enough of the remaining inked panels to use as above. So I adapted the design and used the snowflakes cut from the panels instead. 


I like the patterned snowflakes against the plain card base for some CAS cards ready for Christmas. For these cards I have use Uniko Christmas Folk Snowflake stencil and Uniko In The Forest stencil.

Much love
Steph x

Monday, 15 November 2021

Merry Monday, Some Pastel Christmas BA Inspiration

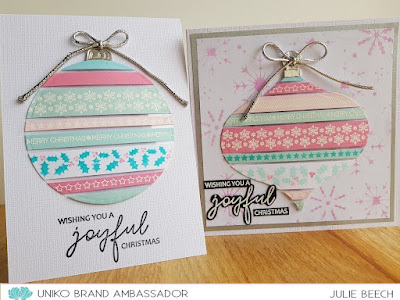
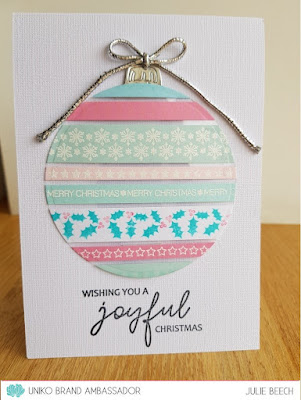
Good morning, Julie here with a little bit of festive inspiration. I've been wanting to try the floating strip technique for awhile and decided to turn the end result into a Christmas bauble. I originally thought of a simple circular one but in the end I used a really ancient bauble die as well!

Here are my two cards. 


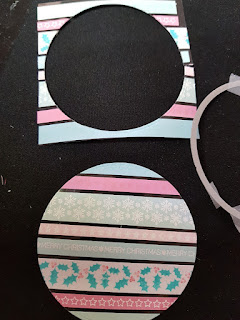
The technique is the same whether you use a basic circle die or a more complex shape die to create your bauble. All you need is a piece of acetate slightly larger than your die and some strips of card!
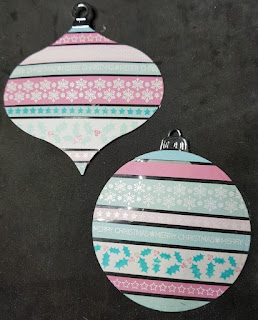
To make mine, I used Background Builders Christmas and Background Builders Christmas 2018 and a variety of pastel coloured card for a non traditional look. Some elements I heat embossed with white EP, others I simply stamped with ink. You could just use some bits of DP as well.
Using double sided tape I added the strips to my acetate background, leaving a small gap between each one. I used some scrap acetate that was from an old brochure, you don't need the good stuff. When covered, I trimmed off the excess.


Then, using a circle die I cut into the acetate panel, a couple off passes might be needed depending on the thickness of the acetate. If it doesn't work after a couple of runs through your machine repeat or remove the die and carefully run a pair of scissors around the impression to free the die cut.


I repeated these steps to create the decorative bauble die also and added a fixing using the matching die in silver and a cut down one from another die for the plain circle one.


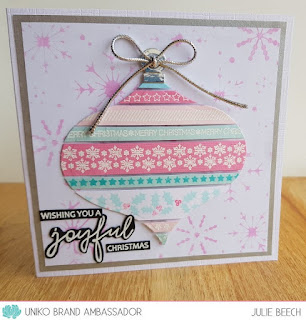
Once I had completed each bauble I was ready to create my cards. After a bit of toing and froing, I used a Gelli plate background using the Let it Snow stencil for one and kept the other plain.


I used a 51/2" square base card, matting the stencilled background on some silver paper before adding the bauble. I used pads down the middle and glue along the edges to give it some shaping. A simple silver chord bow and a trimmed and fussy cut, white, heat embossed sentiment from Christmas Wishes on black completes. I fussy cut the sentiment as I wanted it to look a little lighter than using a solid sentiment panel.

My second card has the bauble attached as before but onto a linen effect, white, A6 note card and a simple stamped sentiment.


So that's all from me. I hope I've given you an idea to help you make your Christmas cards. I think I'm almost there with my Christmas makes but there are always last minute ones to make!

Stay safe out there 'til next time and keep crafting.

Monday, 20 September 2021

Brand Ambassador Inspiration, Spinning Snowflake

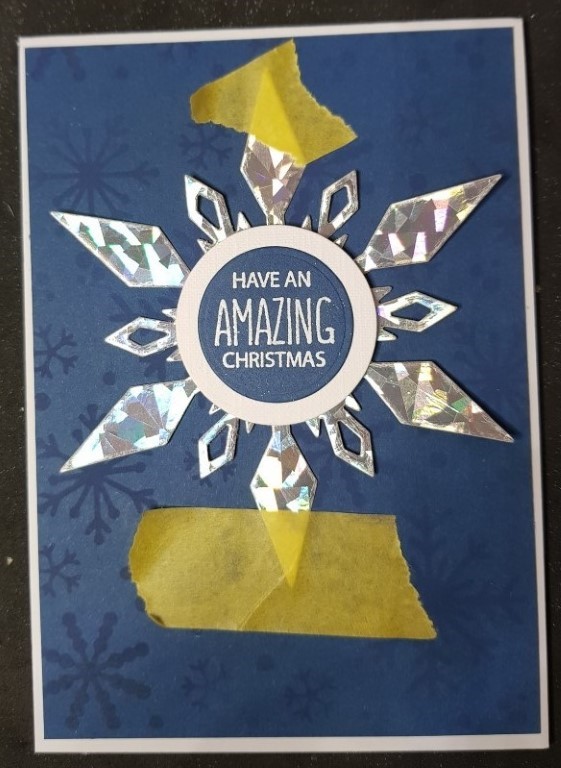
 Good morning folks, Julie here with a bit of brand Ambassador inspiration. Today I'm embracing my inner Jennifer McGuire with a take on a spinning card I saw her make on You Tube. The snowflake on this fun card spins! So grab a cuppa and settle down, there are lots of photos and instructions to follow plus a very short video, if it works!


To start, I took the Sparkling Snowflake Designer Die and cut out one snowflake from holographic card, then, using a small circle die, cut an aperture in the middle.


The size of the aperture needs to be just slightly larger than a flat sided button. It has to be flat and not domed to allow the spinning action.


On a panel of blue card, slightly smaller than an A6 card base, I inked through the Let It Snow stencil with Chipped Sapphire DOx. This gives a subtle background for the star of the show! This was then glued onto an A6 white base card, leaving a white edge showing.

The greeting in the center of the snowflake is made up from sentiments from Doodle Flowers and a new Christmas sentiment set coming soon! Using some of the same blue cardstock, I die cut a slightly larger circle than the opening and heat embossed the sentiment with white EP. This was then mounted onto a circle of white card, I found in my stash!

To attach the snowflake to the spinning mechanism is so easy. Place the snowflake onto the inked panel, a little bit of low tack tape keeps the die cut in place, and carefully glue the button of your choice into the center, careful not to get glue on the snowflake. 


Once the glue on the button is completely dry add some to the top, again keeping it away from the snowflake, and add the sentiment.

Once the glue is dry the snowflake can spin to it's heart content!
Take a look.

So that's that, hope it encourages you to have a go, it's really simple but looks fab and it's fun!
Keep safe and keep crafting, 'til next time.

Sunday, 13 December 2020

Countdown to Christmas Day 13 - Stencil Sunday

 Hey & Happy Sunday!


There was LOTS of excitement here yesterday as Santa came by our road on wheels! Yep, he drove by on an open top bus to wish all the children a Happy Christmas 2020 style. It made up for us being in a high Covid tier and not being able to do so many of the usual festivities with The Beans this year. Here are a couple of photos I took as I know many of you enjoy seeing and reading about what they get up to.


With that excitement I was feeling festive too and as I am without an oven until Tuesday (fingers crossed) I wasn't able to do any baking today, so I made todays Countdown to Christmas cards early ;) I've really enjoyed using all my Christmas supplies and as well as reaching for the NEW products, I have been dusting off the older ones too.


Today, I had a card layout in mind and I used it for both cards but simply switched the stencil design and the colours. First up I gave some fresh inky love to Stencil - Scandinavian Christmas.


For some reason I always reach for red or white to ink up this stencil. It is certainly a favourite and with the detail in the pattern the card doesn't need much embellishment. I did however ink through the stencil with a clear embossing pad before removing to heat emboss some sparkle!


I used a wavy scalloped border die (Mama Elephant I think) to create a detailed edge along the red sentiment layer and I gold heat embossed the Season's Greetings sentiment from the NEW Christmas Wishes clear stamp set.


Next I inked up the Stencil - Let it Snow and used the exact same card layout and just switched up the colours to my 'go to' snowflake combo! 


I love shades of Aqua / Turquoise for snowflakes and I used Altenew Aqualicious for to ink up the snowflakes. Again, before removing the stencil I inked over with a clear embossing pad and used my Stardust embossing powder to add some sparkle. 

I also heat embossed the Let it Snow sentiment, another from the NEW Christmas Wishes stamp set. This sentiment set is packed full of festive sentiments and combinations. 


That's all from me today, but I will be back tomorrow with more to share. Today is 'homework' day for The Beans! We have a few options to choose from, but they have selected to make a Santa's workshop. Well, in their words its a Goomba (character from Super Mario) and a Caterpillar workshop! 

Thanks for stopping by & have a lovely Sunday.
Crafty Hugs Bev x


Tuesday, 31 March 2020

Uniko Brand Ambassador...Snowflake Shaker

Hello,
Carol here with my Brand Ambassador Inspiration post for March.  

The calendar says Spring has sprung but, where I live, apparently Winter didn't receive the memo, as we're in the midst of yet another bout of snow and cold temperatures. More reason to stay inside and all the more reason to complete a card that I had started back in January! I know I 'should' be showcasing Uniko's gorgeous blooms but...the 'muses' called for something that befits the weather we're having! Let's just call it a 'winter' flower rather than a snowflake *grin*

Full-panel acetate-wrap shaker (so easy!) featuring: Let It Snow stencil background, Designer Die Sparkling Snowflake and a sentiment from Simply Said Blocks: Christmas.


Hopefully, March's blustery departure will herald a lovely April arrival (minus any April Fool's shenanigans)!

Friday, 20 December 2019

Uniko Brand Ambassador Inspiration...Dreaming of a White + Pop of Colour Christmas

Hello,

Okay...I am still NOT done sending Christmas cards and, I suspect, still have a few more to make! OHMYSTARS, but I'm behind!  That said: Carol here welcoming you to my Uniko Brand Ambassador Inspiration post!

Fortunately, I have several lovely Uniko stencils and sentiments on hand, as well as some translucent gel and plenty of glitter to create cards (5 here) that are super simple AND super sparkly! While this isn't 100% mass-production - as I've used various stencils - the embossed sentiment fits that bill. I simply arranged the words on my Misti, die-cut my cardstock, added Versamark ink and white embossing powder and, in a few waves of my heat gun, had my sentiments all done. The hardest part: waiting for the glitter to dry! Yes, yes...I could have used pre-mixed glitter gels/shimmer pastes but my stock is running low. It was way more fun to 'glitter me (and Lily and my craftroom) silly'!

I did my best to capture the sparkle in my photos but didn't do them justice. Please use your imagination a bit...these really do shimmer and twinkle!

Uniko Products:

Sentiment: 

Stencils: 


To those receiving these cards...sorry/not sorry *grin* that some glitter may sparkle parts of you, too!

May the gifts of peace, love and joy be yours this Christmas and throughout the New Year!

Merry Christmas!!

~carol

Sunday, 8 December 2019

Stencil Sunday

Good morning and welcome to another Stencil Sunday at Uniko.
It's Julie here this month to share three cards using one layout but three different stencils and colourways.

Last year ,as part of the Christmas release, I made this card using unconvential colours and the Let it Snow Stencil, so I thought I would use the same layout and see what happens when you change up the colours and/or the stencil used. Here are my three takes using the same layout.


This card uses the In the Forest stencil and a trio of green inks from Altenew's Tropical Forest set.


Initially, I was going to use a gold die cut JOY but I preferred the green glitter card with a red background. The touch of red fun foam peeking from behind the green glitter card links it to the colour of the background panel and makes the green pop against the stencilled panel. This is a case of colours opposite on the colour wheel being used to make each of the colours stand out, the green looks greener and the red reder. The same would be true of Yellow/Purple and Orange/Blue combos.
The stencilled panel was made by simply attaching a panel of white card under the stencil then adding each green randomly until all the trees were inked, not worrying too much where each colour went. I think the effect is more interesting than using just the one solid colour. 
The die cut JOY was purchased from The Works but the stamped sentiment panel uses a retired Uniko set. Sequins from the stash complete.

This next card uses the new Winter Foliage stencil .


This time I used small make up brushes to add ink to each separate image. I picked them up at Lidl, as well as some larger ones, just like the Picket Fence blender brushes you can get, but a lot cheaper and there was a great range of sizes. You can really get into those small areas without getting ink into the wrong place. My background card was chosen to match the holly leaves and to keep with tradition, went with a red glittery JOY, minus snowflake, which like the previous card I fussy cut away before adding the fun foam. A few red Stickle berries complete this time.

My third card is virtually the same card using the Let it Snow stencil, as last year, but this time in shades of blue.


I think it's good practice to try to match inking to base cards and trim, if you are using them, it creates a more cohesive design. This time I used DIs in a mixture of Chipped Saphire, Blueprint Sketch and Salty Ocean. I didn't pop up the die cut on foam this time and also kept the snowflake, sequins from the stash complete.


So I hope I've managed to illustrate that simply by changing the colours used, the stencil or both, you can stretch your Uniko supplies and have some fun along the way!

Happy Christmas crafting!