Showing posts with label Sparkling Snowflake Designer Die. Show all posts

Friday, 24 July 2026

Brand Ambassador Inspiration - Christmas in July and a FB VIP reminder

 Hi, Julie here with a quick reminder that there is still time to enter our FB VIP Challenge on the theme of Christmas!

I was thinking what I could use for my inspiration when I can across some Gelli plate prints I made some time ago and it got me to thinking, what could I do with them? I had also recently seen a video on You Tube by Ardyth making a swing card, so I thought I would have a play. Here is my end result.


The Gelli print was made using the Let it Snow stencil and Distressed Oxides in Picked Raspberry and Seedless Preserve which I pimped up with an extra layer in White Gold watercolour paint.

I made a 41/4" square base card from white card and then trimmed my Gelli panel to 33/4", glueing it around the edges only, the reason will become clear next! I die cut a circular aperture using a circle die from The Greetery and removed the two layers. As I hadn't glued the center down, I could use the center of the panel for the middle of my card! To make it stand out against the other panel, I added more Seedless Preserve DOx and then die cut a slightly smaller circle from it, this was then glued to my white circle.

To create the center of the card, I cut a panel of white card 4"x 8" and then scored it at 21/2", 41/2" and 61/2". The rest of my Gelli panel was cut into 2 strips 33/4" x 13/4" and glued them to the two middle panels.

The largest panel was glued to the right of the center fold of the card and the smallest to the left of the front panel. If you follow the link Ardyth explains it so much better!


I cut a Snowflake using the Sparkling Snowflake die but it was too large to fit through the opening, so I trimmed it down and added it to my pink circle. The sentiment from Pattern Building Christmas Tree stamp set was stamped in Picked Raspberry DOx and added before I glued the the die cut onto the inner panel. Again Ardyth explains it wonderfully!

Ardyth says that she is obcessed with this design and I must admit I am too!!

So if you haven't joined in over at FB why not have a play and join us there?!

Happy crafting! 


Tuesday, 17 October 2023

Brand Ambassador Inspiration - Snowflakes

Good morning everyone, 

Steph here today with my Uniko Brand Ambassador Inspiration for this month. 

We seem to be having a mix of weather in the UK from heat waves to all of a sudden very cold and autumnal weather and then back to warm weather again. So I thought I'd throw in a few snowflakes just to remind us that Christmas isn't all that far away...yes I'm trying to ignore that fact too! 


My initial idea was to have three beautiful inked panels peeking through a die cut aperture of the snowflake but I really didn't like it once I had done so I resurrected the remainder of the panel and inset a beautiful silver snowflake instead. Here I have used Uniko Let It Snow stencil with white ink and Uniko Sparkling Snowflake die. The sentiment is from the Uniko Christmas Sentiments stamp set. 

My next cards are slightly different as I didn't have enough of the remaining inked panels to use as above. So I adapted the design and used the snowflakes cut from the panels instead. 


I like the patterned snowflakes against the plain card base for some CAS cards ready for Christmas. For these cards I have use Uniko Christmas Folk Snowflake stencil and Uniko In The Forest stencil.

Much love
Steph x

Tuesday, 29 August 2023

BA Inspiration - Technique Tuesday, Using Sentiment Stamps For Backgrounds

 Good morning Uniko fans, Julie here with another BA post using sentiment stamps in a background. I love using sentiments for a background and have shared many ideas over the years such as here, here and here but this time I've been inspired by Jennifer McGuire to use a turnabout jig to create one.

Here's my first idea, using English Country Garden stamps and dies and some birthday themed sentiments.


I started with an A6 panel of white card and using a freehand cut shape to match my jig middle, I glued it temporarily onto the center of my panel and secured my jig into my MISTI. To get a feel for my layout, I started with the largest sentiment stamp and set off, turning the panel after each time I stamped. Once I could see where the gaps were, I used smaller sentiments to infill and repeated the stamping and turning. 
I stamped my butterfly on one of 3 white butterfly die cuts and coloured it with Copics. From the remaining die cuts, I removed the antennae and lower half of the body and folded them in half down the middle. These were then glued to each wing, meeting at the center and the other flaps were glued over the turnabout panel.  My panel was trimmed and added to an A6 white note card.

I rather liked the effect of the dancing butterfly over the sentiments, so tried another idea out, this time using the Sparkling Snowflake die and some appropriate sentiments.


This time I used Altenew Iceberg ink for the stamping, some of which I double and even triple stamped to increase the saturation of colour. Instead of using all 8 points of my stamping jig, I just used every alternate one, it gives a slightly different effect and I was able to use more sentiments.

The main snowflake was cut from holographic silver card and two others from matching white card folded down the middle and attached the same as the butterfly. One of Bev's sentiments describes the effect perfectly, Snowflakes are winter's butterflies!

So that's all from me for the moment, hope I've given you some inspiration for you to give it a go
Stay safe and keep crafting!

Monday, 20 September 2021

Brand Ambassador Inspiration, Spinning Snowflake

 Good morning folks, Julie here with a bit of brand Ambassador inspiration. Today I'm embracing my inner Jennifer McGuire with a take on a spinning card I saw her make on You Tube. The snowflake on this fun card spins! So grab a cuppa and settle down, there are lots of photos and instructions to follow plus a very short video, if it works!


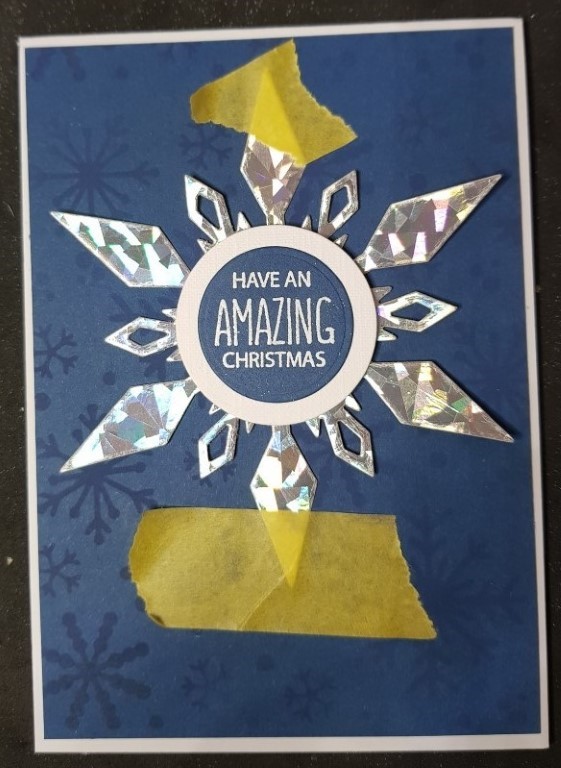
To start, I took the Sparkling Snowflake Designer Die and cut out one snowflake from holographic card, then, using a small circle die, cut an aperture in the middle.


The size of the aperture needs to be just slightly larger than a flat sided button. It has to be flat and not domed to allow the spinning action.


On a panel of blue card, slightly smaller than an A6 card base, I inked through the Let It Snow stencil with Chipped Sapphire DOx. This gives a subtle background for the star of the show! This was then glued onto an A6 white base card, leaving a white edge showing.

The greeting in the center of the snowflake is made up from sentiments from Doodle Flowers and a new Christmas sentiment set coming soon! Using some of the same blue cardstock, I die cut a slightly larger circle than the opening and heat embossed the sentiment with white EP. This was then mounted onto a circle of white card, I found in my stash!

To attach the snowflake to the spinning mechanism is so easy. Place the snowflake onto the inked panel, a little bit of low tack tape keeps the die cut in place, and carefully glue the button of your choice into the center, careful not to get glue on the snowflake. 


Once the glue on the button is completely dry add some to the top, again keeping it away from the snowflake, and add the sentiment.

Once the glue is dry the snowflake can spin to it's heart content!
Take a look.

So that's that, hope it encourages you to have a go, it's really simple but looks fab and it's fun!
Keep safe and keep crafting, 'til next time.