Showing posts with label Winter Foliage. Show all posts

Saturday, 19 July 2025

Seasonal Sentiment Saturday - 12 Days of Christmas Giveaways Day 9


Happy Seasonal, Sentiment Saturday! 

Welcome to day 9 of the 12 Days of Christmas Giveaways. The days of inspiration and giveaways are just flying by. This time next week we will have started the countdown to the Christmas in July New Release!

Today I thought it would be nice to let those sentiment stamps shine and take the stage for our Christmas cards and here is what I came up with.

I started by selecting my sentiment from Christmas Sentiments, Holly Jolly. And because I chose this one I selected the holly leaves and berries from Winter Foliage

And here are the 3 cards I came up with using this combination.


When I know I want to make more than one card with a product or a combination of products like this,  I always sketch out some layouts. That way the creativity flows better. Let's have a closer look at each of them.


One thing I need to start doing, is using more coloured card in my crafting. Even if it's just a little bit like this for a sentiment. I think this just helps draw the focus to the sentiment and adds impact to a CAS card.


Next I wanted a repeating sentiment. I've done this before with the Let it Snow sentiment from this set. You can see the sample on the Christmas Sentiments product page.


Once I stamped the sentiment I created my own stamped patterned paper look with the holly and it was quick and fun to do. 


Lastly I wanted to create a fun focal point with the holly and berries, so I came up with this fun flower style arrangement to add impact to the sentiment.


I started by stamping the holly leaves, 5 of each colour, plus some berries and fussy cut them out. I set these aside until it was time to assemble next to my sentiment once stamped, which I stamped to a thinner panel of white card. This layer again gives a little extra interest to a CAS card. 


If you fancy watching me make these 3 cards in less than a minute, real time 30 mins. Then head on over to YouTube HERE.

Before I go, the giveaway. Be sure to leave a comment by 31st July 2025 for your chance to win the Christmas Sentiments stamp set I've used on this card If you are the lucky winner picked randomly from comments left across Uniko’s social media and already own the products, an alternative will be offered. 

Winners will be announced first week of August 2025.


Crafty Hugs



Tuesday, 14 November 2023

Brand Ambassador Inspiration - Holly

Morning! 

Steph here and I welcome you to my Nov Uniko Brand Ambassador Inspiration post. This month I wanted to focus on Holly.

My first card uses Uniko Framed Holly stamp set and Uniko Most Wonderful stamp set for the sentiment.


I stamped the large frame stamp using very light ink and drew over the lines with an alcohol marker, colouring in the leaves as I went. I have coloured the background in light grey and added Wink of Stella all over for sparkle. I used the extra stamps in the set to stamp individual holly leaves, fussy cut and adhered these to the card front using foam pads. 


My second card uses Uniko Snowflake Serenade stamp set and inked it in light blue. I then used alcohol markers to draw in the holly and berries. The sentiment for this card is from Uniko Christmas Sentiments stamp set. Again I added some Wink of Stella to the holly leaves for sparkle. 


Finally I have used the holly stamps from the Uniko Winter Foliage stamp set and Uniko Festive Sentiments stamp set for the lovely large sentiment. I have added snowflakes from the Uniko Stunning Snowflakes stamp set and used the Wink of Stella on these. 

How are you all getting along with your Christmas crafting? The final card here today is very quick and easy to make if you need to get a few cards done in a short amount of time. 

Much love
Steph x

Sunday, 22 October 2023

Stencil Sunday BA Inspiration - One design Three stencils

Bonjour !

Izzy here with a Stencil Sunday for my Uniko Brand Ambassador inspiration. As my dear teamy Steph was mentioning it in her last Brand Ambassador Inspiration post, Christmas isn't all that far and I then realised that I don't have a lot of Christmas cards in my stash !

If my mojo is very low at the moment, Steph, with her gorgeous Christmas cards made me want to play with my Uniko stencils. So I took off my stash my favourite Uniko's stencil when it's about Christmas and I made this first card.


I love the In the Forest stencil, since it has been released, I have used it every year for my greeting cards. Here I used it directly on the double white card and I brushed two shades of green and a bit of black. The result was nice but I wanted even more firs. So I turned the stencil and I brushed another layer of the same inks.

On a piece of white card stock I stamped Santa from the Jolly Christmas set, I coloured it with coloured pencils and I fussy cut it. I die cut a square of Vellum paper on which I stamped and I black heat embossed the sentiment coming from the Background Builders Christmas 2018.

To finish my card I foam mounted Santa on the Vellum. I turn the Vellum and I put squares of foam tapes behind before adhering it on the card base.

As I loved how we can see through the lovely design made with the stencilling, I kept this design for my two other cards.


For this second card, I used the Winter Foliage stencil that Bev recently used for her beautiful card (see HERE). With a small brush, I applied the different colours.

On the Vellum, I stamped and I gold heat embossed the sentiment coming from the Christmas Wishes set. I stamped the foliage from the Winter Foliage set and I die cut each piece with the matching dies.

I assembled the card in the same way as the previous one.


For this last card I brushed non-traditional colours through the Let is Snow stencil to make my background. 

After looking for what I could put on the Vellum, I tried these little trees from the Background Blocks Scandinavian Christmas set.


I coloured them with Promakers, I fussy cut them and I foam mounted them on the square of Vellum on which I previously stamped and black heat embossed the sentiment from the Christmas Sentiments set.

To finish my card and to make these little trees even brighter I put some Stickles on them.

Well, that's all the Jolly, Bright and Merry I have to share with you today. Have a lovely Sunday and thank you so much for stopping by.


Friday, 20 October 2023

12 Days of Christmas Inspiration & Giveaways - Day 5


Hello & Welcome to the 12 Days of Christmas Inspiration & Giveaways - Day 5

Every Friday, I will have a new Christmas themed card or project to share with you, along with a video showing how I made it. Plus, if you watch the video you will find out what the giveaway is and how to enter for your chance to win 😊 All the videos are HERE on the Uniko YouTube Channel.

In todays video I am giving fresh creative love to one of my favourite Christmas / Winter themed collections, Winter Foliage. This collection includes Winter Foliage Clear Stamps, Winter Foliage Designer Dies and the Stencil - Winter Foliage. I've combined all three on my cards.


I dusted off a few supplies that mostly only come out at Christmas, ribbon and sparkly gold stencil pastes! Making a second card I changed how I made my card a little second time round to make it a little more sleek and how I intended.


And this is the version of the card I made during my video HERE.


I hope you enjoy the video and don't forget you need to watch to find out about the giveaway and how to enter to be in the chance of winning. If you have any festive requests for upcoming 12 Days Of Christmas videos, please add them to the comments here or on any of Uniko's social media.

Crafty Hugs


Monday, 17 July 2023

Merry Monday - Winter Foliage

Hello & Happy Monday! 

Today I was inspired to create a card using the Stencil - Winter Foliage paired with some of the Winter Foliage clear stamps.


I started with the stencil and used a small blending brush from Waffle Flower (shader 0) to colour each of the different elements in the stencil design. I then cleaned my stencil and placed it back over, using Nuvo Moonstone Glimmer Paste to add the beautiful sparkle.


I then embellished the card with a sentiment from Simply Said Blocks Christmas and the holly leaf & berry cluster from Winter Foliage, using the coordinating Designer Dies Winter Foliage to cut them out. Both the sentiment and holly cluster are adhered to the card using foam tape.

That's all from me today, it's back to sorting stock from being in Doncaster on Saturday and preparing lovely samples for the up coming release 😊 Plus all the things I feel I *need* to get done before school is out for summer after Thursday! 

Crafty Hugs

Saturday, 1 July 2023

Hello July!

Hello July and welcome to...


This month myself and the Uniko Brand Ambassadors will be getting into the Christmas spirit and sharing inspiration using Uniko's current Christmas products in preparation for a NEW release, with countdown to release celebrations and inspiration starting 31st July. New products will be available Sunday 6th August.

Don't worry, if you're not quite ready for getting in the Christmas spirit, we will still be sharing other inspiration too! 

However, I'm kicking things off with a couple of cards using Framed - Holly as the main feature of may cards. 


As you can see, I am still on this vellum technique. It's fun trying out different stamps with this technique and this framed was calling for it.

I've stamped the frame in VersaMark and heat embossed in white. I then used just a trio of Stampin' Up! Stampin' Blends to colour on the reverse. I then adhered this to my card base using a fine tip glue and embellished the card with a sentiment from Christmas Wishes and a cluster of Winter Foliage. I finished off with a few red Nuvo drops.


The creative inspiration was flowing, so I went on to make a second card using Framed - Holly. 


This time I decided to stamp the frame in black ink and colouring with the same trio of markers. I then added the same sentiment stamped and embossed in gold. 


I decided the card needed a bit of dimension. So I stamped the image again and selectively coloured a few of the holly leaves, before fussy cutting them out and adhering them using foam tape. This creates a subtle raised spotlighting effect. 

I trimmed the frame and adhered it with double sided tape to a piece of Concord & 9th Poppy card before adhering to my card base using foam tape.

That's all from me today, thanks for stopping by.

Crafty Hugs 


Friday, 10 March 2023

Festive Friday - Warm Winter Foliage

Happy Festive Friday.

The North East finally caught up with the rest of the country today, as we woke up to snow. Of course there was much delight and excitement to be walking to school in it and we have some sledging fun scheduled after school. Hopefully it'll stick around long enough! 

This inspired my card today, along with the Designer Dies Winter Foliage recently coming back in stock. 


I started out by softly ink blending through the Stencil - Let it Snow with Concord & 9th Aqua Sky ink. I then stamped the images from Winter Foliage & die cut with the corresponding Designer Dies Winter Foliage. My chosen sentiment is from Christmas Sentiments.


That's all from me today. Stay Warm.

Crafty Hugs


Tuesday, 13 December 2022

Brand Ambassador Inspiration - Stretch Your Stash

Morning All, 

Steph here today. You may remember that last year I used my Uniko non-Christmas stamps to make Christmas cards (see here) and I thought I'd give it a go this year with my Uniko stencils. It's always good to see what other ways we can use our products and stretch our stash with a little 'outside the box' thinking! 

My first card didn't take too much imagination as I thought the fabulous Uniko Layering Stencil - Zesty would fit beautifully as dried orange slices in a Christmas wreath. I teamed this with one of my favourite stamp sets, Uniko Winter Foliage


After a look through my Uniko stencils, I spotted that the Uniko Mid Century Modern Shapes stencil had the perfect shapes to 'build' a Christmas tree! A little stickles added some tree lights and a sentiment from Uniko Simply Said Blocks Christmas stamp set completed the card. 


For my final card I used one of my favourite stencils and certainly not one you would class as a Christmas stencil, but it's perfect for an animal print lover at Christmas time! The stencil is Uniko Tiger Print and I have teamed it with Uniko Sparkling Snowflake die.


The good thing about this card method is you get two for one! Here I have used the die cut snowflake to make a second card. 


I hope you have got your Christmas cards well under way but don't panic if not, all these cards are quick to make (but only if you like fussy cutting in the case of the first card!). 

As this may be my last post pre Christmas, I will sign off by wishing you all a very Merry Christmas!

Much love
Steph x

Friday, 18 November 2022

Festive Friday!

Happy FriYAY! 


I'm jumping on the early Black Friday bandwagon with our best discount code of the year. Save 30% on all orders of £10 or more, plus shop the sale and save up to 40%. Code is valid until Midnight GMT Saturday 26th November 2022. 

Royal Mail have planned postal strikes next weekend, so get in early to (hopefully) receive your order before then! 

Now onto my inspiration for the day...

Can you tell I am starting to panic that I've not made nearly enough Christmas cards, as usual?! I really need to get the international ones posted and probably the ones for family & friends in the UK ;)

Anyway, back to what I have made today. It's been ages since I inked up Winter Foliage, it's an oldie, but still a firm favourite.


I started off by stamping the holly leaves in Concord & 9th Clover ink. I then stamped the berries in Cranberry ink. The holly leaves are really easy to cut out, so I created a mask for each of them from Eclipse paper, so that when I stamped the pine branches they appear behind the holly leaves.


The pine branches are stamped in Evergreen ink and my chosen sentiment is from Christmas Sentiments and adhered to the card using foam adhesive. 

As I had all the colours and supplies out, I decided to make another quick and simple card using them. The layout is roughly the same, but I started by stamping the sentiment first and then building the cluster around it.


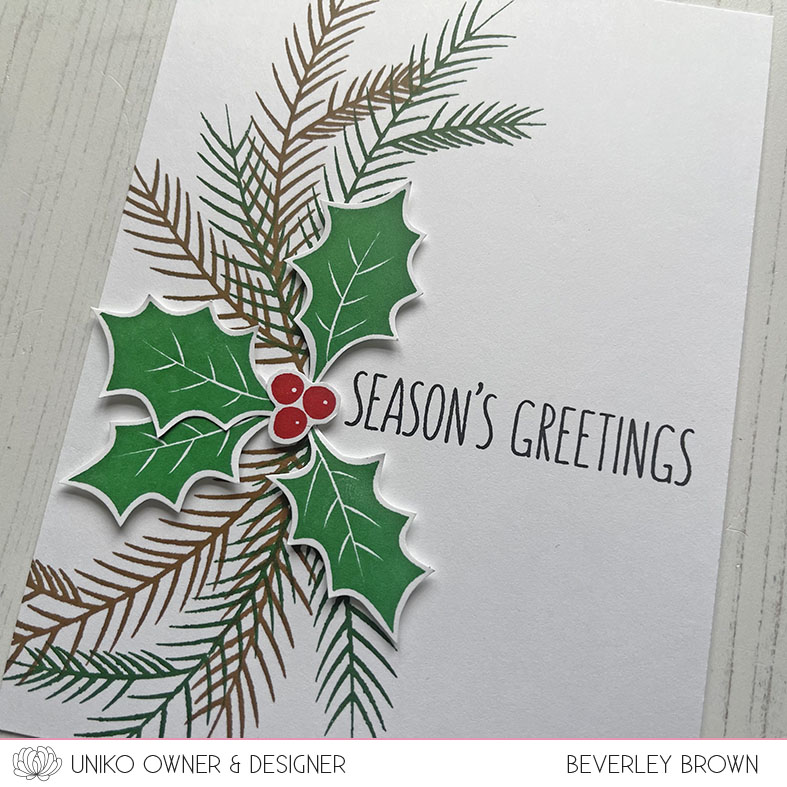
This time I started with the pine branches and I stamped them in both Evergreen and Altenew Espresso ink. The holly leaves and berries are fussy cut and adhered to the card using foam adhesive.


That's all from me today, I am sure you will be seeing more of this set in the coming days/weeks! 

Crafty Hugs 

Friday, 30 September 2022

Festive Friday, BA Inspiration using Winter Foliage

Good morning, Julie here with a little bit of inspiration for your Christmas makes. 
Here are a couple of ideas using foliage stamps from Winter Foliage and Season of Beauty.


My first card was inspire by those turnabout stamp sets you can get but without using the jig and no masking!!!


I drew a circle in pencil roughly in the position I would later place my sentiment panel on an A6 panel of white card and stamped a variety of foliage in various green inks. I used some really old foliage stamps that are now sadly retired, Nature's Treasures 1 as well as the two newer sets to get a variety of textures no masking was required here. I simply used my MISTI, stamped one branch of the evergreen bough, then rotated my panel 180' and repeated. I did the rest of the green foliage the same but added the red berries, Season of Beauty and Winter Foliage free hand.  The berry stems were stamped in brown before colouring the berries with Copic marker, the holly berries I simply stamped and then shaded with a darker Copic marker. A few dots of white gel pen complete.
When dry, I rubbed out my pencil circle and added the central panel. I found the die cut circle in my bits box, used the sentiment from Christmas Wishes stamped in black ink and simply covered up the messy bit in the middle by gluing it flat onto the panel!

This second card was inspired by the latest sketch at CAS Colours and Sketches.


This time I cut a mask from a Post it note and then used the same die to emboss my A6 white panel.
I then added the mask and stamped the holly leaves and evergreen foliage. I stamped the holly berries and a couple of pine cones and used the dies to cut them out. The evergreen boughs were coloured in with a couple of green pencil crayons as were the veins on the holly leaves for extra interest.
Removing the mask, I stamped the sentiment from Season of Beauty in Versamark and embossed in gold EP before adding the berries and cones with glue.

So that's it from me for this month, hope I've given you a couple of ideas to kick start your Christmas makes if you haven't started!

Stay safe and keep crafting 'til next time.