Sunday 30 May 2021

Brand Ambassador Inspiration - Bonne FĂȘte Maman

 Bonjour !

Izzy here. I know that for most of you, Mother's Day has already passed. But here, in France, it is today!

So I had the chance to see on blogland beautiful cards for this occasion and Yana Smakula's ones particularly caught my attention.

So I decided to CASed her card with the Uniko's products.


I stamped, several times, the different layers (except the outlines) of the flower from the Beautiful Blooms III stamp set on white card stock and in two shades : yellow and pink. I fussy cut them and kept them aside. I did the same thing with the foliage.


On a soft pink card stock, I stamped the letters from the Alphabet Outlined set with a pink ink then I lightly brushed the bottom of the letters with the same ink. Then I fussy cut them.


I cut a panel of wood pattern white card stock and I flat adhered it on a double grey slimline card. 

To finish, I put everything together. Once I found the ideal placement of the different elements, I foam mounted them on the card, starting by the "maman" letters.


So this is the card that my mother received yesterday for Mother's Day and she loved it. I hope you will love it too.

That's all for me today. Thanks so much for stopping by. Take care and give your Uniko's products some love !


Thursday 27 May 2021

Brand Ambassador Inspiration - Giraffe, Tiger & Zebra Stencils

Morning All

Steph here with my first Uniko BA Inspiration post. I hope you love it! 

Today I am showcasing a trio of cards made using Uniko GiraffeTiger and Zebra print stencils. I love animal print so I was super excited to get these when they were first released. Here, I have used them with metallic embossing powders to make super luxurious cards. 


My first card uses the Tiger print stencil through which I have applied embossing ink. Before I added the ink, I masked off a rectangle in the bottom right where I wanted to stamp the 'WILD' sentiment.
Once inked, I removed the stencil and applied the metallic embossing powders one at a time. I used gold, silver and copper powders. After I had heat embossed the tiger I stamped the 'WILD' sentiment onto the same piece of card. I also stamped the 'HAVE A' and ‘BIRTHDAY’ onto separate pieces of black card before applying powder and heat embossing. The sentiments are from the Uniko Wild stamp set. The stencilled panel is layered onto a Kraft card blank and the additional sentiments have been added with foam pads.


My next card uses all three animal print stencils and in much the same way as the tiger card, I have inked through the stencil with embossing ink and added metallic embossing powder. Once heat embossed I die cut the squares and layered them onto a larger square of black glitter card. The final square is a sentiment from the Uniko Birthday Sentiments stamp set which I have heat embossed in gold.


And for my final card, I created a black slimline card blank and heat embossed the zebra print stencil down the left hand side and the giraffe print stencil down the right hand side. I then heat embossed the letters and numbers HB2U (Happy Birthday 2 U) from the Uniko Alphabet Outlined stamp set. I created some banner shapes from the leftover embossed pieces from the previous card and added these to the top right of the card to finish.

I have to say that these have turned out even better than I imagined so I'm really pleased and I hope you like them too. 

That's all from me for now.

Much love
Steph x

Wednesday 26 May 2021

Brand Ambassador post : Ombre Wonky stripes

 Hi there!

Hannelie here today with a quick and easy card in three different ombre color versions.


For the pink card I used :


For the yellow card I used :


For the green card I used :


Thanks for popping in!

Hannelie


Tuesday 25 May 2021

BA Inspiration - Christmas in May

Hello

It's Wiebke here with a new Brand Ambassador Inspiration for you!

Like every year, I planned to start my Christmas card production earlier to avoid a stressful harvest time. Every year it's the same - this great plan melts during the warm spring weeks and for sure during the hot summer time like ice cream in the sun...

This April and May we had freh (sometimes almost cold) temperatures here in north eastern Germany - perfect for a bit of Christmas card feeling!

My winter-elements are a snowflake and an icy-sparkling coverage of my sentiment.
But I couldn't ignore the spring time completely. So I added a non-classical colour scheme for a Christmas card: Rainbow colours!


The snowflake layers were cut out with the Designer Die Sparkling Snowflake and then layered together.


The sentiemnt from the Festive Sentiments Outlined Clear Stamp Set was stamped in black Memento ink, coloured with Stabilo Markers (they have very virbrant colours) and then covered with a clear GlitterGlue (Stickles - star dust).


The card is made with Die Cuts, so it's also a great inspiration for our current Challenge #65 Anything Goes with the optional twist of DieCuts.

Hope I was able to inspire you to get started with your Christmas cards early enough this year!

Stay crafty!
Greetings from Wiebke


Sunday 23 May 2021

Mini Uniko Logo Stencil - Guest Designer Tara Cardwell

 Happy Saturday! 


Did you see that the Mini Uniko Logo Stencil that was the FREE gift for our 9th Birthday celebrations is NOW available to purchase on the website HERE.


Today I have a Guest Designer joining us with some inspiration using this mini stencil. Please give a warm welcome to Tara Cardwell one of the lovely owners of my favourite craft stores, Seven Hills Crafts! 


Hello Everyone, Tara here. I've been playing with the new floral stencil today but when I saw it, I saw not a flower, but a butterfly - and here's how I did it.


I die cut a circle from cream card and taped the stencil in place and used a detail blending tool to ink in shades of brown, red, orange and yellow to give a sort of "red admiral" feel.


Once I was happy with my first stencil shading, I took it off, cleaned it, flipped it over to get a mirror image and inked again with the same colours.   That left me with the following "wings" and a couple of brown bits in the middle.   I used the brown bits to help me pencil draw a thorax to connect the wings.  I then just used a couple of markers to shade the thorax.   I drew the antenae with a brown fine liner but a brown pencil would work too.


To give more butterfly like detail I added a few dots of stickles in red and crystal.  


I mounted the circle onto a square kraft base card and used more crystal stickles to add a flight trail and then stamped a sentiment either side of the trail using stamps from Big & Bold Happy to finish the card.


Hope that gives you some ideas how to stretch yours stash beyond the original design!


I hope you have enjoyed todays feature and a big THANK YOU to Tara for inspiring us all. 


Crafty Hugs
 

Friday 21 May 2021

Uniko Challenge #65 - Anything Goes + optional twist Use Die Cuts

 Hey!

Welcome to the May/June 2021 Uniko Challenge.

We have the super simple theme of Anything Goes and an optional twist of Use Die Cuts.


We're delighted to welcome Elaine as our guest Designer for this challenge. I'm sure many of you will know her well and been inspired by her wonderful cards. A visit to her blog is always a pleasure, find it HERE.


Such a beautiful card using Uniko's Pure Florals Peony stamp.

The Uniko Brand Ambassadors have also been busy creating cards to inspire you to play along. Let's see how they've interpreted the theme.


Are you ready to play?

Well, just in case you need some more incentive to play along with the challenge here are the details of the prizes.

Due to the current chaos around the world and here in the UK, I have temporarily reduced the value of the prizes. This is so that I can keep my small business afloat during these uncertain times. I hope you understand and will still join in on the fun.

Thank you for your continued support & joining in with the fun at Uniko.
  
THE PRIZES
  • Main Winner Chosen By the DT - £15 eGift Certificate
  • Random Twist Winner - £5 eGift Certificate
  • Random Uniko Stamps Winner - £5 eGift Certificate
  • Top 3 Chosen By DT - 150 Loyalty Reward Points

There is plenty of time to join and play along with this challenge. 
The deadline for submission is midnight (GMT) on Friday 25th June 2021.

Crafty Hugs
 

Thursday 20 May 2021

New Brand Ambassador - A Warm Welcome to Steph!

Happy Thursday! 

I am delighted today to be giving a warm welcome and introduction to our newest Brand Ambassador, Steph Mortimer. I'm sure you are familiar with Steph's work around blog land as she is on a few challenge design teams and is a frequent participant in previous Uniko Challenges. If not, I am passing you over to Steph for a little introduction....


Hello, my name is Steph and I am over the moon to be joining the Uniko team as a Brand Ambassador. It has been a dream of mine for a while so I don’t think it’s really sunk in yet! So, here’s a little about me by way of introduction. 


I live in Derbyshire with my husband and twin girls. Like many crafters I have been creating in one form or another since I was a child but what first captured my heart was cross stitch. It wasn't until I was looking for wedding stationary that I caught the paper crafting bug. Not being able to find anything that I liked, I purchase a Big Shot machine and a few staple items and set about making my own. 


My first papercraft obsession was stamps, quickly followed by dies, but I have since managed to amass ink pads, alcohol markers and now it seems patterned papers a plenty! My natural cardmaking style is CAS, but I am always looking to learn new techniques and push myself out of my comfort zone so I do occasionally like to throw everything at a card in a very un-CAS like way! 


I was first introduced to Uniko by Brand Ambassador Alumni, Lyndsey Bowe and I have spent many a happy hour crafting in her dining room and routing through her Uniko collection. I now have an impressive Uniko collection of my own and I’m so happy I will be using them even more now I’m part of the team.


Welcome Steph! 


I asked Steph to choose a few of her favourite Uniko makes so that I could share them with you to give you a flavour of her style if you are unfamiliar with her creations. Let's have a look...


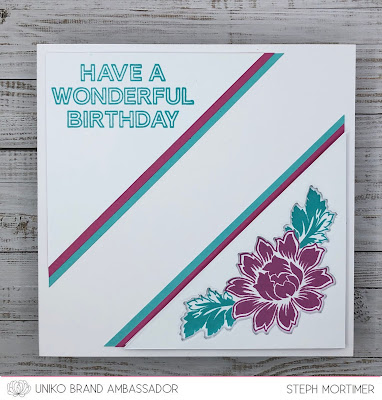
Absolutely love this combination of Uniko Peonies and English Country Garden Butterflies. I think you would agree with me that the colouring and colours are stunning.


Simple Art Deco elegance with this card using our Background Builders Arts Decoratifs and Arts Decoratifs stamp sets. 

And lastly but by no means lease this beautiful starry sky CAS card...


Now you can see why I am delighted to have Steph join us here at Uniko and I am sure you are all as excited as I am to see Steph in action, so keep your eye out for Steph's first inspiration post coming soon here on the blog.

I would love it if you would leave some welcoming comment love and be sure to pop back tomorrow for the start of our next challenge - yay! 

Until then, thank you for stopping by today.


Crafty Hugs
 

Friday 14 May 2021

May 2021 NEWS, Restocks AND Discount Code!

 Happy Friday!


It's always a good day in The Studio when a bunch of restocks arrive 😊 and today is that day! A few of these clear stamp sets have been out of stock for a while - my apologies for that. 


I feel like things are getting back to 'normality' and I am able to spend more of my day in The Studio now  that The Beans are back at school, I finally have more time to start investing and restocking again. However, I am taking things slowly and at a speed I can manage, it's just me here in The Studio! Plus I always want to bring you new stuff too!! 


I've had a few emails about when Designer Dies will be restocked, so to hopefully answer some future emails I will post here! I will be restocking dies, but I don't currently have a date as to when this will be, my apologies for this I know you love dies and it's frustrating when they're out of stock. 


Uniko dies are manufactured in the US, so along with this factor and the pandemic, they are also a BIG investment for a small business like Uniko. With not attending any craft shows since October 2019, plus being closed to orders during lockdown in 2020 due to the pandemic, I have had to decide what to feed Uniko funds into and currently my decision is for restocking stamps, stencils and new releases of these products. I hope you understand my decision and believe me, it isn't easy making them. 


Anyway, lets have a look and see what clear stamp loveliness is lining the Uniko shelves again...


I'm excited for these stamps to be back, a selection perfect for those masculine cards needed for Fathers's Day and the Gerbera Daisy perfect for all those Summery cards! 

I hope there is something back in stock that you've been waiting for. If you have emailed me about a particular restock, they're on the list for the next batch in June. 


Before I go today, it's my BIRTHDAY and I'm 21 again - haha! So in celebration I have a discount code AND a selection of birthday products are on SALE


Ok, it must be time for cake now! Have a lovely day and weekend 😊 


Crafty Hugs


Wednesday 12 May 2021

BA Inspiration - Wonky Stripes Rule!

 Morning all, Julie here with a little bit of Wonky Stripe inspiration! Here are four cards made using the two wonky stripe stamps and the wonky stripe stencil.


My first card was inspired by the challenge at CAS Mix up, where their theme is stencils and rainbow colours and a GD spot over at ATSM where the theme is stencils and die cuts.


I used a selection of DIs to ink my rainbow on an A6 panel of white card through the Wonky Stripe stencil, stamped the die cut Originally Organic Additions elements and coloured them with Copic markers. A couple of strips of linen effect card frame half the stenciled panel. I used scrap pieces of linen effect card and they were just a little too small so added a couple of slivers of gold mirri card to fill the gap. A sentiment from Pure Floral peony was stamped on black and embossed with gold EP, picking up the gold strips.

My second card uses the other half of the inked panel and a fussy cut large peony bloom.


A panel of linen effect card was glued over the stenciled panel and the fussy cut bloom added. I decided to leave the peony uncoloured as I thought it would detract from the rainbow edge. The sentiment is from the same Pure Florals- Peony set.

As with the last card I used a rainbow panel but this time I used the BB Wonky Stripe stamp.


It's difficult to use embossing and Copics without making a mess of your pens, so the trick is to stamp in a pale coloured ink, I used Altenew's Limestone, colour the image and then add the embossing over the top. If you use your Misti, just leave the stamp in place and make sure that you put your stamped panel back exactly where it was before. Don't cut it down until the embossing is complete!
Again as the background was quite lively, I used the simple outline of the small peony bloom from Pure Florals -Peony over my trimmed down panel. The coloured panel and bloom were added to an A6 note card on pads and a sentiment strip stamped with a greeting from the same Peony set completes.

Finally, I just had to use the large gerbera stencil again with the solid BB Solid Wonky Stripes as an accent along the bottom.


After inking the stencil with Mustard Seed and Twisted Citron in the center and Spiced Marmalade DI for the petals, I added detail with a matching Zig watercolour pen and blended the center of the flower with a little more Twisted Citron. The stencil doesn't have a stem, so I added one free hand and coloured it with green Zig pens.  
On a strip of white card, I stamped a couple of times with the BB Solid Wonky Stripes stamp in Altenew's Obsidian ink. My pad is still quite new and juicy so there is a little splatter where it shouldn't be but I think I got away with it! On another A6 note card, I added the stamped panel, then the trimmed down gerbera. 
My sentiment strip is made up from the words from two different sets Beautiful and Bee Happy. Once I got them laid out on my Misti, I stamped a few more to use in other projects, as its quite tricky to get the words lined up. You never know when you'll need a sentiment strip!

And take a deep breath... 
Hope you liked the ideas here, I sort of got carried away with my theme!

Anyway, look after yourselves and keep crafting until next time.