Showing posts with label Background Builders Christmas 2018. Show all posts

Saturday, 5 July 2025

Christmas In July - Vellum Frosted Christmas Trees


Happy Weekend. 

Today I am off south with Uniko for Stamperama Bracknell, the show is tomorrow and I am super excited to be going somewhere new. 

In between show prep and restocks arriving, I still managed to squeeze in a little creative time. On Thursday I shared a card on the Seven Hills Crafts blog HERE and seen below using the Kristina Werner Merry Trees, yes, I am doing Christmas in July over there too! 


I stencilled the background, but wanted to add a sentiment. So I decided to add a vellum panel to do that. It adds a wonderful frosted feel to the card and perfect to stamp a gold heat embossed sentiment. 

Anyway, I thought I would replicate the look with Uniko products and this is how it turned out...


I decided to use Background Builders Christmas 2018 and stamped the line of trees in black ink up my card panel. I then coloured the trees with a Stampin' Up! Stampin' Blend. For the sentiment I used the popular Christmas Wishes and added a few Poppy enamel dots to finish. 


I love how you can use the same layout and similar supplies, but achieve different looks. Well, that's two more Christmas cards added to my stash. 

That's all from me today, but I will be back tomorrow with more to share. 

Crafty Hugs

Tuesday, 1 July 2025

Christmas in July - Brand Ambassador Inspiration with Background Builders Christmas 2018

 Afternoon, Julie here with the first of many posts celebrating Christmas in July with Uniko!


Over at Color Hues their new colour combo is red and white, so I thought I would use that to spark an idea using Background Builders Christmas 2018, some red card and white heat embossing. Here's what I came up with.


I've used this set a couple of times to make 'jumper' style cards as the patterns always remind me of Christmas sweaters! There are a few strips which you could combine to make a pattern but I stuck with just two.
For this card, I simply stamped and embossed three of the stylised snowflake strip onto an A6 panel of red card and bookmarked it with the hatched lined stamp strip. A simple partial circle die cut out of the red panel followed by a die cut welt made from two stacked circle dies, suggests a neckline. The red panel was then trimmed to leave a border when attached with glue to my A6 white base card.  A simple white heat embossed sentiment from Christmas Sentiments completes, a very simple card in the end.

Here are a couple more ideas along the same lines from a few years ago.


This uses a zipper die set from MFT and the tags below are simply strips of card with fussy cut collars, die cut circles, butchers twine, a couple of buttons and some ribbon bows!


So that's all from me today but don't forget to look out for more Christmas inspiration to kick start your Christmas stash from the BAs as well as a new release later in the month.

So for the moment I'll say bye and happy crafting!


Friday, 29 November 2024

Brand Ambassador Inspiration - Quick Christmas Cards

Merry Christmas! 

Hopefully everyone is in full Christmas mode now but don't panic if not. I have used Uniko's Background Builders Christmas 2018 stamps to create some fairly quick cards (the heat embossing makes these a take a little longer but you could reduce time by simply stamping with ink instead).

Here I lined up four of the stamp strips and carefully inked and stamped them one at a time. The sentiment is from the Uniko Christmas Sentiments stamp set. 

This card took only slightly longer to make than the last as the striped stamp was used twice so it had to be cleaned and repositioned between colours.

On this card I have used clear embossing powder over the red and green ink and gold embossing powder for the centre strip but of course you could just use the ink and leave out the heat embossing. The sentiment this time is from the rereleased Uniko Pure Florals Poinsettia stamp set. 

Following on from making my last card I discovered that I had red and green embossing powder in my stash (doh!) so I made the card again using these rather than ink and clear embossing powder, changing the rotation of the background builder strips. 

Hopefully these have helped if you are a little pushed for time or behind in your Christmas card making.

Much love

Steph x

Friday, 17 November 2023

12 Days of Christmas Inspiration & Giveaways - Day 9


           Hello & Welcome to the 12 Days of Christmas Inspiration & Giveaways - Day 9

Every Friday, I will have a new Christmas themed card or project to share with you, along with a video showing how I made it. Plus, if you watch the video you will find out what the giveaway is and how to enter for your chance to win 😊 All the videos are HERE on the Uniko YouTube Channel.

This week I have a trio of cards to share using Background Builders: Christmas 2018...


From Scandi inspired Christmas jumpers for a Warm Christmas Wishes card, using traditional Kraft, White & Red.


To a more clean & simple design of classic Christmas trees...


You'll have to watch this weeks video HERE to find out what my third card is, but lets just say I can talk about pretty Christmas lights, a lot 😂 I also share what this weeks giveaway is & how to enter 😃 Can you believe how quick these weeks are going? 


Crafty Hugs

Sunday, 22 October 2023

Stencil Sunday BA Inspiration - One design Three stencils

Bonjour !

Izzy here with a Stencil Sunday for my Uniko Brand Ambassador inspiration. As my dear teamy Steph was mentioning it in her last Brand Ambassador Inspiration post, Christmas isn't all that far and I then realised that I don't have a lot of Christmas cards in my stash !

If my mojo is very low at the moment, Steph, with her gorgeous Christmas cards made me want to play with my Uniko stencils. So I took off my stash my favourite Uniko's stencil when it's about Christmas and I made this first card.


I love the In the Forest stencil, since it has been released, I have used it every year for my greeting cards. Here I used it directly on the double white card and I brushed two shades of green and a bit of black. The result was nice but I wanted even more firs. So I turned the stencil and I brushed another layer of the same inks.

On a piece of white card stock I stamped Santa from the Jolly Christmas set, I coloured it with coloured pencils and I fussy cut it. I die cut a square of Vellum paper on which I stamped and I black heat embossed the sentiment coming from the Background Builders Christmas 2018.

To finish my card I foam mounted Santa on the Vellum. I turn the Vellum and I put squares of foam tapes behind before adhering it on the card base.

As I loved how we can see through the lovely design made with the stencilling, I kept this design for my two other cards.


For this second card, I used the Winter Foliage stencil that Bev recently used for her beautiful card (see HERE). With a small brush, I applied the different colours.

On the Vellum, I stamped and I gold heat embossed the sentiment coming from the Christmas Wishes set. I stamped the foliage from the Winter Foliage set and I die cut each piece with the matching dies.

I assembled the card in the same way as the previous one.


For this last card I brushed non-traditional colours through the Let is Snow stencil to make my background. 

After looking for what I could put on the Vellum, I tried these little trees from the Background Blocks Scandinavian Christmas set.


I coloured them with Promakers, I fussy cut them and I foam mounted them on the square of Vellum on which I previously stamped and black heat embossed the sentiment from the Christmas Sentiments set.

To finish my card and to make these little trees even brighter I put some Stickles on them.

Well, that's all the Jolly, Bright and Merry I have to share with you today. Have a lovely Sunday and thank you so much for stopping by.


Monday, 15 November 2021

Merry Monday, Some Pastel Christmas BA Inspiration

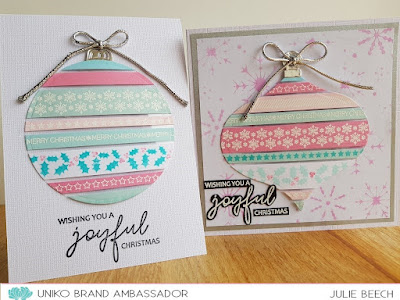
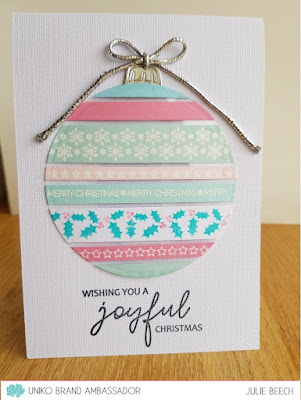
Good morning, Julie here with a little bit of festive inspiration. I've been wanting to try the floating strip technique for awhile and decided to turn the end result into a Christmas bauble. I originally thought of a simple circular one but in the end I used a really ancient bauble die as well!

Here are my two cards. 


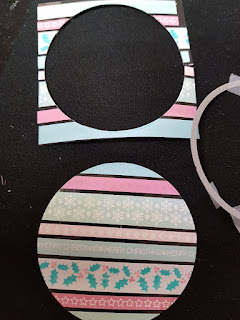
The technique is the same whether you use a basic circle die or a more complex shape die to create your bauble. All you need is a piece of acetate slightly larger than your die and some strips of card!
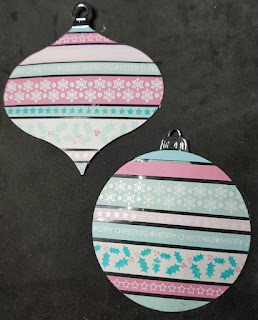
To make mine, I used Background Builders Christmas and Background Builders Christmas 2018 and a variety of pastel coloured card for a non traditional look. Some elements I heat embossed with white EP, others I simply stamped with ink. You could just use some bits of DP as well.
Using double sided tape I added the strips to my acetate background, leaving a small gap between each one. I used some scrap acetate that was from an old brochure, you don't need the good stuff. When covered, I trimmed off the excess.


Then, using a circle die I cut into the acetate panel, a couple off passes might be needed depending on the thickness of the acetate. If it doesn't work after a couple of runs through your machine repeat or remove the die and carefully run a pair of scissors around the impression to free the die cut.


I repeated these steps to create the decorative bauble die also and added a fixing using the matching die in silver and a cut down one from another die for the plain circle one.


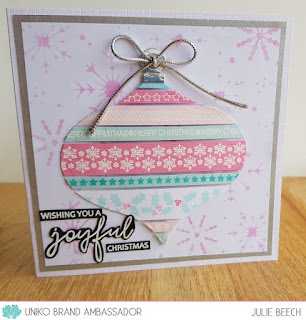
Once I had completed each bauble I was ready to create my cards. After a bit of toing and froing, I used a Gelli plate background using the Let it Snow stencil for one and kept the other plain.


I used a 51/2" square base card, matting the stencilled background on some silver paper before adding the bauble. I used pads down the middle and glue along the edges to give it some shaping. A simple silver chord bow and a trimmed and fussy cut, white, heat embossed sentiment from Christmas Wishes on black completes. I fussy cut the sentiment as I wanted it to look a little lighter than using a solid sentiment panel.

My second card has the bauble attached as before but onto a linen effect, white, A6 note card and a simple stamped sentiment.


So that's all from me. I hope I've given you an idea to help you make your Christmas cards. I think I'm almost there with my Christmas makes but there are always last minute ones to make!

Stay safe out there 'til next time and keep crafting.

Monday, 12 April 2021

Merry Monday - BA Inspiration

 Good morning folks, Julie here with a little bit of BA Inspiration. 

In keeping with my aim to create all my Christmas cards before the end of November, I'm back with some Merry and Bright Christmas inspiration for you.


For my inspiration, I used the latest challenge over at CAS Christmas, where their cue word this month is RAINBOW. Rather than use the larger stamps from our Christmas sets, I used some of the smaller ones and used them in unusual ways in a rainbow theme.

My first card uses the tiny tree from Christmas Pop and stamped it in a rainbow pattern following the line of my die cut snowdrift. 


I first cut a snowdrift from some scrap card and traced a line in pencil as a guide for my stamping, then starting roughly in the center and working outwards, I added my rainbow of trees. After stamping the sentiment from Festive Sentiments onto the snowdrift, I glued it onto my card, as simple as that.

My second card is probably my favourite of the three. When I was teaching, many years ago, Rene Magritte was one of the artists that we used as inspiration, especially the paintings where he paints features of the face but without the actual face being there, such as Les Belles Relations and The Paysage de Baucis. The features are in the correct anatomical place so your brain fills in the gaps. This card is a little like that, this time it's Rudolf!


The antlers are from Background Builders:Vines, Winter Additions, the baubles are stamped with the small flower center from Wonderful Day and his nose is the flower center from Kindness Blooms. His eyes were drawn freehand with a black fine liner and his nose was made shiny by the addition of some Glossy Accents. A few hand drawn lines for the strings and the same sentiment from Festive Sentiments completes.

My final card was a little trickier to make and had a bit of a shaky start!


My first attempt ended up in the bin as I managed to get an inky splodge in the bottom corner after I had completed it, this is the second attempt, after an initial dry run on some scrap paper!
I doodled some lines in the rough shape of a tree in pencil before adding the bulbs from Background Builders Christmas 2018. Once the ink was dry, I drew over the pencil lines with a black fine liner then left it again to dry before rubbing away  the pencil lines and coloured the bulbs with my Zig watercolour markers. To give the bulbs more impact, I gave them a coat of Glossy Accents, the same sentiment completes.

Well that's about it from me for the moment. I hope I've inspired you to use those tiny stamps that sometimes get forgotten and to think outside the box when it comes to your cardmaking. 

Keep safe out there.

Friday, 12 March 2021

Festive Friday - Brand Ambassador Inspiration

Good morning all, Julie here with another Festive Friday post featuring three cards on the same colour theme.

I'm still determined to get ahead with my Christmas makes in the hope that I wont need to be in a rush later in the year and this month I've been inspired by the colours over at CAS Christmas, so why don't you grab yourself a cuppa, sit back and check out these makes.

This first card uses the Christmas Pop trees as well as BB Falling Snow and a freebie snow stencil from a magazine. 
The two Christmas Pop trees were stamped and heat embossed with white EP before trimming down and edging them with red ink. The third snowflake one was made by tracing the shape of one of the others, cutting out from kraft card, then stamping with BB Falling Snow and embossing in white EP. On a scrap panel of kraft, I stenciled the snow using some Ranger Texture paste over the top 2/3rds and when dry added the strip of red, white and kraft coloured DP to the bottom. Arranging the trees over the DP, the finished panel was popped up on pads over a kraft base card, a trio of red gems complete. 


You can't get much simpler than this one layer card. Festive Sentiments Outlined and a holly sprig from Framed - Holly, stamped and embossed in white EP, 3 tiny red crystals for the red berries all on an A6 kraft base card. You could use any large sentiment here, such as Festive Sentiments, or even stamp it in black. A great design for mass production?


I've used Background Builders Christmas 2018 before to make a plaid pattern before, here and here. This time I've used a panel of kraft card, red ink, a white gel pen and a black fine liner to make a panel to cut my letters from. The kraft is obviously darker and very absorbent so the red is not as bright as it would be on white, but using my Misti I was able to go back a couple of times to deepen the colour.

You can see that I made a couple of mistakes with the stamping and line drawing but there was still enough left for me to cut out all the letters I needed, waste not want not!
The Wishing You is from Festive Sentiments and Christmas from Most wonderful were stamped onto the off white base card in black before the die cut merry was added on matching red foam letters.

So that's all from me for the moment, hope I've given you some ideas to get your Christmas stash rolling!
Stay safe and keep crafting 'til next time.

Thursday, 7 January 2021

2 CAS cards with a video - Brand Ambassador Inspiration

 Hello friends Rahmat here today with a focus on the stamp set Always and Forever


I have  2 cards to share and also have a short video to share the process of these cards. Please watch it to see the process.


Here are some pictures of these cards.

I have done just stamping only on both these cards.


This second card is a one layer card.


Products used :
Background builders Christmas 2018

          Thank you for stopping by, I really appreciate your kind feedback. Have a great day!