Friday 28 January 2022

BrandAmbassador Inspiration - Techniques with Kraft Paper, Stencils & Inks

Have you ever used Ranger Distress Oxide Inks on dark cardstock or Kraft Paper?
These Oxide colours are very different to the "original" Distress Inks.
For those of you who havn't worked with one or both inks yet I will try to give a quick description of the differences.

The "original" Distress Inks are water-reactive dye inks with an almost clear formula which soaks into the paper. They are perfect to work on white, very pale or light coloured papers. The darker your papers are, the more it's just like a kind of watermark print you can make with these inks and when the colour of the paper is too dark you can't see the ink any more, cause there is not enough difference between ink and paper.
These translucent Distress Inks are perfect to blend with a sponge, brush or blending tool. The colours overlap, can be reactivated again and again and you can create lots of new colour-shades.

The Distress Oxide Inks are a water-reactive dye and pigment ink fusion, You can use any colour of paper to work on - white, colours, black and also kraft. The Oxide colours are opaque, so they are covering the colours beneath. Many people say, the creamy consistence is even easier to blend than Distress Inks! (Be sure to use seperate blending tools and don't mix the different inks on one tool!)

That's only a very short introduction of these fantastic colours.
I think many crafters know them, so I don't want to write too much "old" stuff. But if you are new to these mediums and have more questions to the inks, please feel free to ask in the comments! I will try to help!


In this top picture you can compare the first three techniques I introduce today to each other.


Let's come to my used techniques!
I used different kind of Kraft Papers - a lighter one, a darker one and another darker one with a bit of structure.
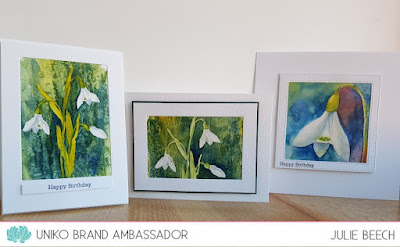
All cards are made with the Uniko Flower Power #5 Stencil and sentiments of different Stamp-Sets like Wonderful Day, Simply Said Birthday, Floral Vines and All Occasion Sentiments #6.

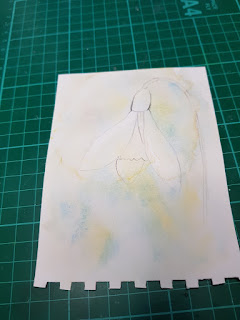
For this first card I used the Oxide Inks directly on the  Kraft paper. They blended well with smoth colour gradients. The colours are: for the petals tumbled glass and salty ocean & for the center squeezed lemonade and mustard seed.
The sentiment is heat embossed in two shades of yellow - matchable to the middle area of the flower.
The details on the center dots are Nuvo crystal drops gloss in Buttermilk and English Mustard.

The all other cards I added a white Unicorn pigment ink from Hero Arts to the paper first, then cleaned the stencil and then I started to bring the colours to the flowers.
Here in the second card I've used the same colours than in the first one. The sentiment is heat embossed with white embossing powder.

For the third card I coloured the petals and the center with Kuretake/Zig Clean Color Real Brushes and then blended them with a watered brush.
The sentiment is embossed with white powder again.

For the fourth card I returned to the Oxide Inks, but to different colours - kitsch flamingo, picked raspberry, festive berries.
This card got a more distressed look! I softly wiped with the white inkpad over the paper and got these light planar marks. Then I used an old Distressing Tool to roughen the edges of the paper before I glued it to the cardbase. I added some white details to the center dots with a Gelly Roll pencil.

I think here with the pink colours it's even more obvious then with the blue colours how great the white ink base workes with the colours! They look so soft now!
I made another picture with a closer look for you:


On my last card for today I enjoyed the white pigment ink and just traced the outline-edges of the petals with metallic Gelly Roll Pencils. I used all the rainbow colours! The center circled I coloured too and added some Glossy Accents to every circle.
The sentiment is heat embossed with Ranger liquid platinum powder on a little piece of paper I then cut to a banner.


Hope you enjoyed this little techniqual journey with me!
Wish you nice and crafty days!

Greetings from Wiebke

Tuesday 25 January 2022

Brand Ambassador Inspiration - Background Blocks Mid Century Modern

Good morning all, 

I hope this blog post finds you well? Steph here with my first Uniko Brand Ambassador Inspiration post of 2022! 

I am starting the year off with Uniko Background Blocks Mid Century Modern stamp. I love the Mid Century Modern sets and this one is particularly good for masculine cards, however I have applied a mix of styles here.


My first card teams the background block with a mix of sentiments from Uniko Simply Said Blocks and Simply Said Blocks II stamp sets. The sentiments are heat embossed onto black card using blue embossing powder while the background block was stamped and heat embossed in yellow powder. I used the stamp twice, slightly overlapping, to give a longer edge to the card and I trimmed it before adhering to the card base.


For my second card I wanted a softer and more feminine feel so I teamed the background block with florals from the Uniko Originally Organic Additions stamp set. The elements of this card are all stamped in dye ink which gives a softer look than the heat embossing above. 

Possibly my favourite of the three cards, here I have heat embossed the background block in black onto yellow card. I have used the block twice to show how nicely the background blocks fit into a slimline card. I have added some enamel dots over some of the 'terminals' (I often think of this stamp as an underground map!!). The sentiment is from the Uniko Doodle Flowers stamp set and is white heat embossed onto a black card strip before being adhered with foam pads. 

Hopefully there's something here to kickstart your New Year crafting. I know I found it hard getting back into it after a very lazy break between Christmas and New Year! 

Take care and keep crafting!

Much love

Steph x


Wednesday 19 January 2022

BA Inspiration - Watercolour Spring Botanicals - Snowdrops

Good morning, Julie here with a bit of Brand Ambassador inspiration. 
Today I've got my arty hat on, inspired by the ladies at CAS Mix Up to get my watercolour paints out of cold storage!! Here is what I came up with after a couple of afternoons playing about and getting messy!


I don't get my paints out as much as I should, in fact my travelling box had some of the pans stuck to the lid! As you can see I've used the fab Spring Botanicals - Snowdrops as well as an old digi that Bev gave away some time ago for my large single flower.

I apologise ahead, as this is going to be a photo heavy post, so grab a cuppa, sit back and follow my journey. I learnt such a lot experimenting with these cards.

Before I start, here is a list of what I used to create the basic panels.
  • A6 panels of Watercolour or Mixed Media paper
  • Spring Botanicals - Snowdrops 
  • Masking Fluid
  • A piece of cling film
  • household salt
  • Altenew's Morning Frost ink
  • Watercolour paint, Cadmium Yellow, Prussian Blue and Alizarin Crimson
After stamping my image with the Morning Frost, I masked it out using masking fluid.


Once the masking fluid was dry, I washed over the image with plain water followed by a Cadmium Yellow wash, then by one of Prussian Blue. As my washes were quite wet they mixed on the page to create a wonderful pattern of blues and greens.

Before the washes dried too much, I added salt around the edges and placed the cling film over and left it to dry completely. Don't rush this as the longer you leave the wrap on the better the texture in the finished panel.


I was enjoying myself so much that I made another panel!

Once completely dry, I carefully removed the masking fluid to reveal the stamped image against the textured background.

I love the texture you get from the salt and cling film. If you don't have watercolours you could try Brusho crystals to get a similar effect. If your masking has not been too accurate, you can always add some white gouache paint to the dark areas, but I left mine as is.


The revealed image was then painted using a mixture of the yellow and blue paint for the stems and leaves and a watery mix of Prussian Blue and a tiny bit of Alizarin Crimson for the shadows. I added a little too much yellow for my green I think in the first, so in the second panel I added more blue and watered the mix down. Watercolour always dries paler than you think! I prefer the more realistic second attempt.

To make my cards, I decided to frame them using the same card as my base card, one was framed vertically, the other horizontally.


The sentiment strip on the first card is from Simply Said. I simply mounted the frame of the second card on some matching dark green card and left it without a sentiment.

My final card uses the free digi snowdrop you can download here and you don't need any masking fluid.


To start, I enlarged the digital image as I only needed a single bloom and printed it off. I then flipped it over and traced from the back onto a panel of mixed media paper. The ink from the printed image leaves a faint impression on the MM paper when you remove it. Any missing areas can be quickly sketched in. You'll also notice that because of the process the finished image is a reverse of the original. If you would prefer the image the other way around you would either have to flip the image before enlarging or add pencil scribble to the wrong side of the print off.


I found this video on You Tube by Joanne Boon Thomas and tried to follow it as best I could using the same colours as I used in the other two panels. I wont go into the process here as she does it much better than I could!


The above image shows the beginning of the process. Sorry, but I forgot to photograph my panel when I'd finished painting.
Here is the completed card using my trimmed down, finished panel. The frame is cut using a MFT die-namic die on a 5 x 5 base card, sentiment Simply Said again.


Looking at the finished painting, I think I should have added a little more shadow to the central petals, but overall I'm quite pleased with the result, even if it looks nothing like Joanne's!

And relax, that's a wrap, as they say.

I hope you are inspired to get out those watercolours and have a play, it's only paper and paint in the long run if you make a mess. An old tutor of mine always said not to throw away your mistakes, they maybe much better than you think after a night's sleep. He's been proved correct on more than one occasion!

So until next time, keep crafting and stay safe.

Saturday 15 January 2022

Brand ambassador inspiration post : Hearts all over !

 Hi there!

Hannelie here today sharing a handful of cards with ideas for using hearts as the focal point on your cards ! I also hope you will find inspiration to look at your stamp sets with new eyes ! I used a few Christmas sets as well in some of the cards below. Showing the versatility of Uniko's products :)

 For the first two cards I turned the hearts into cacti !


For the first card I used :


... with googly eyes... 


For the second card I used :


Pulling the heart strings...


For the third card I used :


Some encouragement...


For the fourth card I used :


... and a very traditional Valentine's card !


For the fifth card I used :


I hope these cards will inspire you! 

Thank you so much for popping in today ♥

Hannelie


Thursday 13 January 2022

Mid Century Modern Hugs!

 Hello & Happy Thursday! 

How are we almost in mid January, already?! The days seem to be just flying by like crazy for me. Lots keeping me busy in the studio from organising restocks, prepping for our first show of 2022 (Stamperama Newcastle, designing new things, a new website AND prepping Uniko's BIG 10th Birthday Bash next month!

However, with all that, I have been able to sneak in a little creative time 😉  I was packaging some stamps today, one of the sets was Mid Century Modern Florals and a card design popped into my head. So before I forgot, I got to making it...


It's been a while since I built a flower using this set and this is one of my favourite combinations. I layered the fussy cut floral with the Background Block Mid Century Modern, which I have stamped through a circle negative mask. 


The sentiment is from Simply Said Blocks II, which I have stamped twice and trimmed to create two separate sentiment blocks. 

Short(ish) and sweet from me today because, as I am typing this The Beans are in the bath and most likely I will find two whales have magically been in there with them and splashed water everywhere! 

Until next time, Crafty Hugs

Tuesday 11 January 2022

Two For Tuesday - Large Background Sketched Foliage

Hello & Happy Tuesday! 

I was determined to get to make and share two cards in-between work jobs today and answering emails. So if you're awaiting a reply from me, I apologise, I *needed* to sit and create something! 

One of my jobs today was a stock check & website update. As much as this can be a tedious task, it was also a nice reminder of all the lovely stamps I have neglected to use! One that stood out to me today was Large Background - Sketched Foliage.


So I dusted my stamp off and got to inking it up. I had no particular plan or layout in mind and just went with the flow. 

With it being a large stamp, I use my stamping tool for this background. For my first card I trimmed a panel of white card to 10 x 13.5 cm and stamped the background onto it. I did mask the bottom of my panel to keep the border 'equal' by eye all the way round. 


With using a stamping tool I was able to easily ink the stamp with two colours. I stamped the top with Altenew Olive ink and the bottom with Altenew Moss ink to create a subtle two tone effect.


I think this foliage image is perfect for both feminine and masculine cards. So for this first card I kept it more masculine, simply adding the Happy Birthday sentiment from Floral Vines. I did embellish with a few enamel dots from my stash.


For my second card today I opted for a more feminine design and used just snippets of the background to create a fun focal point. 


As you can see I decided to pair the background with the smallest butterfly from English Country Garden Butterflies. I think the sketched foliage is a wonderful backdrop to pair with them. 


I inked and stamped the foliage in Altenew Olive ink. I then die cut 3 stitched circles from the panel and used the negative to help me place them onto my card base. The sentiment is from Simply Said Blocks II (available on backorder & due in 24th Jan) and I know so many people coming down with Covid, hence my choice! 


The butterflies are stamped, die cut and coloured with water based markers. I then added a colourful second non stamped die cut underneath, securing just down the body of the butterfly. I wanted to tie in the colours I used to colour and also create a feel of fluttering wings. 

I hope you've enjoyed this brief look at the Large Background - Sketched Foliage. I am always open to suggestions, if there is a particular stamp set, designer die or stencil you are looking for ideas for, just add them to the comments! 

Crafty Hugs

Monday 10 January 2022

Brand Ambassador Inspiration - Even more love...

 Bonjour !

Izzy here. First I wish you all a very Happy New Year full of love, happiness, health and a lot of craft !

To echo Steph's post (see HERE) and her cards full of love, today it's my turn to show you two cards.  They can be used for Valentine's Day, for a loved one or for a friend.


The first uses again the Always and Forever set that I associated here with the Beautiful Blooms I set and its matching dies. 

I stamped the heart on a scrap of white card stock, I coloured the flower with a colour pencil and I fussy cut it.

I die cut the small flower of the set 4 times then I stamped the flower in two colours using the second generation stamping technique.

I adhered the flowers and the heart on the double white card with glue dots and to finish I stamped a sentiment from the Simply Said Blocks III set that I foam mounted.


For my second card, I used the Big & Bold Love set together with the Background Blocks Nautical Stripes and the Background Blocks Scattered Hearts sets.

First I scored two lines on the double white card and I used the Background Blocks Scattered Hearts set on the left part of the scored lines.

On a piece of white card stock, I stamped the striped heart and I fussy cut it. Then, on another piece of card stock I stamped the Background Blocks Nautical Stripes that I die cut with a heart shape.

To finish, I stamped the sentiment and some tiny hearts on the double card and I adhered the two striped hearts with glue dots.

That's all for me today. Thanks so much for stopping by. Take care and give your Uniko's products some love !


Friday 7 January 2022

Uniko Challenge #68 Winners

  Hey!

I'm here today to announce the WINNERS of Challenge #68 Celebrate, optional twist Reds & Greens

A huge thank you to everyone who played along with this challenge.

First we have our overall WINNER chosen by the Design Team.

#56 Mugdha


Congratulations Mugdha!

Here's your winner's badge


You have won a £15 eGift Certificate to spend in the Uniko store. Please contact me at bev@uniko.co.uk by 21st January 2022.

 Next up is the random winner who twisted with us....


Congratulations Anita!

You have won a £5 Egift Certificate to spend in the Uniko store. Please contact me at bev@uniko.co.uk by the 21st January 2022.

Here is your winners badge:


Then we have our randomly selected winner who used Uniko products on their creation...


Congratulations Greta!

You have won an £5 Egift Certificate to spend in the Uniko store. Please contact me at bev@uniko.co.uk by 21st January 2022 to claim your prize.

Here is your winners badge:


Now for our Top 3 chosen by the DT and in entry order:

#24 Craftyfield


This is an entry from instagram. Please follow the link to view the card.

Congratulations to you all & here is your Top 3 badge:


You have all won 150 loyalty reward points.

Please contact me at bev@uniko.co.uk


Congratulations to ALL the winners & EVERYONE who joined in with the challenge!

Uniko is taking a break from challenges in 2022, but keep your eyes open for other ways to win Uniko goodies throughout the year.