Saturday 29 February 2020

The Saturday Show!


Hey & Happy Saturday!

I'm back with the February & 8th Birthday Edition of, The Saturday Show! The blog post I dedicate to my awesome customers.

I absolutely LOVE seeing what you all create using Uniko products, it makes me so happy to see you enjoying my designs and the new and creative ways to use them. As much as I inspire you, YOU ALL inspire me too.

I have seen SO many amazing cards using Uniko products this month. So here are just a few that have stood out to me that I have spotted around social media, blogs & Uniko's 8th Birthday Linky Party HERE.


Okay, so how about these first two cards from Carole, from Card & Cake. Carole has been a wonderful customer at Uniko for many years and I was delighted to meet Carole at Happy Stampers  Festival the first year & I think every year since I had a stand there :)


Don't you just love it when you find a stamp combination and layout you love, to then be able to create two cards with subtle differences. 


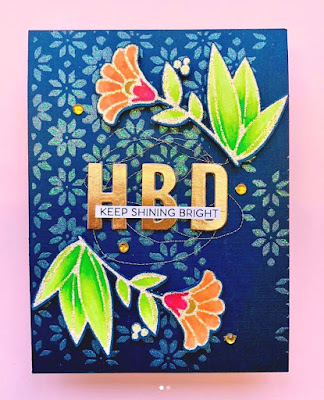
This combination of Background Blocks Pinstripe, Sentiments Outlined & You Are, Yes You clear stamp set is perfect. I am loving these cheerful Spring colours too, that really pop against the monochrome stripes. 

Be sure to pop on over to Carole's blog HERE to see more wonderful creations.

Next, I had to share this Beautiful Blooms II beauty by Vinita, I just LOVE seeing older Uniko clear stamps being given fresh inky love.


I particularly love how Vinita has used the bloom to create an all over pattern seen inside the circle die cut & then accentuated the design with a single bloom. This card really shows the capabilities of a small stamp set. 

Be sure to head on over to Vinita's blog Made With Love N Care, to see more beautiful creations.

Next I wanted to share a card by a new follower of Uniko, Dhruvika. Dhruvika doesn't own any Uniko clear stamps yet, but this didn't stop her from participating in the Uniko 8th Birthday Linky Party using one of Uniko's FREE Digital stamps.

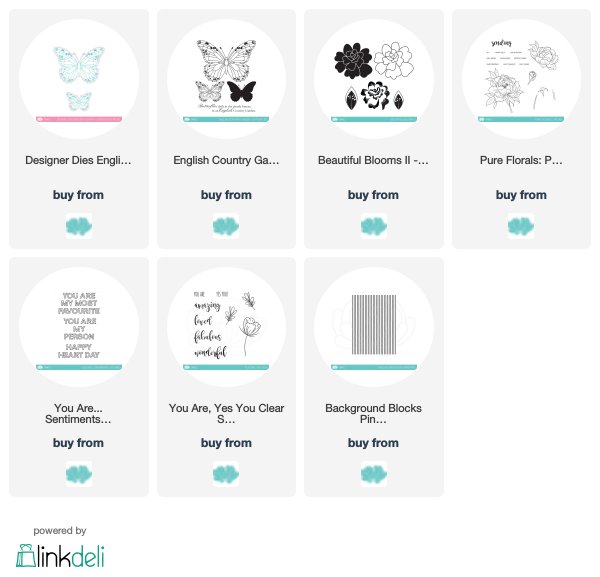
I have designed quite a few digital stamps and collection for various magazines now and although the page does need updating, there are a couple of freebies available for download on the FREEBIES page (link above) or HERE.


Dhruvika has been wonderfully creative with the Crocus flower from the Spring Botanicals digital collection from 2017. I just LOVE how she has made the image her own by creating a beautiful cascading bouquet down the edge of the card. The colouring and fussy cutting is AMAZING.

Be sure to head on over HERE to read more about this card and have a look around her blog too. I know you won't be disappointed.

Next I have another card using Uniko's FREE digital stamps, from another new follower at Uniko, Kavya.


I was delighted to be tagged by Kavya over on Instagram with this beauty using one of the images from the Fabulous Florals digital collection from 2016. It is hard to believe I designed this collection almost 4 years ago! 

Kavya has given them a fresh 2020's on trend look by pairing the florals with Pantone's colour of the year Classic Blue and the hints of sparkle and gold with the cheerful bright colours too. 

Be sure to give Kavya a follow if you are on Instagram.

Lastly for today I have a couple of cards by Nonni, that I spotted HERE on Instagram and also Nonni's blog, Nonni's Handmade Cards.


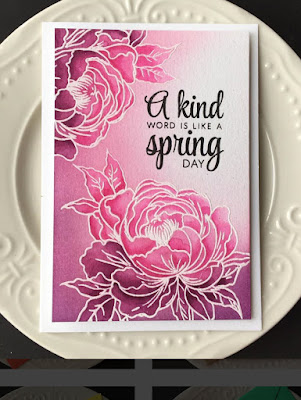
First is this absolute stunner using Uniko's popular Pure Florals Peony (back in stock soon). The ombre watercoloring is absolutely jaw dropping and really brings this big blooms to life. All the heart eyes for this beauty! 

And this, using English Country Garden Butterflies...


How happy and cheerful do these butterflies look dancing across the bottom of the card in those beautiful yellows and orange? The life and movement is wonderful and again, a delight to see this older clear stamp set being given fresh inky love. 

WOW! That is a whole bunch of inspiration to get your creative juices flowing, it certainly has mine. 

I hope you have enjoyed todays The Saturday Show & you are inspired as much as I am to find time to create today. 

If you would like to be featured on The Saturday Show be sure to #unikoltd #unikostamps on social media so I can find you. If you are not on social media but would like to be featured / have used your Uniko stash please email me a photo or link to bev@uniko.co.uk 


Thanks for stopping by today. 
Crafty Hugs

Friday 28 February 2020

Uniko Challenge #57 Winners

Hey!

I'm here today to announce the WINNERS of Challenge #57 Anything Goes, optional twist Cool Winter Colours

A huge thank you to everyone who played along with this challenge.

First we have our overall WINNER chosen by the Design Team...

#126 Mac Mable


Congratulations Mac Mable

Here's your winner's badge


You have won a £25 eGift Certificate to spend in the Uniko store. Please contact me at bev@uniko.co.uk by 13th March 2020

We would also love to have you join us as our Guest Designer for our next challenge. If you are interested please contact Jane at jane.taylor52@btinternet.com by 6th March 2020.

 Next up is the random winner who twisted with us....

#104 Anke


Congratulations Anke

You have won an in stock £5 clear stamp set from the Uniko store. Please contact me at bev@uniko.co.uk by the 13th March 2020, with your choice of stamp set and your postal address.

Here is your winners badge:


Then we have our randomly selected winner who used Uniko products on their creation...

#112 Anita in France


Congratulations Anita

You have won an in stock £5 clear stamp set from the Uniko store. Please contact me at bev@uniko.co.uk by 13th March 2020, with your choice of stamp set and your postal address.

Here is your winners badge:


Now for our Top 3 chosen by the DT and in entry order:

#37 Nananas
Uniko stamps

#129 Kavya

#132 Nonni


Congratulations to you all & here is your Top 3 badge:


You have all won 150 loyalty reward points.

Please contact me at bev@uniko.co.uk


Congratulations to ALL the winners & EVERYONE who joined in with the challenge!

The next Uniko Challenge starts on Friday 20th March.

Hope to see you come back and join in with the fun :)

Thursday 27 February 2020

Brand Ambassador Inspiration: Two more birthday themed cards

Morning all.
Julie here with some more cards to keep the birthday party running here at Uniko.


As you may know, we're celebrating Uniko's 8th Birthday.  We've had the Birthday Linky Party .....


...and there's the amazing Birthday Giveaway where one lucky winner will receive a fantastic prize.


Today I have a couple of birthday cards to share, one feminine and one more unisex.

Here's my first card using the recently released Hello Lovely and a sentiment made up from elements from both Birthday Sentiments and Festive Sentiments stamp sets. Yes I said Festive, Happy is not just for Christmas!


I thought I would include some pics of the make for this post, I usually forget until I have almost completed the card but this time I made a special effort, not so much for this card but for the second!

 Here are my elements, the peony cluster stamped and heat embossed with white EP, watercoloured and then fussy cut, a 5 x 7 white base card and a 61/4" x 4 1/4 " panel of matching card with an oval cut out.


I arranged my spray around the aperture and then placed the panel over the base card and traced the outline of the opening with a pencil. I then placed my base card in my MISTI and added the sentiment, stamping in black Memento. You need to rub the pencil out now!


To finish I popped the panel up on pads over the base and added a few sequins.


Now for my second card. 
(Just to warn you, this is a photo heavy description)
It's an interactive one, inspired by this this video on You Tube.


I started by inking a 9.5cm x 14.2cm white card panel with the Scattered Polka Hexagons stencil in bright colours, then cut a slot in it 11/4" x 1/4" as shown below. I also cut a strip of card 1" wide from A4 and scored at 2" and 21/2". From some scrap card I also die cut some balloons and inked them with bright colours. You could of course use coloured card if you have it.


You need to ensure that your central balloon is the largest and you have a slightly smaller balloon in the same colour.
Now comes the assembly, looks way more complicated than it is.
The die cut balloons were added onto the stenciled panel, mainly around the edge and trimmed back to the edges of the panel. 
On the 2" end of the long strip I added some strong double-sided tape and then the smaller of the pink balloons which was stamped with a sentiment from the Anniversaire Arts set, the edge of the balloon is just touching the fold. I did have to trim the excess white card away, you can take away but never add!


On the large balloon, I stamped the sentiment from Birthday Wishes and then added it over the top of the first onto the 1/2" space on the strip with just the widest part hanging over the fold.


Now its time to add this mechanism to the card. 
The long section of the folded strip was slipped through the slot and secured to the base with more strong tape, just on the edge of the smaller balloon, making sure the large balloon was central on the panel.


Flipping the panel over I added more tape, keeping it away from the mechanism.


Then added it to an A6 black card which I had trimmed down by 1cm so that there was room for the pull element in an envelope.


By pulling the end of the strip the top balloon flips back to reveal the hidden sentiment.
I trimmed the excess card from the mechanism and added a pull instruction, some hi-lights with a white gel pen onto the balloons and some strings for the balloons with a black fine-liner.


And breath, told you it was a photo heavy post!
Well you may need a lie down in a darkened room after that but hope I've inspired you to have a go and perhaps join in with our birthday theme, you've only got a few days left!

Thanks for stopping to read until the end, see you back soon.

Wednesday 26 February 2020

Brand Ambassador Inspiration - More Birthday Fun!

Hello there! 
It's Sarah here with my Brand Ambassador Inspiration post for February and you're no doubt aware it's Birthday month here at Uniko so we've been featuring lots of birthday related cards, particularly using the new release goodies that became available on Sunday. 

Sadly we're nearing the end of the birthday month but it's still worth sharing a few birthday creations I thought - although this trio features older sets instead of the new releases!

I love the BIG & BOLD sentiment sets, especially those with dies so here goes using BIG & BOLD Happy plus BIG & BOLD Wish along with Organic Wishes (made into birthday fireworks / party poppers)! 


In addition to the BIG & BOLD sentiments I've created a frame for the focal sentiments using some smaller images from the set as well as Balloon Bash - just because you can't beat balloons for birthdays!


Next up using the BIG & BOLD Wish set - who says candles can't be upside down!!! 


... and the last one featuring BIG & BOLD Wish teamed with Organic Wishes to create some celebratory fireworks!

Thanks for calling by and I hope you've enjoyed all our Birthday inspiration and celebrations on the blog this month and lastly, DON'T FORGET there's still time to enter the HUGE prize giveaway to 'WIN stamps for a year' details on THIS post!


Tuesday 25 February 2020

Brand Ambassador Inspiration ........ Easy foiling with Uniko Stencils

Happy Tuesday .......

It's Linda here with my Brand Ambassador Inspiration post for February.
It's been a busy month, and it's not over yet! 
We're celebrating Uniko's 8th Birthday.  We've had the Birthday Linky Party .....


There's the amazing Birthday Giveaway ....... where one lucky winner will receive a HUGE prize .....


And of course there's the brand new February/Birthday Release which was launched at the weekend. 
As I said ..... a busy month!

Today I've got a few ideas for you using some simple foiling techniques with your Uniko Stencils.

Foiling seems to be one of the popular techniques at the moment, and there's a few different ways of adding the pretty, shiny foils to you cards, using stencils.

Stencil paste is one of them ......  I'm not sure if they all work in the same way but, I use the Sweet Poppy Stencil Medium and it works a treat .......


Simply apply the medium through your stencil design (Mid Century Modern Squares) and then let it dry completely.  I tend to leave it overnight but depending on the stencil design, and the temperature of your craft space an hour or so should be fine.
Once it's dry, lay your foil over the top, pretty side up, sandwich your card and foil between copier paper and then run it through a laminator.  It doesn't have to be anything fancy ..... mine is a cheap and cheerful one, bought years ago and works fine.


What I will say is ...... don't have the temperature too high, that way you'll avoid getting foil where you don't want it!

Use your finished pieces as backgrounds for your stamped images (Hello Lovely) ........


Add a touch of colour and a simple sentiment ......


Foil Transfer Gel works in the same way ........ apply the gel through your stencil (Party Confetti), let it dry and then add your foil.  Some gels work with heat ....... the laminator, and some also work with pressure.  Instead of using the laminator run the foil and card through your die cutting machine.


Deco Foil Duo Transfer Gel works with, or without heat ......... and gives great results eaither way.  I used my Big Shot ...... sandwiching the foil and card between copier paper and using the same plates as I would for cutting thin metal dies.  You may or may not need to add a shim, it depends on your machine.


I added a collection of sentiments (Simply Said Blocks & Simply said Blocks II)  on the top for a really simple but fun design


Another easy way of adding foil is to use the sticky embossing powder ......


This works just like any other embossing powder, except when you heat it, it goes tacky.

I inked through my stencil (Nature's Treasures II) using Distress Oxide ink ..... Oxides tend to stay wet a little longer so if you're quick you can get the powder on top before they dry.


Heat it as you would regular embossing powder, once it goes clear quickly lay the foil over the top, gently rub over the design and peel away the excess.  You don't always get a clean finish but, I quite like the distressed look.

Finally .... a really quick and easy way to add foiled accents is simply apply the foil over your double-sided tape


I like to use the Ultra Tacky stuff .... you know the one, with the red backing, gets everywhere!
I simply run the tape along the edge of my card and apply the foil over the top.  Give it a rub to burnish the foil onto the tape and then peel back the excess ...... so pretty!


Thanks for popping by .... enjoy the rest of your day.

I hope you've enjoyed the Birthday month celebrations, and as I've said they're not over yet.
There's still time to join in the fun ....... the Birthday Linky Party is still open,  there's still time to join the Huge Birthday Prize Giveaway  and the Blog Hop is still running.
Oh!  and don't forget ....... for the whole month of February you can save 10% on all your Uniko purchases.  Just add the code .... CELEBRATE8 before you check out.


Cheerio until next time ......