Showing posts with label Alphabet Outlined. Show all posts

Monday, 17 June 2024

Brand Ambassador Inspiration - Masculine Monday

Morning all, 

Steph here today. Welcome to my Uniko Brand Ambassador Inspiration this month where I am focussing on those oh so difficult masculine cards, using Uniko Bauhaus Blocks stamp set.


For this card I started off with Uniko Background Blocks Linear stamp and used green ink on cream card. On another piece of cream card I stamped one of the stamps from the Uniko Bauhaus Blocks stamp set, also in green ink, and after colouring with alcohol markers adhered this with foam pads. The sentiment is also from the Bauhaus Blocks set and stamped in black ink. Finally the whole panel was adhered to a black card base. 


For my next card I chose a different one of the Bauhaus Blocks and stamped it in black, blue and green ink, following which I coloured each with alcohol markers in coordinating colours. On a separate piece of card I stamped a red block and coloured with red alcohol markers. This I adhered to the panel using foam blocks. I then stamped the 'Happy Father's Day' sentiment in red using a mixture of Uniko Everyday sentiment sets. I then stamped the letters DAD from the Uniko Alphabet Outlined stamp set, coloured and adhered these to the panel using foam pads. 


For my final card today I started off with the Uniko Mid Century Modern Shapes stencil and three distress oxide inks. After randomly stencilling the background I stamped the Bauhaus Block in black and coloured random areas with a black alcohol marker. 

I hope this has given you some inspiration for masculine cards, and more ways to use your Uniko stash.

Much love
Steph x

Friday, 2 February 2024

Celebrating 12 Years - Fun Birthday Inspiration


Hello & Happy Friday! 

It's all about birthdays this month at Uniko as we celebrate twelve years. So it should be no surprise that the creative inspiration being shared will be birthday themed. 

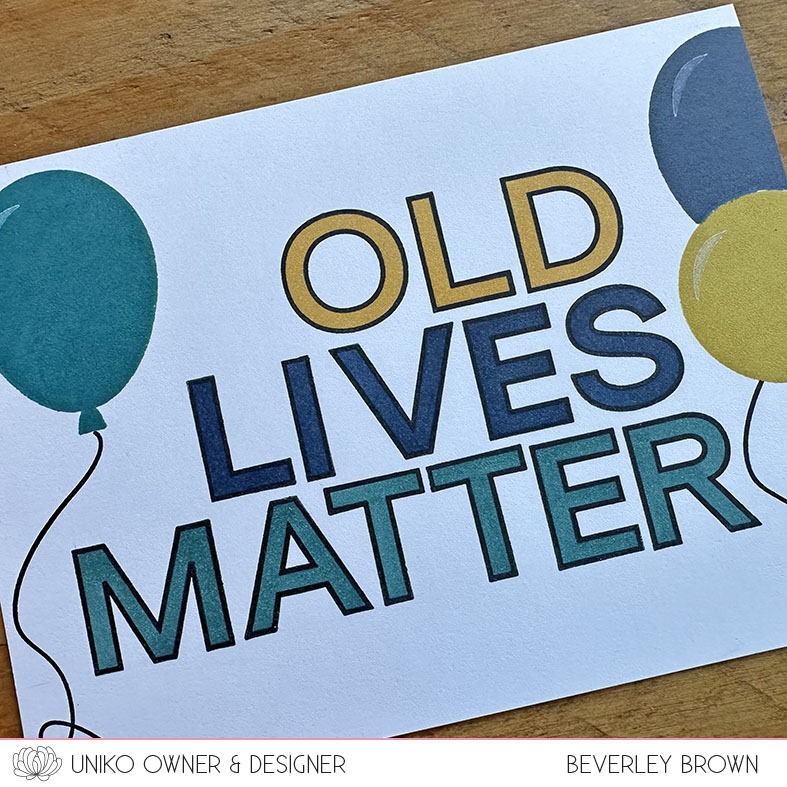
A while back I spotted a fun sentiment on a card and it made me chuckle, so I decided to use it for my card today. 


As this is a unique sentiment, I dusted off my trusted Alphabet Outlined to stamp it. My intention was to stamp the sentiment central on my one layer card, but as you can see that didn't happen! I quite like the stagger/step effect that it turned out to be in the end.


I had my brother in mind for this card, he turns the BIG five zero later this month and so I chose some masculine colours to stamp the balloons from Balloon Bash in Peacock, Midnight and Stardust. I then matched the colours to Copic Markers as best I could with the ones I have to colour the sentiment.

If you missed day 1 of the celebrations and first of the giveaways, be sure to check it out HERE. I do hope you will join me tomorrow for more inspiration and a giveaway you will not want to miss! 

Crafty Hugs


Thursday, 4 May 2023

April Showers Bring May Flowers

Hello & Happy Thursday! 

It's a late one for me in the studio tonight as I finally get round to sharing one of the cards I created today. 

Since coming back from the show I have been inspired to dust off some older clear stamp sets and products and breathe some new inky life into them. I love new products, but I know from speaking to crafters at the shows these past weekends and for myself, it is easy to get caught up in the constant flow of using and buying new and neglecting older stuff we once loved.

One of the collections I have neglected is the Flower Power clear stamps. So with it being May and as the saying goes, 'April Showers Bring May Flowers'. I thought I would start with these sets.

Today I started with Flower Power #8, the newest of the collection to create this fun and colourful card.


I started by stamping a cascade of the line flower in black ink across the diagonal of my card panel. I then used a trio of Stampin' Up! Blends in each of the colours to colour the flowers. I also coloured and fussy cut 3 flowers to add after I had decided upon the sentiment.


For my sentiment choice I finally decided upon Alphabet Outlined, of which I created the HAPPY. I stamped each of the letters in black and then coloured them with a fine liner. Each of the letters are fussy cut and adhered using fine glue. The birthday part of the sentiment is from Birthday Sentiments and again I have stamped and fussy cut the wording. It is then adhered using foam adhesive. I finished the card by adding the individual flowers with foam adhesive and some tiny sparkly rhinestones. 

So what do you think of this fresh inky creation? 

I sure had fun playing with this set and enjoyed pairing it with some other clear stamps that haven't seen much ink lately! 

This is all I have to share today, but I will be back on the blog tomorrow with more creativity and a winner from the Designer Dies Natures Treasures II blog hop.

Until then, thank you for stopping by.

Crafty Hugs


Thursday, 27 May 2021

Brand Ambassador Inspiration - Giraffe, Tiger & Zebra Stencils

Morning All

Steph here with my first Uniko BA Inspiration post. I hope you love it! 

Today I am showcasing a trio of cards made using Uniko GiraffeTiger and Zebra print stencils. I love animal print so I was super excited to get these when they were first released. Here, I have used them with metallic embossing powders to make super luxurious cards. 


My first card uses the Tiger print stencil through which I have applied embossing ink. Before I added the ink, I masked off a rectangle in the bottom right where I wanted to stamp the 'WILD' sentiment.
Once inked, I removed the stencil and applied the metallic embossing powders one at a time. I used gold, silver and copper powders. After I had heat embossed the tiger I stamped the 'WILD' sentiment onto the same piece of card. I also stamped the 'HAVE A' and ‘BIRTHDAY’ onto separate pieces of black card before applying powder and heat embossing. The sentiments are from the Uniko Wild stamp set. The stencilled panel is layered onto a Kraft card blank and the additional sentiments have been added with foam pads.


My next card uses all three animal print stencils and in much the same way as the tiger card, I have inked through the stencil with embossing ink and added metallic embossing powder. Once heat embossed I die cut the squares and layered them onto a larger square of black glitter card. The final square is a sentiment from the Uniko Birthday Sentiments stamp set which I have heat embossed in gold.


And for my final card, I created a black slimline card blank and heat embossed the zebra print stencil down the left hand side and the giraffe print stencil down the right hand side. I then heat embossed the letters and numbers HB2U (Happy Birthday 2 U) from the Uniko Alphabet Outlined stamp set. I created some banner shapes from the leftover embossed pieces from the previous card and added these to the top right of the card to finish.

I have to say that these have turned out even better than I imagined so I'm really pleased and I hope you like them too. 

That's all from me for now.

Much love
Steph x

Wednesday, 27 January 2021

Brand Ambassador Inspiration : Always & Forever

Hi there!

Hannelie here today with not one, but four cards to show you a variety of designs and color ways with the Always & Forever clear stamps set!

Lots of photos to follow 💕


Card #1:


Card #2 :


Card #3:


Card #4:


For all the cards I used : 

Always & Forever clear stamp set

For Card #1 , I used the Alphabet-outlined stamp set to create the background. I used a heart shape mask (die cut) and stamped the X's and O's randomly .

A single black rhinestone to finish off the card.


For Card #2, I used the Quilted stencil as background.


For Card #1 & 2 :

  • Inks used : Altenew Ruby Red & Versafine black ink

I used my Silhouette cameo to cut out the stamped images and popped it up with foam squares over the stamped/stenciled BG


For Card #3

  • Inks used : Spun Sugar, Faded Jeans & Iced Spruce Distress Oxide Inks
  • Sentiment from Simply-said-blocks

For Card #4

  • Inks used : Spun Sugar & Picked Raspberry Distress Oxide Inks
  • Flat back pearls


For Cards #3 & 4 I used the Quilted stencil as BG and my Silhouette cameo to cut out the stamped images. Foam squares were used to pop up the stamped hearts over the stenciled BG.


Thank you so much for popping in to take a look... I hope you feel inspired 😊

Hannelie

Thursday, 31 December 2020

See Ya 2020!

 Happy New Years Eve!


My apologies for my disappearance just before & over Christmas. I simply took on too much and got totally overwhelmed before Christmas with how much I needed to get done and then Christmas Day came & went! I have since been enjoying some much needed downtime with The Beans & my husband.

This is a little snapshot of our Christmas Day!


I hope you all had a lovely day even though it may have looked different this year under the circumstances. 

As 2020 draws to a close, one of the strangest and another of the hardest years in my 41 years of life, I am looking not to what was bad or hard, but to all that I am grateful for. 

I am grateful for...

 good health
my family
 to have a roof over my head
for my business 

FOR YOU ALL HERE 


Thank you for your continued support & custom at Uniko and sticking with me during one of the toughest years. This card is for YOU ALL.


Today after clearing a walk way and an area on my desk, I made time for me in the studio to create this simple one layer thank you card. Apart from the smaller thank you stamps and one which is on the retired shelf, I think I *need* to design some larger thank you sentiment stamps ;)


Though having Alphabet Outlined is proving to be very useful to spell out larger words, which is what I did for todays card. I paired it with the flower from You Are, Yes You and simply coloured with Copic Markers.

That's all my creativity I have to share with you today, but before I go and maybe pour myself a large glass of gin, I have a little discount code for you to use on the Uniko website.


THANK YOU once again for all your support & custom. Cheers to a New Year with LOTS more exciting Uniko products to come your way. Nothing, not even Covid 19 is going to stop me from bringing you more FUN and inspiration.

Crafty Hugs 
Bev x


Friday, 14 August 2020

Hey You

 Hey & Happy Friday!


I do hope you are well. It's been a while since I checked in over here, so I thought I would share my most recent masculine make with you...


I love the Background Block Mid Century Modern for masculine cards and it is so easy to use to create an all over background too. 

You might be thinking that my chosen colours are not very masculine, but I used my friends favourite colours. I kinda like the combo of grey, aqua and purple. 


'Hey You' is my usual greeting in a text, so it seemed an appropriate greeting on my card for him. Alphabet Outlined is perfect for creating your own focal sentiments. I used foam adhesive to give a little dimension and I added a few enamel dots for added interest.

I hope you all have a lovely and creative weekend :)

Crafty Hugs
Bev


Tuesday, 17 March 2020

Brand ambassador inspiration : Flower power #7

Hi there!

Hannelie here to bring you some inspiration and ... wishing you a happy St. Patrick's day 🍀

Today I am showing you three cards using the Flower power #7 stamp set. I combined the sweet flowers in the set with newer products, stamps as well as stencils, to create different looks.

Card #1


On the card above, I combined the solid flower with the Alphabet outlined set and sentiment from Happy succulents clear stamp set. I used a mask , created with a circle die, and stamped the flowers ( which reminded me a bit of the shape of a clover ) randomly to create a background for my sentiment. Everything stamped with my Misti and Altenew green inks and Versafine black ink. I finished off this one layer card with tiny black rhinestones.

Card #2


I used the same circle mask I used for the first card to mask off the focal point. I then used the Bright butterflies stencil and Altenew inks in red and purple shades for the butterflies. With the mask still in place I stamped the outline of the flowers using the rule of threes to draw the eye to the sentiment which is from Simply said blocks set. I finally added rhinestones for added interest.


Card #3


For this bright and happy card I used the solid flowers and a wreath builder (template cut with my Silhouette cameo). By changing the position of the stamp on the Misti, I could have stamped a bigger circle of flowers, but I liked the way how it actually created a little cluster of flowers ! I picked two shades of Altenew yellow ink ( Note to self... next time pick two shades with more contrast ;) . I then stamped the outline flower in black and popped the sentiment from Simply said blocks up with foam dots. Once again tiny black rhinestones in the flower centers for interest. A colored card base just to add some extra yellow 😀

I hope this will inspire you to mix the old and new, stamps and stencils to create something amazing !

Thanks for visiting Uniko today!

Hannelie