Thursday 31 August 2023

Brand Ambassador Inspiration - Fantastic Foliage


Good morning, crafters

Anita here, and today I have two cards for you, both using different Uniko foliage sets.  I've had these sets in my stash for a while but this is the first outing for both of these!  Two very different stamps and two very different cards.

First up, I've used a beautiful stamp set which is part of the Framed series, Framed - Floral Vines...


I chose to use a pale grey cardstock for my main panel.  I began by stamping the image in Antique Linen Distress Ink.  This is the ink colour that I always use for this technique, where I want to colour the image and then re-stamp and emboss after, as it is pale enough to disappear under the final embossed lines.  So after stamping I coloured the leaves and flowers with Copic markers.  Then, with the stamp still in the same position in my Misti, I re-stamped in VersaMark ink and heat embossed in white.  I added the sentiment in black, which is from the Birthday Wishes clear stamp set, before trimming down the grey panel and also the card base to fit the ratio of the framed image.


For my second card I've used the Large Background Sketched Foliage stamp...


This is a technique I've not used in a while - layered emboss resist.  A little time consuming but you can create some great effects with it.  I just used one layer on this example but you can use multiple layers if you choose inks with varying depths of colour, starting with the lightest.  I began with a white cardstock panel and roughly ink blended using Distress Oxide in Twisted Citron and Mowed Lawn.  I then left it to dry before stamping the image in VersaMark and heat embossing in clear.  The clear embossing powder ensures that the ink shades you've applied on the first blend are trapped under the embossing.  I then ink blended with the darker shade, Rustic Wilderness, over the entire panel.  The embossed areas then just need a buff with a soft cloth to wipe off any ink being resisted.  For a little interest I added some water droplets and blotted these away to remove some of the colour.  The panel was die cut with a stitched rectangle and I added a strip using a sentiment from the Simply Said clear stamp set.


I can't believe it will be September tomorrow, it doesn't feel like we've had summer yet here in the UK.  I'm not quite ready to start with the autumnal projects yet so let's hope September will bring summer back, at least for a little while!

Thanks for popping by today.  I have a little time off work next week so I may be back sooner with more inspiration for you.


Tuesday 29 August 2023

BA Inspiration - Technique Tuesday, Using Sentiment Stamps For Backgrounds

 Good morning Uniko fans, Julie here with another BA post using sentiment stamps in a background. I love using sentiments for a background and have shared many ideas over the years such as here, here and here but this time I've been inspired by Jennifer McGuire to use a turnabout jig to create one.

Here's my first idea, using English Country Garden stamps and dies and some birthday themed sentiments.


I started with an A6 panel of white card and using a freehand cut shape to match my jig middle, I glued it temporarily onto the center of my panel and secured my jig into my MISTI. To get a feel for my layout, I started with the largest sentiment stamp and set off, turning the panel after each time I stamped. Once I could see where the gaps were, I used smaller sentiments to infill and repeated the stamping and turning. 
I stamped my butterfly on one of 3 white butterfly die cuts and coloured it with Copics. From the remaining die cuts, I removed the antennae and lower half of the body and folded them in half down the middle. These were then glued to each wing, meeting at the center and the other flaps were glued over the turnabout panel.  My panel was trimmed and added to an A6 white note card.

I rather liked the effect of the dancing butterfly over the sentiments, so tried another idea out, this time using the Sparkling Snowflake die and some appropriate sentiments.


This time I used Altenew Iceberg ink for the stamping, some of which I double and even triple stamped to increase the saturation of colour. Instead of using all 8 points of my stamping jig, I just used every alternate one, it gives a slightly different effect and I was able to use more sentiments.

The main snowflake was cut from holographic silver card and two others from matching white card folded down the middle and attached the same as the butterfly. One of Bev's sentiments describes the effect perfectly, Snowflakes are winter's butterflies!

So that's all from me for the moment, hope I've given you some inspiration for you to give it a go
Stay safe and keep crafting!

Monday 28 August 2023

Merry Monday BA Inspiration with Mid Century Modern Wreath Builder & BB Arts Décoratifs Christmas

 Bonjour !

Izzy here with my last cards to inspire you with the last release products. This time I used the Mid Century Modern Wreath Builder & the Background Blocks Arts Décoratifs Christmas sets.

Let's go with the Mid Century Modern Wreath Builder. I saw recently a video from Jennifer McGuire and she was using a 4-for-1 card technique to make beautiful and quick cards. Honestly this is really what I need when Christmas is too close and that I'm running out of time to make cards. She made this technique with stencils but I tried it with stamps and my MISTI.


I didn't make 4 cards because I was only able to put two pieces of white card stock in my MISTI at the same time. To help you to understand, the red/orange wreaths on both cards is only one stamping action. Same for the green one and for the gold outlines embossing.


To make the cards, I used Kaleidacolor inks so that it changes a bit of colours on each card. For the holly and the berries stamping, it was just about to place them in a corner and then turn the card to stamp them back. 


The only things that change from one card to the other, are the colours, the card bases and the sentiments (both coming from this set).

It was just a try but I finally loved how they turned out and I think I will use this technique in December!

For my third card, I combined the Background Blocks Arts Décoratifs Christmas together with the Background Blocks Arts Décoratifs that I used as background. I thought it was an original matching but I didn't know by that time that my team mates' had had the same idea. Anyway, I hope that it will still inspire you.


On a black double card, I stamped and gold heat embossed the background. And on a gold card stock I stamped in black the BB Arts Décoratifs Christmas. 


To make it pop up even more, I just added some colours to the trees and the stars. No sentiment needed as it speaks by itself.

Et voilà ! That's all for me with the Christmas cards. I hope that you have enjoyed the inspiration and thank you so much for stopping by.


Friday 25 August 2023

Festive Friday Mix

Hello & Happy Friday.

Another week of the school holidays is almost over and in honest truth, I'm not quite ready for them to end. Just one more week and a couple of days to go. Plus a week tomorrow The Beans turn 9. THAT, I know I am not ready for! 

Firstly I am nowhere near prepared celebrations wise, a party to organise, cakes to make and everything in between. Secondly, they are growing up way too fast and it's like this instinct of wanting to keep them little for as long as possible.

Anyway, enough of my sentimental rabbling, let's get to my card....


Last week the most recent release restocks arrived along with a few other requested clear stamps. One of them was Rustic Wreath. So I had an inspirational creative moment and decided to pair the Rustic Wreath with sentiments and elements from Mid Century Modern Wreath Builder.


I'm pleased with how this turned out, I was unsure as to how the modern rustic look would pair with the quirky Mid Century style, but I like it. 


A bit of dimension on this card with the white stamped panel and the bow adhered with foam tape. But still it will get through normal post as my tape is the 1mm thick, so 2mm in total plus the card thickness. 

I hope I will get some time this evening to create once appointments, swimming lessons and dinner is done. The Beans are off to the PIL with their usual Friday night sleepover.

Have a lovely day! 

Crafty Hugs 
Wednesday 23 August 2023

BA Inspiration Post with Pure Floral Gerbera stencil

 Hello friends!

Happy Wednesday!

It's time for some inspiration with me!

Today I wanted to showcase the Uniko Pure Floral Gerbera stencil and paired it with English Country Garden butterflies with two different looks!

Card#1

Who are ready for fall!!! I love the fall colors as the leaves begin to change and the weather turns cooler!

Here is my interpretation of the fall colors........


I started with using Distress inks and white pigment ink using the Gerbera floral stencil in fall colors. After blending the inks I fussy cut the floral image.
On a white piece of CS, I used MOD background Builder stencil and stamped the sentiment from the Yes, You Are stamp set. I love the soft look background with stripes!

Then stamped the largest butterfly and watercolored it with my ZIG watercolor brushes, die cut it.
In the end, I assembled all the elements with some die-cut leaves. 


Card#2


Once again I used the Pure Florals Gerbera Stencil to showcase its beauty!

I started with white pigment ink on a wine-red CS. For a detailed and deep look at the centre, I overlapped the centre with aged mahogany DI.
I stencilled the flower 2 times with the same method. Now on a white CS base at the top, I stencilled some wonky stripes look by overlapping it using Wonky stripe stencil with the same colors.
Now added a sentiment white strip with my inked flowers and some cute stamped flutters-by. I accented it with some white pearls and some Posco white paint dots in the centre of the flowers.


Hope you enjoyed it!
Happy crafting with Vinita!!


Tuesday 22 August 2023

One Layer Happy Birthday

Hello & Happy Tuesday! 

It's week 5 of the school holidays and I feel it's zooming past. I don't feel ready for them to be over quite yet, I'm enjoying the non routine of life. Creating has been a little bit hit and miss this past week, but I did manage to make a quick one layer birthday card for my Mother In Law yesterday.


I'm trying hard to embrace the soft stencilling and I achieved this by not inking my blending brushes at all with fresh ink. I simply used what was remaining on each of these coloured brushes and I am delighted with the results.


I wanted a silhouette image to layer over the Stencil - MOD Background Builder and decided upon the one from Just Because and the sentiment from Happy Days. A few enamel dots in Pebble finished my quick make.

I hope you are all well and enjoying the remainder of the summer. Who knows, we might get a nice Indian Summer for September  - here's hoping! 

Crafty Hugs 


Monday 21 August 2023

Merry Monday BA Inspiration with Mid Century Modern Baubles

Bonjour !

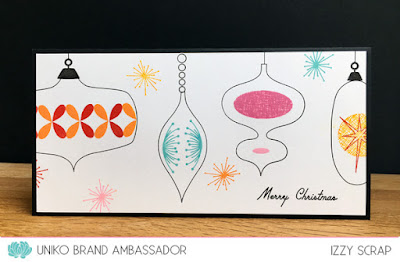
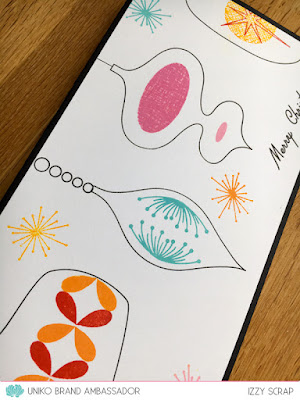
Izzy here. Today I'm back with a new Christmas card. This time I used the beautiful Mid Century Modern Baubles set from the last release to make my card.

This baubles set is a beautiful addition to the Mid Century Modern (MCM) collection so I wanted to show you how I got inspired with this set combining it with other sets of the MCM series.


For my first card, at the beginning I had the design in mind but I didn't know which colours to use and it naturally came to use Uniko's colours.


So I simply stamped the baubles on three different coloured card stock. I used some of the little stamps from the set to decorate them, and I used one of the Mid Century Modern Frames to stamp the sentiment. I fussy cut the baubles and I glued them on a slimline card. 


I kept on with a slimline design for my second card, but this time I used the Mid Century Modern Florals to decorate the baubles.


I simply stamped the baubles on a white card stock and I used some elements of the Mid Century Modern Florals with Distress Oxide inks to add some colours. 
I stamped the sentiment and I glued the panel on a black slimline card. Done !


Before leaving, I remind you that the July/August Release sellouts are back in stock !


That's all for me today but I will come back next Monday with other Christmas cards. Have a lovely day and thank you so much for stopping by.


Monday 14 August 2023

Merry Monday BA Inspiration with Mid Century Modern Christmas

Bonjour !

Izzy here with a Merry Monday card to add to my Christmas card stash. I thought I would share two cards from the most recent Uniko release as I was not able to participate.

Before being able to play with this new release, I made sure not to look at my team mates' cards so as not to be influenced by their beautiful creations (I now had a look 😍). It seems that I had the same ideas as some of them, but I still hope that I will give you new inspirations with this release's products.

Today I will start with the Mid Century Modern Christmas set.


For this one I went for a one layer card using this new set together with the cat from the Mid Century Modern Purrfect Day set. I saw afterwards that Julie had had the same idea. 

This little tree together with the presents reminded me the last Christmas when my cat jumped into the bag of gifts I had just put under the tree.


For lack of space we have a thin and tall Christmas tree that I represented on my card by stamping the fir 4 times one below the other thanks to masking. I also used masking for the cat and the presents.

I coloured everything with colour pencils and I stamped the sentiment in two parts. In black for the Merry and in red and clear embossed for the Christmas.

To finish I added some stars, also from the set, and I gold heat embossed them.


For my second card, I went for a slimline one with a CAS look. I started by die cutting a rectangle bordered with triangles on which I stamped 5 trees that I coloured with rainbow colours.

I adhered this panel on a slimline double card and I stamped the sentiment that comes from the Mid Century Modern Baubles set.

That's all the Bright and Merry I have to share with you today, but I will be back next week with more to share with this new release.

Have a lovely day and thank you so much for stopping by.


Wednesday 9 August 2023

Good News!

Happy Wonderful Wednesday.

I'm back today with good news and a card. 

So before I get to my card, how about the news. You might have seen on the website, or the post I shared on social media the day after release. My sincere and HUGE thanks to you all for the overwhelming love, comments, support and record amount of orders, that I have (apart from the backorders) now completed and posted. That all but two of the products sold out.

I know a few missed out on ordering, which shows with the backorders that are already stacking up, thank you! 

The good news is, you don't have to wait long for the restocks to arrive. They are due in the studio Thursday 17th August along with a few other restocks. I will share here on the blog, social media and via our newsletter to announce their arrival. Backorders will be my priority as soon as they land in the studio.

Now onto my card...


If you saw my release day Facebook Live or caught the replay HERE. You might recognise the bauble on this card. I demonstrated my reverse masking technique with Mid Century Modern Baubles and then I used the Stencil - MOD Background Builder to add the detail. 

I decided my base card needed a little pattern too, which for a clean & simple card maker is quite unusual! I was looking through my stamps and felt I have neglected so many of them that I am going to try my best to give some older clear stamps some love and pair them with the new release. 


One of the clear stamp sets I've neglected is Background Builders Classics. So I used the stripes to create my own simple tone on tone plaid. I finished off with a sentiment from Simply Said Blocks Christmas (back in stock next week) and some enamel dots.

I think that's all I have to share today. Once again, thank you for making this an amazing release.

Crafty Hugs 


Tuesday 8 August 2023

Brand Ambassador Inspiration - Picked Posies

Good morning all, 

Thanks for joining me, Steph, today for my Uniko Brand Ambassador Inspiration post. I thought it would be nice to show off the range that Bev created exclusively for Craftstash called Picked Posies.

My first card uses the Uniko Picked Posies Fresh Cut Foliage background stamp and adhered this to the card blank at an angle. I then stamped and die cut the florals from the  Picked Posies set. The sentiment is from the sentiment set of the same name and I have fussy cut it and adhered it over vellum before adding to the card front.


This time I created a monotone card and stamped the background in two shades of purple. Directly onto this I stamped the outline and solid Picked Posies stamps. Finally I die cut the word ‘smile’ using the Uniko Picked Posies Smile layering sentiment.


My final card uses the Picked Posies Plaid layering stencil set over which I have added flowers and foliage stamped and die cut using the Picked Posies set.

This range is currently on sale exclusively at Craftstash so if you like what you see then head over and check them out!


Much love
Steph x

Sunday 6 August 2023

2023 July/August Reveal, Release, Brand Ambassador Blog Hop & GIVEAWAY!

Hello, Happy Sunday AND Happy New Release Day!

I'm super excited to share these new products with you and they are now officially available to purchase over HERE on the website.

But, let me first formally introduce them. 

First up we have 3 new clear stamp sets to add to our popular Mid Century Modern collection. This first large A5 clear stamp set, Mid Century Modern Wreath Builder features a fun wreath in both solid and outline, a mix of sentiments in a font style I was inspired to create myself and a variety of bows, berries and holly leaf accents.


Mid Century Modern Wreath Builder £16
Copyright Uniko Ltd 2012 - To Date


Next is a mini clear stamp set featuring a larger version of the 'Merry Christmas' from Mid Century Modern Wreath Builder. Along with a fun geometric Christmas tree and accents.


Mid Century Modern Christmas £6
Copyright Uniko Ltd 2012 - To Date


Lastly in the Mid Century Modern line up is Mid Century Modern Baubles. This clear stamp set features 3 bauble shapes and a variety of building accents to create beautiful festive hanging baubles. Plus a variety of mix and match sentiments in the same font as sentiments from Mid Century Modern Frames.


Mid Century Modern Wreath Baubles £16
Copyright Uniko Ltd 2012 - To Date


All these new Mid Century Modern clear stamp sets are designed to give a wealth of creative options on their own. But also pair beautifully with any of the previously released Mid Century Modern products for even more. 

Next we switch to our Art Deco inspired product and a new Background Block, Arts Decoratifs Christmas. Again, so much creative potential using it on it's own. But it also pairs beautifully with our previously released products in this range.


Background Blocks - Arts Decoratifs Christmas £6
Copyright Uniko Ltd 2012 - To Date


Lately, but by no means least for the clear stamps is a new addition to the Everyday Sentiment series. This clear stamp set of family members has been a long time coming. I was just waiting for the right font and I have definitely found it! 

These pair beautifully with Everyday Sentiments, Everyday Love Sentiments, Everyday Spring Sentiments, Christmas Sentiments and the sentiments from Floral Vines. I've tried to cover as many spelling variations around the world and personal preferences that I could fit into an A6 clear stamp set. 


Everyday Family £11
Copyright Uniko Ltd 2012 - To Date


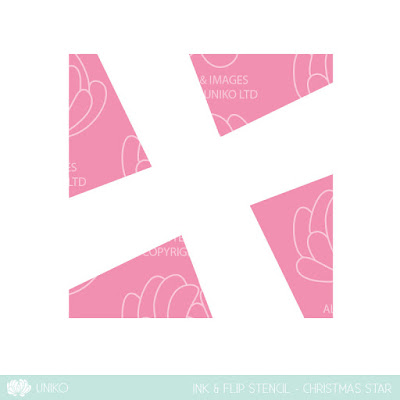
And finally the last product is a new stencil with a fun new feature, Ink & Flip! This design when inked and flipped creates a fun geometric Christmas star, but as the Brand Ambassadors have shown, it has more creative options. 


Ink & Flip Stencil - Christmas Star £4.25 
Copyright Uniko Ltd 2012 - To Date


And now we have the formal introductions done, let's get to more inspiration using them. Be sure to leave some comments love either on their blogs or social media. I will be randomly selecting a winner to win the entire release and will announce the winner Saturday 26th August 2023.


 Anita


Bev


I'm sure you will agree with how creative and inspiring the Brand Ambassadors have been. Not only in today's hop, but all week. So a big shout out to them all for their creativity. 

I hope you have enjoyed this release, happy shopping and hope to see you over on Facebook at 7pm this evening. I will be taking a look at the new products, along with making a couple of cards in the live. Don't worry if you can't make it or you don't do Facebook, I will be saving and uploading the video to YouTube.

Crafty Hugs