Showing posts with label Simply Said. Show all posts

Wednesday, 27 September 2023

Brand Ambassador Inspiration - Autumn Vibes

Good morning!

Anita here with a trio of cards for you today.  The weather here in the UK is certainly telling us it's autumn and although the leaves haven't yet started to turn, I thought I would go with an autumnal theme.  I've used the same little batch of ink colours on all of these cards.

First up, I've used one of the Background Blocks stamp sets, Layered Modern Floral...


On a white panel I stamped the image, which is created using two main stamps from the set, together with some tiny accent stamps.  For the flowers I initially stamped using a pale orange shade, then re-stamped with a mid orange tone applied to the stamps with a blending brush to the inner parts and then a third time with a dark orange applied to the very centres.  For the leaves I stamped first with a lightish green and then applied a darker olive shade to various parts when re-stamping.  I finished with some of the individual leaves and dots to fill the design.  The sentiment is from the Simply Said set which I've stamped in brown ink.  The panel was then die cut with a scalloped rectangle and adhered flat to the card base.


My second project is a one layer card using the Beautiful Blooms III stamp set...


I kept this one super simple.  I stamped the flower first, letting each shade dry before stamping the next layer, this just stops the images bleeding when using dye inks.  I then masked the flower and stamped the two leaf/stem images either side, building up those layers too.  I finished with a sentiment stamped in brown, this one being from the Organic Wishes stamp set.  


And for my final card, I've revisited a layout/design I used to use a lot, using the Organic Wishes set...


I stamped the images in VersaMark ink and then heat embossed in white.  I then used the emboss resist technique, firstly masking off a vertical section and then ink blending the background with four shades of dye ink.  I die cut the panel with a stitched rectangle and stamped the sentiment from the same set, before adhering the panel flat to the card base.


Thanks for taking a look, have a lovely Wednesday!


Thursday, 31 August 2023

Brand Ambassador Inspiration - Fantastic Foliage


Good morning, crafters

Anita here, and today I have two cards for you, both using different Uniko foliage sets.  I've had these sets in my stash for a while but this is the first outing for both of these!  Two very different stamps and two very different cards.

First up, I've used a beautiful stamp set which is part of the Framed series, Framed - Floral Vines...


I chose to use a pale grey cardstock for my main panel.  I began by stamping the image in Antique Linen Distress Ink.  This is the ink colour that I always use for this technique, where I want to colour the image and then re-stamp and emboss after, as it is pale enough to disappear under the final embossed lines.  So after stamping I coloured the leaves and flowers with Copic markers.  Then, with the stamp still in the same position in my Misti, I re-stamped in VersaMark ink and heat embossed in white.  I added the sentiment in black, which is from the Birthday Wishes clear stamp set, before trimming down the grey panel and also the card base to fit the ratio of the framed image.


For my second card I've used the Large Background Sketched Foliage stamp...


This is a technique I've not used in a while - layered emboss resist.  A little time consuming but you can create some great effects with it.  I just used one layer on this example but you can use multiple layers if you choose inks with varying depths of colour, starting with the lightest.  I began with a white cardstock panel and roughly ink blended using Distress Oxide in Twisted Citron and Mowed Lawn.  I then left it to dry before stamping the image in VersaMark and heat embossing in clear.  The clear embossing powder ensures that the ink shades you've applied on the first blend are trapped under the embossing.  I then ink blended with the darker shade, Rustic Wilderness, over the entire panel.  The embossed areas then just need a buff with a soft cloth to wipe off any ink being resisted.  For a little interest I added some water droplets and blotted these away to remove some of the colour.  The panel was die cut with a stitched rectangle and I added a strip using a sentiment from the Simply Said clear stamp set.


I can't believe it will be September tomorrow, it doesn't feel like we've had summer yet here in the UK.  I'm not quite ready to start with the autumnal projects yet so let's hope September will bring summer back, at least for a little while!

Thanks for popping by today.  I have a little time off work next week so I may be back sooner with more inspiration for you.


Tuesday, 29 August 2023

BA Inspiration - Technique Tuesday, Using Sentiment Stamps For Backgrounds

 Good morning Uniko fans, Julie here with another BA post using sentiment stamps in a background. I love using sentiments for a background and have shared many ideas over the years such as here, here and here but this time I've been inspired by Jennifer McGuire to use a turnabout jig to create one.

Here's my first idea, using English Country Garden stamps and dies and some birthday themed sentiments.


I started with an A6 panel of white card and using a freehand cut shape to match my jig middle, I glued it temporarily onto the center of my panel and secured my jig into my MISTI. To get a feel for my layout, I started with the largest sentiment stamp and set off, turning the panel after each time I stamped. Once I could see where the gaps were, I used smaller sentiments to infill and repeated the stamping and turning. 
I stamped my butterfly on one of 3 white butterfly die cuts and coloured it with Copics. From the remaining die cuts, I removed the antennae and lower half of the body and folded them in half down the middle. These were then glued to each wing, meeting at the center and the other flaps were glued over the turnabout panel.  My panel was trimmed and added to an A6 white note card.

I rather liked the effect of the dancing butterfly over the sentiments, so tried another idea out, this time using the Sparkling Snowflake die and some appropriate sentiments.


This time I used Altenew Iceberg ink for the stamping, some of which I double and even triple stamped to increase the saturation of colour. Instead of using all 8 points of my stamping jig, I just used every alternate one, it gives a slightly different effect and I was able to use more sentiments.

The main snowflake was cut from holographic silver card and two others from matching white card folded down the middle and attached the same as the butterfly. One of Bev's sentiments describes the effect perfectly, Snowflakes are winter's butterflies!

So that's all from me for the moment, hope I've given you some inspiration for you to give it a go
Stay safe and keep crafting!

Tuesday, 25 October 2022

Two for Tuesday, BA Inspiration

 Good afternoon, Julie here with two cards on Tuesday!

I was inspired by the sketch over at The Paper Players to create two cards using the same sketch, colours but different themes.

Here are the two I came up with.


Here's a closer look at the first card.


I love a sketch, they are a great way to get inspired when your mojo is not quite working as it should!
For this I started by stamping the small outline rose and two of the leaflets in Versamark and embossing with gold EP. Using some Candied Apple, Mowed Lawn, and Pealed Paint DI smooshed onto my craft mat, I water coloured before fussy cutting out. A little shadow was added using one of my Zig watercolour markers.

The central strip was stamped using a selection of Simply Said sentiments in Altenew Evening Gray on a strip of paper, before adding to an A6 base card. A piece of textured white card from my stash was mounted onto some gold card and the Floral Vines sentiment was added and embossed with the same gold EP. The rose spray was then added to the top panel and attached over the central strip.

My second card uses the poinsettia from Season of Beauty, Christmas Sentiments and the Winter Foliage stencil.


The central panel was a leftover from an other project yet to see the light of day and perfect for this card. After stencilling over kraft with Unicorn white ink, I cleaned the stencil and then when the white ink was dry, I inked again with DI, love the white shadow you get with this technique.

The poinsettia was stamped with Versamark then embossed with gold EP, bracts and flower center were then added. Using the same water colour technique and colours as the first, I then fussy cut it out when dry. 
This time I used a plain white panel for my sentiment, adding the fussy cut image in the left hand corner before adding the whole over the central band.

Two cards using the same sketch, colours but different looks. I think it's a layout that will come in handy again as I think it's very versatile. 

So that's it from me for the moment, hope I've inspired you to create something for yourself along the same lines.
Until next time, keep safe and keep crafting!

Sunday, 26 June 2022

Brand Ambassador Inspiration - Stencil Techniques Trio

Hi there

Happy Sunday!  Anita here with some stencil inspiration for you.  I love getting creative with stencils and, not only are they an inexpensive addition to your craft stash, they can be used in so many ways, in addition to the traditional ink blending method.

So I've got three different techniques for you using three different stencils from the Uniko range.


Using Pigment Powders and Water


For this technique I always use watercolour paper.  Lay the stencil flat to the paper, I used Flower Power #5 here.  There's no need to use tape, in fact it's best if you don't as the stencil will need to be lifted away easily.  Gently sprinkle pigment powders over the design.  I used Brusho here and just gently tapped the pot and used it very sparingly as there is so much pigment.  Then use a fine mist water sprayer to cover the design and to activate all the pigment.  Do not over-saturate or the water will start to migrate under the stencil.  Just lift it away and leave it to dry.

I finished off by stamping a sentiment from the So Much Clear Stamp Set.


Using the Ghosting/Watercolour Lifting Technique


I ink blended a background using Distress Oxide inks.  For this technique I used the Stylised Floral Stencil.  The stencil was placed over the ink blended panel and then spritzed with water.  Carefully lift the stencil away and leave for a few moments before blotting with a paper towel.  The water will activate the ink and allow the colour to be lifted away.  This generally works best with Distress and Distress Oxide inks as they react with water.

I die cut the panel with a stitched rectangle and heat embossed a sentiment from the Simply Said Clear Stamp Set onto a strip of vellum which was wrapped around and secured on the reverse.


Reverse Stencilling


For this card I've used the Flower Power #1 Stencil.  This technique involves inking up the stencil directly with ink pads and then spritzing well with water before placing it onto the cardstock.  I chose Strathmore Bristol Smooth cardstock for this as it takes water well.  I inked it up with Distress Inks in three shades.  Once placed onto the surface I left it for a short while to let the ink settle into the cardstock.

I trimmed it down and matted it onto a panel of co-ordinating cardstock, leaving a slim border, before adding the sentiment which is from the Simply Said Blocks Clear Stamp Set.  I then added some clear gems to finish.


Thanks for taking a look, hopefully these have given you some creative inspiration.  I hope you enjoy the rest of your weekend.

Crafty hugs

Wednesday, 19 January 2022

BA Inspiration - Watercolour Spring Botanicals - Snowdrops

Good morning, Julie here with a bit of Brand Ambassador inspiration. 
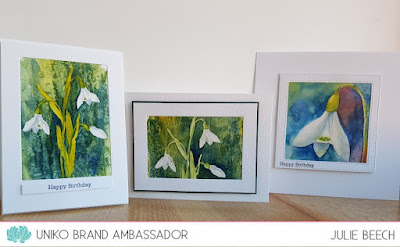
Today I've got my arty hat on, inspired by the ladies at CAS Mix Up to get my watercolour paints out of cold storage!! Here is what I came up with after a couple of afternoons playing about and getting messy!


I don't get my paints out as much as I should, in fact my travelling box had some of the pans stuck to the lid! As you can see I've used the fab Spring Botanicals - Snowdrops as well as an old digi that Bev gave away some time ago for my large single flower.

I apologise ahead, as this is going to be a photo heavy post, so grab a cuppa, sit back and follow my journey. I learnt such a lot experimenting with these cards.

Before I start, here is a list of what I used to create the basic panels.
  • A6 panels of Watercolour or Mixed Media paper
  • Spring Botanicals - Snowdrops 
  • Masking Fluid
  • A piece of cling film
  • household salt
  • Altenew's Morning Frost ink
  • Watercolour paint, Cadmium Yellow, Prussian Blue and Alizarin Crimson
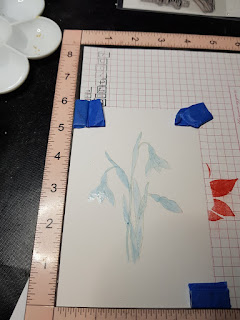
After stamping my image with the Morning Frost, I masked it out using masking fluid.


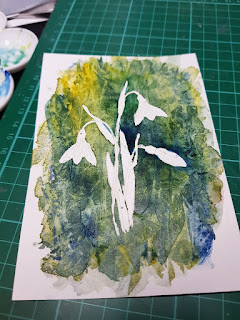
Once the masking fluid was dry, I washed over the image with plain water followed by a Cadmium Yellow wash, then by one of Prussian Blue. As my washes were quite wet they mixed on the page to create a wonderful pattern of blues and greens.

Before the washes dried too much, I added salt around the edges and placed the cling film over and left it to dry completely. Don't rush this as the longer you leave the wrap on the better the texture in the finished panel.


I was enjoying myself so much that I made another panel!

Once completely dry, I carefully removed the masking fluid to reveal the stamped image against the textured background.

I love the texture you get from the salt and cling film. If you don't have watercolours you could try Brusho crystals to get a similar effect. If your masking has not been too accurate, you can always add some white gouache paint to the dark areas, but I left mine as is.


The revealed image was then painted using a mixture of the yellow and blue paint for the stems and leaves and a watery mix of Prussian Blue and a tiny bit of Alizarin Crimson for the shadows. I added a little too much yellow for my green I think in the first, so in the second panel I added more blue and watered the mix down. Watercolour always dries paler than you think! I prefer the more realistic second attempt.

To make my cards, I decided to frame them using the same card as my base card, one was framed vertically, the other horizontally.


The sentiment strip on the first card is from Simply Said. I simply mounted the frame of the second card on some matching dark green card and left it without a sentiment.

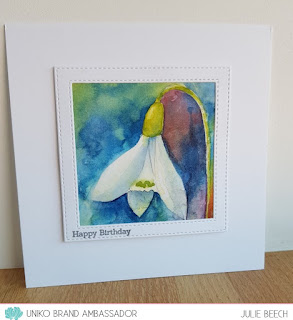
My final card uses the free digi snowdrop you can download here and you don't need any masking fluid.


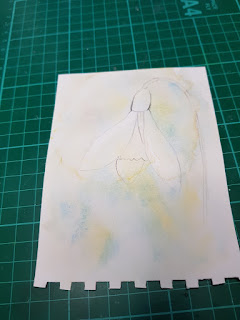
To start, I enlarged the digital image as I only needed a single bloom and printed it off. I then flipped it over and traced from the back onto a panel of mixed media paper. The ink from the printed image leaves a faint impression on the MM paper when you remove it. Any missing areas can be quickly sketched in. You'll also notice that because of the process the finished image is a reverse of the original. If you would prefer the image the other way around you would either have to flip the image before enlarging or add pencil scribble to the wrong side of the print off.


I found this video on You Tube by Joanne Boon Thomas and tried to follow it as best I could using the same colours as I used in the other two panels. I wont go into the process here as she does it much better than I could!


The above image shows the beginning of the process. Sorry, but I forgot to photograph my panel when I'd finished painting.
Here is the completed card using my trimmed down, finished panel. The frame is cut using a MFT die-namic die on a 5 x 5 base card, sentiment Simply Said again.


Looking at the finished painting, I think I should have added a little more shadow to the central petals, but overall I'm quite pleased with the result, even if it looks nothing like Joanne's!

And relax, that's a wrap, as they say.

I hope you are inspired to get out those watercolours and have a play, it's only paper and paint in the long run if you make a mess. An old tutor of mine always said not to throw away your mistakes, they maybe much better than you think after a night's sleep. He's been proved correct on more than one occasion!

So until next time, keep crafting and stay safe.

Sunday, 1 August 2021

Stencil Sunday - Rainbows & Clouds

 Hello August & Happy Sunday! 


I'm here today with a couple of cards I've made using the Stencil - Rainbow & Clouds from the July Release. If you missed it you can catch up HERE and there is still just time to comment along the hop to win too ;)
I had LOTS of ideas with how to use this stencil, but end of school chaos, start of the holidays and release prep stopped me from getting them made. However, I had a few hours to myself on Friday evening and got to playing & getting a couple of them made to share with you. 


When I first started using stencils I kept very basic and rarely used anything other than ink or embossing paste and embossing paste was very sporadic too! It wasn't until I saw Brand Ambassador Wiebke use pencils and fine liners with stencils, that I started to think outside of the box and use them like I would stamps to create cards. 


So for this card I used Concord & 9th Aqua Sky card for my base and drew inside the clouds using a Bermuda Bay marker from Stampin' Up! I then inked through the largest rainbow using a variety of C9 ink colours. It was a little time consuming, but fun to do.  A sentiment from Simply Said Blocks II, some twine, foam adhesive and some Nuvo Drops finished my card off.


For my second card today I couldn't resist going back to using Gina K Designs Pastillage Texture Paste. This stuff is SO much fun! Last time I used it for my card HERE, I used a white background. But the beauty is you can apply it onto a coloured card base and add colour, like I have today.


I just love how vibrant the ink colours remain when applied over the texture paste. This little panel of rainbow sure made me happy on a dull rainy day! 


I couldn't resist using this sentiment from Reach For The Stars, it was just made to be combined with the rainbow and the little trio of stars from the set.


So many more ideas floating in my head, but I will save those for another day ;) Until next time, thank you for stopping by today.

Crafty Hugs

Saturday, 5 December 2020

Countdown to Christmas Day 5 - Sparkling Snowflakes

 Happy Weekend!


I know we are only on day 5 of the Christmas Countdown (and I have just realised I got ahead of myself yesterday HERE and have now edited my post), but since advent started the days just seem to be going quicker for me and I keep thinking of all the Christmassy things that I still want and need to do - LOL! Anyone else feel the same?


Today I am sharing a snowflake anniversary card. One of my new fitness friends saw that I made cards & commissioned me to make a card for her 8th Anniversary with her fiancé. They are both HUGE Disney lovers, so she requested something with a little inspiration from the film Frozen. This is what I came up with and I am super happy to report that her fiancé loved it! 


If you don't know by now, I'll tell you again... I LOVE SNOWFLAKES! So I was in my element making this special card. 

Of course I used all Uniko products ;) The large snowflake is the Designer Die - Sparkling Snowflake and I paired it with the coordinating stamp from Stunning Snowflakes. I used Altenew inks in Dusk and Sea Glass to stamp the snowflakes and added some of my favourite White Blizzard Glitter Nuvo Drops.


The centrepiece snowflake is inked and embossed with Stardust embossing powder for a little extra impact. I also lightly ink blended the edges of the snowflake. The sentiment is from Simply Said II and embossed in white onto a strip of Pacific Point card from Stampin' Up! 


I have no doubt that you will be seeing some more snowflakes in the coming days as we continue the Countdown to Christmas ;) But for today, this is all I have to share!

Until tomorrow, thank you for stopping by today.
Crafty Hugs Bev x


Thursday, 23 July 2020

Uniko Brand Ambassador Inspiration: Inspired by Twofer Challenge Card #29~Butterflies...English Country Garden Note and Birthday

Hello,

Carol here, welcoming you to my Uniko Brand Ambassador post, where I'm defaulting to what I do in missing-mojo situations: drawing inspiration from other designers or, in this case, from challenges.  Today, my muse is none other than Twofer Card Challenge #29, where this month's theme is Butterflies!  A perfect opportunity to use the lovely English Country Garden stamps & dies to create two cards, with two different designs, for two different occasions.  


Here they are....


My first card features an alcohol inked background, with some gold alloy added for extra shimmer, as a canvas for a gold-embossed three-layer vellum butterfly. The sentiment, also gold embossed, is from Simply Said.


I am completely (as in totally, full-on) smitten with slimline cards, so I *had* to make one! Here, I prisma pencil coloured three butterflies, die cut and positioned them inside the circles, then added a birthday sentiment from Simply Said.


Here they are again...the shimmer of the alloy and pearlized inks is soooo pretty.


Hopefully, I've inspired you to use your Uniko butterflies in different ways, for different challenges/occasions! They really are wonderfully versatile!