Tuesday, 31 October 2017

CAS Colours & Sketches #247 - The Double!

Hey!

Happy Tuesday, after a little hiatus last week due it being half term and the Beans were off nursery, meaning little time to get much done I am back! I can't believe we are on the last day of October!

As this is the 5th Tuesday of October, it is 'The Double' challenge over HERE at CAS Colours & Sketches! 

Here is the challenge...


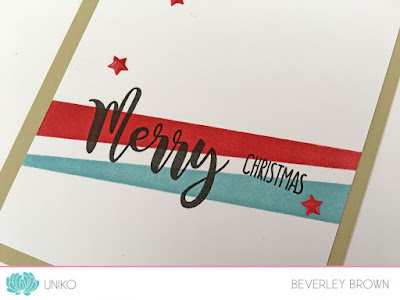
And here is how I have used both the colours & the sketch...


I usually struggle with the double, but this time I knew exactly what I wanted to create and what supplies to use! 

I've been so inspired by my awesome DT and how they have been using the NEW Uniko Stencils, like Jane and Lindsey have HERE and HERE, that I had to give them some more love! 


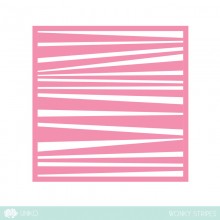
I've used the Wonky Stripes Stencil and I simply masked off to ink one stripe at a time, one in Baja Breeze and one in Real Red as I don't have Riding Hood Red! I then used the Festive Sentiments to stamp the Merry Christmas and mounted the panel flat to a River Rock card base. A few enamel stars finished the card off.

That's all from me today, I am hoping to catch up on some work once the beans are at nursery today and *try* not to eat all the Halloween sweets before the Trick or Treaters come this evening!! 

Thanks for stopping by, but if you need some more inspiration using the challenge be sure to hop on over HERE to see what the rest of the CAS Colours & Sketches Design Team have made.

Hugs


DT Inspiration - Halloween ....

... Hi! It's Deborah here with you today - and it's been a while! We've been in Michigan for 5½ years now and today is our 5th Halloween celebration. Much to my daughter's delight, Halloween is HUGE over here. Tonight, she and her friend Alyx are off to downtown Northville to celebrate Halloween in style. It's a big event - the fire station rings its bell at 6.00pm and kids appear from everywhere - all dressed up. They visit the houses that have been beautifully (horrifically) decorated, and then at 8.00pm the fire bell rings again and all the kids seem to vanish! It's such fun!

There are no specific Halloween stamps in Bev's collection (hint, hint), but that didn't stop me. Just for a change, I've made a scrapbook page:


I used lots of different sets to create this page. I started off by stamping the chevrons in purple and orange at the top and bottom of the page. Next, I used one of the new stencils - Scattered Polka Dots - to create my own pattern for the page. lightly sponging dots in purple and orange. I added the date and then layered on some stars from Background Builders Seeing Stars, again in purple and orange. On some scrap white card, which I'd backed with Stick It double sided adhesive, I stamped the letters to make the word Halloween and embossed them with clear powder, and then carefully cut out each letter and attached them to the page. The word 'Happy' comes from the new Festive Sentiments set and I stamped it directly on the page. I also stamped some of the larger stars from Background Builders Seeing Stars, cut them out and coloured over them with Copics. I used several dies to cut the cobweb, the spider and the skeletons. I found a little vellum ghost, made from Uniko Style, on my desk that was left over from a Halloween card make.


The picture above shows my original plan for the page - I was going to add some words on the central panel. But I wasn't happy how it looked, so I played again and came up with this:


I was much happier with this layout and went to work building up the layers with lots of stencilling and stamping:


The photos are ones I took a couple of years ago. The skeletal couple kissing under the spider is from the Skeletons Alive display that takes place throughout October in Northville. The very scary scarecrow was on display at Three Cedars Farm - another wonderful place to visit in Northville. I layered the photos on design paper and glitter paper and added frames to match. The die cut skeleton has been covered in sparkle from a clear Wink of Stella brush - it really does look amazing in real-life.

Thanks so much for stopping by to see my Uniko post today. I had so much fun making this scrapbook page and really must do more. Stamps make so much more than just cards!! Here's another quick look at my Halloween page:


You can find full details of the project on my blog - Deborah's Gems. Bye for now! See you again soon.


Saturday, 28 October 2017

DT Inspiration - End of year's card

Bonjour,

It's Izzy and I'm here with a Design Team Inspiration card that I'm combining with the current challenge over at Less is More too. It's our Recipe week and the theme is Stamp Layering.

I wanted to use this technique on an end of year's card.


I first stamped the Winter Foliage with Versamark ink all around the soft blue card and I heat embossed with clear embossing powder.
Then on top of it, I stamped different images from Background Builders: Vines Winter Additions with Versarmark, but this time I heat embossed with white embossing powder.


To finish, on a stitched die cut square I stamped the sentiment from Festive Sentiments in blue (Altenew Sea Glass) and some snowflakes from Background Builders: Vines Winter Additions and I heat embossed them (Wow Silver Pearl). I foam mounted it over the card. And that's it !

As I loved the result, I decided to make the same one with a french sentiment from my stash...We never have too much end of year's cards !


If you'd like to play along at Less is More this week, I invite you to go and check all the details on the blog HERE.


Thanks so much for calling by today and I hope you enjoyed my card. Have a fabulous weekend !

Izzy xx


Friday, 27 October 2017

Wonky Stripes Stencil Ideas

Hi all! I'm here today to share some ideas with you about ways to use that brand spanking new stencil - Wonky Stripes. And how totally amazing and versatile is this stencil!
WonkyStripesStencilPP 


And as it's THAT time of year I'm starting with a Halloween inspired card.


I started by inking up the stencil with distress oxides in orange and black and die cut a long skinny panel from it.


I then stamped and hand cut the explosion  and added some googley eyes and die cut ovals to make some spooky faces.

Supplies:
Stamps: Uniko, Explosion
Inks: Ranger distress, spiced marmalade, black soot; SU, lemon lime twist; Mememnto, tuxedo black
Stencil: Uniko, Wonky Stripes 
Die: Lil'inker, Stitched Mats long & skinny, Anytime Tags 
Googley eyes from my stash

My next two cards use the same technique with the Wonky Stripes stencil - simple and easy but giving it a whole new look.


I masked parts of the stencil using washi tape before inking over in three different oxide inks. I rubbed the washi on my jeans a few times to reduce the stickiness and this seems to stop it from lifting the surface of the cardstock when it's removed.


I then stamped the greetings in between the lines and added some enamel stars to finish off. So quick, so easy, so me! Here's a photo of how I placed the washi tape: 


Supplies:
Stamps: Uniko, Simply Said Birthday
Inks: Ranger distress oxide, twisted citron, cracked pistachio, slaty opcean, picked raspberry, candied apple; SU, berry burst; Mememnto, tuxedo black
Stencil: Uniko, Wonky Stripes
Embellishments: SU, enamel stars, emerald envy, peekaboo peach 

Huge thanks for dropping by to look at my Uniko post today. And keep crafting!

 post signature

Thursday, 26 October 2017

WINNER of the October 2017 Design Team Blog Hop & Giveaway!

Hey!

I am popping in tonight to announce the WINNER of the October 2017 Design Team Blog Hop HERE.  Random.org helped me pick the lucky comment...


In order of the hop the lucky commenter is...

What a great idea to use the Santa from Block Party against the Wonky Stripes background. Love all your samples but especially that one
Jane

Congratulations Jane! 

Please send me an email to bev@uniko.co.uk by thursday 2nd November 2017 along with your postal address. I can then get your goodies on the way to you. If you ordered any of the October Release, please remind me and I will send you an eGift Certificate to the value of the items you ordered.


THANK YOU to everyone who left such lovely comments along the hop.


Hugs to you all.


Wednesday, 25 October 2017

Halloween Wreath...Challenge Reminder and Casing a Uniko Studio Designer

Hello,

Carol here popping in to remind you that a) Uniko Studios Challenge #43~Fall/Autumn


is still open for a few more days and b) the challenge also offers the optional twist of Halloween which opens doors for so many more possibilities.  The 'optional twist' is my theme for today's post...

With Halloween but a few days away, I decided to create yet one more Halloween card that doesn't include any 'spooky' creatures (okay, maybe one).  Curious?  I hope so!

My starting point was team-mate Sarah's wonderful inspiration card where she transformed a Christmas wreath set into a lovely Autumn card through the use of a fall palette.


Taking my lead from her, I wondered if something similar could be created using a Halloween palette.  *PING* moment!  I used the same Rustic Wreath base as Sarah did, paired it with a variety of images from Flower Power #1 and Background Builders: Seeing Stars, added a 'happy' from Simply Said Blocks and Halloween/wee pumpkins from my stash.  I placed the panel on a piece of shimmery bat designer paper, added the 'must have' spider *grin*...and ta dahhhh!


Same card, just a different pose...


With a change in sentiment - or the addition of 'birthday' - this could easily become a card for someone celebrating an October 31st birthday.

Hope you enjoyed my card, showcasing how delightfully flexible and versatile Uniko products can be!

Looking forward to visiting you in the gallery here!

Monday, 23 October 2017

The British Craft Awards 2018 Voting is NOW Open!

Hey!

It's probably a long shot, as there are SO many fabulous British Retailers, inspirational crafters & bloggers in this industry, but I am asking for your help anyway!
If you LOVE Uniko Ltd and would like to see my little company grow a little bit more, I would LOVE for you to vote for Uniko Ltd in the...
 British Craft Awards 2018!
22780166_1454710721314009_6562631678468649692_n

The British Craft Awards are back! And this year they’re bigger than ever before, with 6 crafting categories for you to vote in!
 
Celebrating the crème de la crème of the crafting world, the British Craft Awards 2018 are the most highly prized awards for excellence, so make sure you have your say and put your favourites in the spotlight! Whether it’s an amazing designer or blogger who gets your creative juices flowing, or a retailer or product that’s transformed your crafting in the last 12 months, this is your chance to tell us who you think deserves extra special recognition for what they do!
 
Vote for your favourites today, and if you’re a UK resident you’ll also get the opportunity to enter our prize draw for a chance to win! They have a total of £600 Amazon vouchers up for grabs, so what are you waiting for? Voting closes at 11.59pm on Sunday 17th December 2017.
 
CLICK HERE to vote.
 
THANK YOU so much in advance for your vote, your custom and most of all keeping my dream business alive.
Hugs
F4933FEA1542074D511250ADE7A9D0F4

Saturday, 21 October 2017

Quick & Simple Background Cards

Hi, it's Lindsey here with some inspiration for quick and easy Christmas cards.


I've used the brand new stencils (hot off the press in this week's October release) together with some background block stamps from the September and October releases.


I have 4 cards for you all following the same format but using different stencils or background blocks stamps.


For the stencil backgrounds I used sponge daubers and added more ink in some areas for the different tones.


The sentiment is from the Simply Said Christmas set.


Uniko Stencil Scattered Polka Dots £4.50
Uniko Stencil Wonky Stripes £4.50


For the stamped backgrounds, I opted for heat embossing with the snowflakes and Versamark for a watermark effect with the polka dots.


I’ve used the Wonky Lines Background Block with my Gansai Tambi metallic watercolours for a shimmery die cut tree - need lots of shimmer and glitter for Christmas!


I've used the new Background Blocks stamps: Falling Snowflakes, Wonky Stripes and Scattered Polka Dots.
 

All the cards were very quick and easy to make, perfect for mass production Christmas cards!

Thanks for visiting today.