Showing posts with label In the Forest stencil. Show all posts

Wednesday, 9 July 2025

Christmas in July Brand Ambassador Inspiration - Colourful Christmas

 Bonjour !

Izzy here with an inspiration card for celebrating Christmas in July with Uniko !

To make my card, I focused on the two words Christmas and July. For me Summer is the season of colours, whatever they are. So I decided to make a Christmas card with lots of colours and here is what I came up with.


Of course I had to use my favourite stencil when it comes about Christmas : In the Forest. On a double white card, I simply brushed different colours on top in a diagonal way. 

Then I used one of the trees of the Christmas Pop Trio stencil to make the big tree. I stencilled it with the same colours then I fussy cut it all around.


To ground it on my card, I stamped in black and I clear heat embossed a sentiment line (from Background Builders Christmas set) on a strip of white card stock that I flat adhered on the card.

Finally, I foam mounted the tree on top.

Well, that's all from me today. Thanks for joining me and hopefully I've given you some more inspiration to start your Christmas stash. I will come back soon with more inspiration. 

Have a lovely day and thank you for stopping by.

Thursday, 14 December 2023

Brand Ambassador Inspiration - Slimline Christmas

Morning all, 

Since my waist is not looking very slimline this Christmas, I thought I’d better make my cards slimline instead! 

This card started out with the lovely bold sentiment from the Uniko Mid Century Modern Christmas stamp set. My next plan was to use the Christmas tree from this set but I managed to temporarily lose it (later found to have dropped into a desk drawer!). So, change of plan and to keep with the trees, I chose the Uniko In The Forest stencil and two shades of distress oxide ink. Finally a cute die cut bow to finish off the card.


Sticking with trees I selected the Uniko Pop Trees stamp set (sadly now discontinued) and teamed it with a sentiment from the Uniko Festive Sentiments stamp set. 

For my last card I used Uniko Background Blocks Scandinavian Christmas stamp to create a beautiful panel to the side of the card. I then added the doves and sentiment from the Uniko Peace on Earth stamp set keeping the rest of the card CAS. 

Much love

Steph x

Sunday, 22 October 2023

Stencil Sunday BA Inspiration - One design Three stencils

Bonjour !

Izzy here with a Stencil Sunday for my Uniko Brand Ambassador inspiration. As my dear teamy Steph was mentioning it in her last Brand Ambassador Inspiration post, Christmas isn't all that far and I then realised that I don't have a lot of Christmas cards in my stash !

If my mojo is very low at the moment, Steph, with her gorgeous Christmas cards made me want to play with my Uniko stencils. So I took off my stash my favourite Uniko's stencil when it's about Christmas and I made this first card.


I love the In the Forest stencil, since it has been released, I have used it every year for my greeting cards. Here I used it directly on the double white card and I brushed two shades of green and a bit of black. The result was nice but I wanted even more firs. So I turned the stencil and I brushed another layer of the same inks.

On a piece of white card stock I stamped Santa from the Jolly Christmas set, I coloured it with coloured pencils and I fussy cut it. I die cut a square of Vellum paper on which I stamped and I black heat embossed the sentiment coming from the Background Builders Christmas 2018.

To finish my card I foam mounted Santa on the Vellum. I turn the Vellum and I put squares of foam tapes behind before adhering it on the card base.

As I loved how we can see through the lovely design made with the stencilling, I kept this design for my two other cards.


For this second card, I used the Winter Foliage stencil that Bev recently used for her beautiful card (see HERE). With a small brush, I applied the different colours.

On the Vellum, I stamped and I gold heat embossed the sentiment coming from the Christmas Wishes set. I stamped the foliage from the Winter Foliage set and I die cut each piece with the matching dies.

I assembled the card in the same way as the previous one.


For this last card I brushed non-traditional colours through the Let is Snow stencil to make my background. 

After looking for what I could put on the Vellum, I tried these little trees from the Background Blocks Scandinavian Christmas set.


I coloured them with Promakers, I fussy cut them and I foam mounted them on the square of Vellum on which I previously stamped and black heat embossed the sentiment from the Christmas Sentiments set.

To finish my card and to make these little trees even brighter I put some Stickles on them.

Well, that's all the Jolly, Bright and Merry I have to share with you today. Have a lovely Sunday and thank you so much for stopping by.


Tuesday, 17 October 2023

Brand Ambassador Inspiration - Snowflakes

Good morning everyone, 

Steph here today with my Uniko Brand Ambassador Inspiration for this month. 

We seem to be having a mix of weather in the UK from heat waves to all of a sudden very cold and autumnal weather and then back to warm weather again. So I thought I'd throw in a few snowflakes just to remind us that Christmas isn't all that far away...yes I'm trying to ignore that fact too! 


My initial idea was to have three beautiful inked panels peeking through a die cut aperture of the snowflake but I really didn't like it once I had done so I resurrected the remainder of the panel and inset a beautiful silver snowflake instead. Here I have used Uniko Let It Snow stencil with white ink and Uniko Sparkling Snowflake die. The sentiment is from the Uniko Christmas Sentiments stamp set. 

My next cards are slightly different as I didn't have enough of the remaining inked panels to use as above. So I adapted the design and used the snowflakes cut from the panels instead. 


I like the patterned snowflakes against the plain card base for some CAS cards ready for Christmas. For these cards I have use Uniko Christmas Folk Snowflake stencil and Uniko In The Forest stencil.

Much love
Steph x

Wednesday, 12 October 2022

Brand Ambassador Inspiration - Dies, Stencils & Stamps

 Bonjour !

It's Izzy here with two inspiration cards that I'm combining with the current challenge over at Addicted to Stamps and More where it's all about Stencils and/or Dies.

 As I used Uniko products to make my DT cards, I wanted to give even more love to my Uniko dies, Stencils and Stamps. 

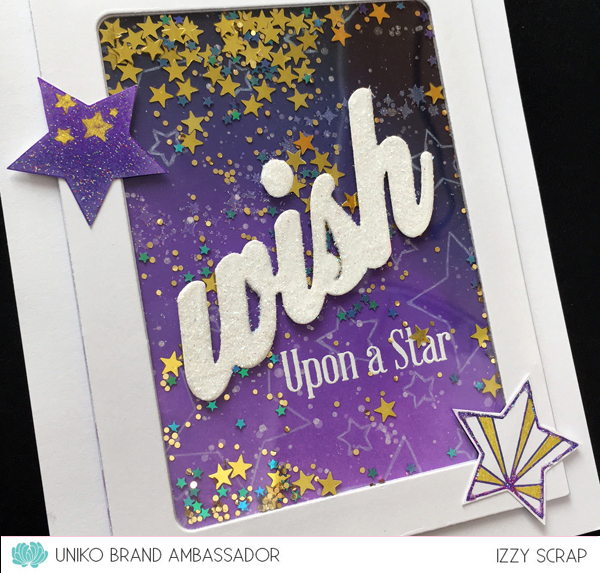
For my first inspiration, I went with a shaker card. I get inspired by the Dream Factory challenge where it's about Stardust movie.


I started with the background blending purple and dark blue distress inks to make the sky. Then I used the star galaxy wave from the Reach for the Stars set that I stamped and heat embossed with clear glitter embossing powder. 

Then I used the Seeing Stars stencil and with a white pencil, I drew the stars onto the background. And to give more shine, I speckled with a brush a mix of water and Perfect Pearls. Then I stamped and white heat embossed the second part of the sentiment that comes from the BIG & BOLD Wish clear stamp & die bundle.


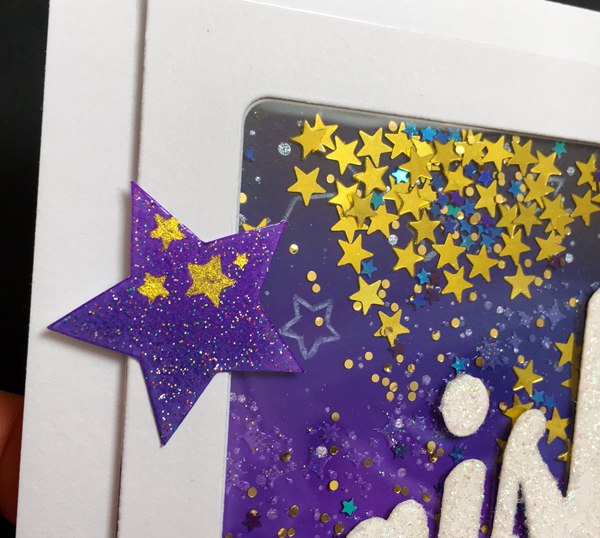
I die cut (x3) a frame in white card stock and I glued an acetate sheet on the back to make the shaker card window. I put some tiny stars sequins on the background then I glued the window on top. In a white glittery paper, I die cut the Wish word from the BIG & BOLD Wish clear stamp & die bundle and  I glued it on the window.


To finish my card, I stamped with purple ink two stars from the Background Builders: Seeing Stars set. I  heat embossed them with clear glitter embossing powder, then I filled the blank with a gold gel pen before adhering them on the card.

With the end of year being in a bit more than two month away, I made my second card with one of my favourite stencil from Uniko : In the Forest.


On a watercolour card stock, I played with some Brusho powders. On top I stamped the swirling snowflake wave and the sentiment from the Snowflake Serenade set. Once everything was dry, I used the stencil In the Forest with Versamark ink and I white heat embossed the trees. 


To finish my card, I flat adhered this panel on a double white card. In a white glitter paper I die cut the Sparkling Snowflake and I glued it on the card.


Now here is a sneak peek of the card I made for the Addicted to Stamps and More challenge, still using Uniko dies, stencil and stamps...


I hope that my cards inspired you to go and play with your Uniko products and to come and play along at Addicted to Stamps and More.


Thanks so much for stopping by and have a fabulous day !


Tuesday, 11 October 2022

Uniko Brand Ambassador Inspiration - Christmas Stencils

Hello everyone, 

I hope October finds you well. Steph here today with my Uniko Brand Ambassador post and I am still very much on the Christmas crafting wagon! I do think Christmas craft might be my favourite.

This month I have focussed on stencils because I think you can make cards pretty quickly with stencils (if you exclude the paste drying time!), you can usually get two cards out of one run of the stencil (A6 size cards) and they add interest without adding bulk for lower postage costs.

For my first two cards today I used the Uniko Christmas Folk Snowflake stencil and white stencil paste. 


Once the stencil paste had dried I cut down the panel to make two and adhered to the card bases. I started off with the Kraft card but I definitely prefer the one mounted onto a red card base. To this, I added a heat embossed sentiment from the Uniko Festive Sentiments stamp set which I fussy cut, mounted onto velum and fussy cut again.

My next cards use the Uniko In The Forest stencil, one with white stencil paste and one with glitter stencil paste.


As the stencils are detailed and the focal point on the card I didn’t want to add anything more than a simple sentiment, again from the Uniko Festive Sentiments stamp set and also heat embossed, fussy cut and layered onto velum.

I hope these designs have given you some ideas for quick Christmas cards and ignite your passion for stencils! 

Much love

Steph x


Sunday, 6 December 2020

Countdown to Christmas Day 6 - Stencil Sunday!

 Happy Sunday! 


Welcome to day 6 of the Uniko Countdown to Christmas. Stencil Sunday is long overdue and so what better way to get back into the regular feature than with a Festive Stencil Sunday? Today I am giving some fresh inky love to the Stencil - In The Forest and also the NEW Stencil - Christmas Pop Trio.


Surprisingly, as I have not been a huge lover of the colour green in the past, I am absolutely loving this green & white combo this year and incorporating this fun bitty polka dot ribbon!


When it comes to using stencils I keep things pretty simple! For this first card I inked through the In The Forest stencil with Altenew Hunter Green ink, I wanted it to be a slightly light shade than the ribbon for a little bit of contrast.

Before I removed the stencil I then used my VersaMark ink pad to ink over the top of the green ink so that I could then emboss the trees with sparkly Stardust Embossing powder.


The sentiment is from the NEW Christmas Wishes clear stamp set, which I have popped up with some 1mm thick foam adhesive. The bow makes this card a little bulkier, so I think it will be a hand delivered card ;)

This lead me onto my second card for today combining In The Forest with the striped Christmas tree from the NEW Stencil - Christmas Pop Trio


This time I masked off a section to ink the background of In The Forest trees and I decided not to add the embossing to them this time. Instead I added the sparkle of the Stardust embossing powder to the striped Christmas Pop Trio tree.


I added ribbon down the edge of the stencilling to hide the 'join' and the sparkly Christmas Pop Trio tree is adhered using 1mm thick foam adhesive. The sentiment is another from the NEW Christmas Wishes clear stamp set.

I really enjoyed making these two cards today and the layout are nice and simple to adapt to other themes of cards, not just Christmas cards!

That's all from me today, I hope you enjoy the remainder of your weekend & I will be back tomorrow with more to share. Until then, thank you for stopping by today and joining in on the fun here at Uniko.

Crafty Hugs Bev x


Friday, 20 December 2019

Uniko Brand Ambassador Inspiration...Dreaming of a White + Pop of Colour Christmas

Hello,

Okay...I am still NOT done sending Christmas cards and, I suspect, still have a few more to make! OHMYSTARS, but I'm behind!  That said: Carol here welcoming you to my Uniko Brand Ambassador Inspiration post!

Fortunately, I have several lovely Uniko stencils and sentiments on hand, as well as some translucent gel and plenty of glitter to create cards (5 here) that are super simple AND super sparkly! While this isn't 100% mass-production - as I've used various stencils - the embossed sentiment fits that bill. I simply arranged the words on my Misti, die-cut my cardstock, added Versamark ink and white embossing powder and, in a few waves of my heat gun, had my sentiments all done. The hardest part: waiting for the glitter to dry! Yes, yes...I could have used pre-mixed glitter gels/shimmer pastes but my stock is running low. It was way more fun to 'glitter me (and Lily and my craftroom) silly'!

I did my best to capture the sparkle in my photos but didn't do them justice. Please use your imagination a bit...these really do shimmer and twinkle!

Uniko Products:

Sentiment: 

Stencils: 


To those receiving these cards...sorry/not sorry *grin* that some glitter may sparkle parts of you, too!

May the gifts of peace, love and joy be yours this Christmas and throughout the New Year!

Merry Christmas!!

~carol

Sunday, 8 December 2019

Stencil Sunday

Good morning and welcome to another Stencil Sunday at Uniko.
It's Julie here this month to share three cards using one layout but three different stencils and colourways.

Last year ,as part of the Christmas release, I made this card using unconvential colours and the Let it Snow Stencil, so I thought I would use the same layout and see what happens when you change up the colours and/or the stencil used. Here are my three takes using the same layout.


This card uses the In the Forest stencil and a trio of green inks from Altenew's Tropical Forest set.


Initially, I was going to use a gold die cut JOY but I preferred the green glitter card with a red background. The touch of red fun foam peeking from behind the green glitter card links it to the colour of the background panel and makes the green pop against the stencilled panel. This is a case of colours opposite on the colour wheel being used to make each of the colours stand out, the green looks greener and the red reder. The same would be true of Yellow/Purple and Orange/Blue combos.
The stencilled panel was made by simply attaching a panel of white card under the stencil then adding each green randomly until all the trees were inked, not worrying too much where each colour went. I think the effect is more interesting than using just the one solid colour. 
The die cut JOY was purchased from The Works but the stamped sentiment panel uses a retired Uniko set. Sequins from the stash complete.

This next card uses the new Winter Foliage stencil .


This time I used small make up brushes to add ink to each separate image. I picked them up at Lidl, as well as some larger ones, just like the Picket Fence blender brushes you can get, but a lot cheaper and there was a great range of sizes. You can really get into those small areas without getting ink into the wrong place. My background card was chosen to match the holly leaves and to keep with tradition, went with a red glittery JOY, minus snowflake, which like the previous card I fussy cut away before adding the fun foam. A few red Stickle berries complete this time.

My third card is virtually the same card using the Let it Snow stencil, as last year, but this time in shades of blue.


I think it's good practice to try to match inking to base cards and trim, if you are using them, it creates a more cohesive design. This time I used DIs in a mixture of Chipped Saphire, Blueprint Sketch and Salty Ocean. I didn't pop up the die cut on foam this time and also kept the snowflake, sequins from the stash complete.


So I hope I've managed to illustrate that simply by changing the colours used, the stencil or both, you can stretch your Uniko supplies and have some fun along the way!

Happy Christmas crafting!