Showing posts with label Anniversaire Arts Decoratif. Show all posts

Friday, 7 February 2025

Uniko Birthday Inspiration Through The Years - Part 3


Happy Friday.

Welcome to day 7 of the Uniko 13th Birthday Celebrations and part 3 of my Inspiration Through The Years. If you missed part 1 and part 2 you can catch up HERE and HERE.

Today I am sharing three cards using a product from 2018, 2019 and 2020. I've then made a new card inspired by the original.

Let's have a look.


First up is Kindness Blooms, which released in February 2018. I remember making this card and I loved creating the polka dot background and the fussy partial cutting. 

So for my updated card I decided to do something similar.


I started by stamping the trio of large loopy blooms along the edge of my card, once the ink was dry I cut along to create this fun edge. 

I then set to using the small circle/dot stamp to create the multicoloured polka dot background on my base card. The loopy flower layer is adhered using foam tape.


My sentiment choice is from Birthday Sentiments, which was released the same month. I think I love this fresh take on my original card.

Next up is 2019 and the year Uniko's most popular, ever growing and still highly sort after collection was released, the one and only Mid Century Modern Collection.


Two of the first 4 products released in May 2019 were Mid Century Modern Florals and Background Blocks Mid Century Modern, which I decided upon to use on my card today.


I don't think I will ever tire using this collection! There are so many creative options and colour combinations. I started by using the Mid Century Modern background, stamping it in Pebble ink.


I then added some 'flowers' stamped in Harbor, Honeysuckle, Sorbet, Buttercup and Sprout. My sentiment is from Birthday Wishes which also debuted in the same release.

Lastly for today is another super popular collection that was released in February 2020, my take on Art Deco.


This collection features Anniversarie Arts Decoratifs, Background Blocks Arts Decoratifs and Background Builders Arts Decoratifs. Since this original release I have added a Christmas version of the background block and I am always thinking of more to add! 

Here's how I used the collection today...


I went for the clean and simple look today, using 3 of the background builder patterns to create a focal point. I then added some colour and a sentiment from the collection. A little bit of bling finished my card off.


I know the Background Builders is currently out of stock, it'll be back soon! 


That's all from me today. I hope that you have enjoyed the inspiration today and this little look back at Uniko's past. I will have more to share in this mini series throughout the month.

Crafty Hugs


Tuesday, 16 May 2023

Brand Ambassador Inspiration - Happy Birthday Cards

 Bonjour !

Izzy here with a little bit of Brand Ambassador Inspiration. As there was some birthday celebration in the air, I go on with two inspiration cards.

For the first one I wanted to use the last released Designer Dies Nature Treasures II Collection but this time I paired them with one of my favourite Uniko bundle, English Country Garden Butterflies Clear Stamp and Die and the beautiful background stamp Large Background French Scrip.


To make this card, I first die cut a white panel with a wonky stitched die on which I stamped the Large Background French Scrip. 

On a piece of white card stock, I stamped the butterfly with no-line colouring ink and I coloured it with coloured pencils. Once finished, I stamped back the butterfly but this time with black ink and I heat embossed it with clear powder and I cut it with the matching die.

I also die cut some of the leaves from the Designer Dies Nature Treasures II Collection. I cut some in Vellum paper and others in white card stock. I also stamped and gold heat embossed some of the curly leaves.

To finish my card, I tied a gold thread around the French Scrip panel and I foam mounted it on the double white card. Then I glued the leaves and the butterfly with glue dots. A sentiment from the Simply Said Blocks set has been gold embossed and glued on the card.


For my second card, I used part of the MOD Background Builder Circles stencil and I played with the colours of the last Color Hues challenge. 

To finish, I stamped the sentiment from Anniversaire Arts Décoratifs and I cut two out of four angles of the card so that it matches with the stencilled pattern.

Et voilà ! That's all for me today. I hope that you enjoyed the inspiration and thank you so much for stopping by.


Thursday, 17 February 2022

Brand Ambassador Inspiration - CASE Myself

This is a second special Birthday-surprise for Bev!

Today it's on me to join into the fun of the CASE myself event on the Uniko Blog!
There's a difference to the other participating crafters - they are all Alumni Team Members who just came back to celebrate the 10th Birthday of Uniko with Bev, the team and all customers...
But I am still an active member! During the next days you will see what I'm talking about... the February Release is coming closer - just a few days left until the Sneak Peek and Introducing Days will start! 
😀

Beverley released her very first stencil designs in autumn 2017.
I was so honoured when Bev asked me to join a small team with a focus on stencils! Sure I wanted!
During the years I had some Guest Designer postings, but wasn't a permanent member of any team before!
On February, 17th 2018 Bev introduced our new Stencil Design Team on the Uniko Blog
- Sarah Gray, Julie Beech, Linda Walmsley and me.

But first let's return to the CASE myself event!
Is there anything closer than using my very first contribution I made as fresh team member of the Stencil Design Team and CASE it?
Definitly not!

This is the card I used as CASE inspiration:

KomMa-designed_K1-907
K1-907 - fly by balloons


I made three new cards.

For the first one I used the Equalizer block Stencil, The English Country Garden Butterflies Stamps and Dies and a sentiment of the Anniversaire Arts Décoratives set.
Here I've used the layout and the colours of the balloon card. I also took the three different colours of the balloons to the butterflies. The background isn't embossed here, but the front of the butterflies and the sentiment are. The butterflies are adhered one side flat, the other one with a mix of 1 mm and 2 mm dimensional pads.

KomMa-designed_K1-1561_#2
K1-1561 - Birthday Butterflies

The second one is made with the Honeycomb Pattern Stencil and the Bee happy and Simply Said Blocks II.
Here I've used the layout, but different colours. Again I intensified the colours from top to bottom. The three bees are identical, but (like balloons in the wind) they fly in different directions. The sentiment isn't on a banner this time, but it has a black background like in the original card.

KomMa-designed_K1-1560_#1
K1-1560 - Bee Wishes

And the third one is in the background like the one before, but I changed the sentiment to one of Floral Vines and the bees to "the one" of Mid Century Modern Florals.
Maybe you can remember, where you have seen these bees before?
If not, hop here or here and you will find my funny special own bee-creations - it's like a second act of CASEing myself.
The little rings and dots give an optical kind of black background for the sentiment, but with a lighter, less bold look.

KomMa-designed_K1-1559_#1
K1-1559 - Happy BeeDay

To see the full lists of supplies and some more pictures, please follow the added links to my blog.

Stay inspired and be excited, what the Uniko BA-team will show you soon!


Greetings from Wiebke

Wednesday, 22 December 2021

12 Days of Christmas Giveaways - Day 10


Happy Wednesday!

Welcome to day 10 of the 12 Days of Christmas, Giveaways. 

If you missed day 1 and you're wondering what this is all about, be sure to check out all the details HERE and you're welcome to catch up and comment on the previous days. You can find links in the right hand sidebar.

I'm back to the New Year cards today...


You didn't think I'd miss showcasing some Art Deco during this giveaway event, did you? Anniversaire Arts Décoratifs is the perfect celebration sentiment set. So it only seemed right it made an appearance. Here I have paired it with Background Blocks Art Décoratifs and the 2022 is stamped using Alphabet Outlined, which I have coloured black.


My colour choice is a subtle nod to the 2022 Pantone Colour of The Year, Very Peri or Periwinkle Blue. What do you think of this colour choice? Or do you not take note of Pantone & colour trends?


So today's giveaway* is...


To be in the chance of winning simply leave a comment on this post and or any of the social media platforms I will be sharing the giveaway!

Crafty Hugs 


* As it is a giveaway the prize is open to participants worldwide. The item will be marked as a gift from me personally to avoid customs charges. An alternative prize will be offered if the winner already owns any of the prize offered on the day they win. You have until midnight Thursday 30th December 2021 to comment. Winners will be announced on the blog on Friday 31st December 2021.


Sunday, 7 November 2021

Brand Ambassador Post : Background Blocks - Pinstripe II

 Hi there!

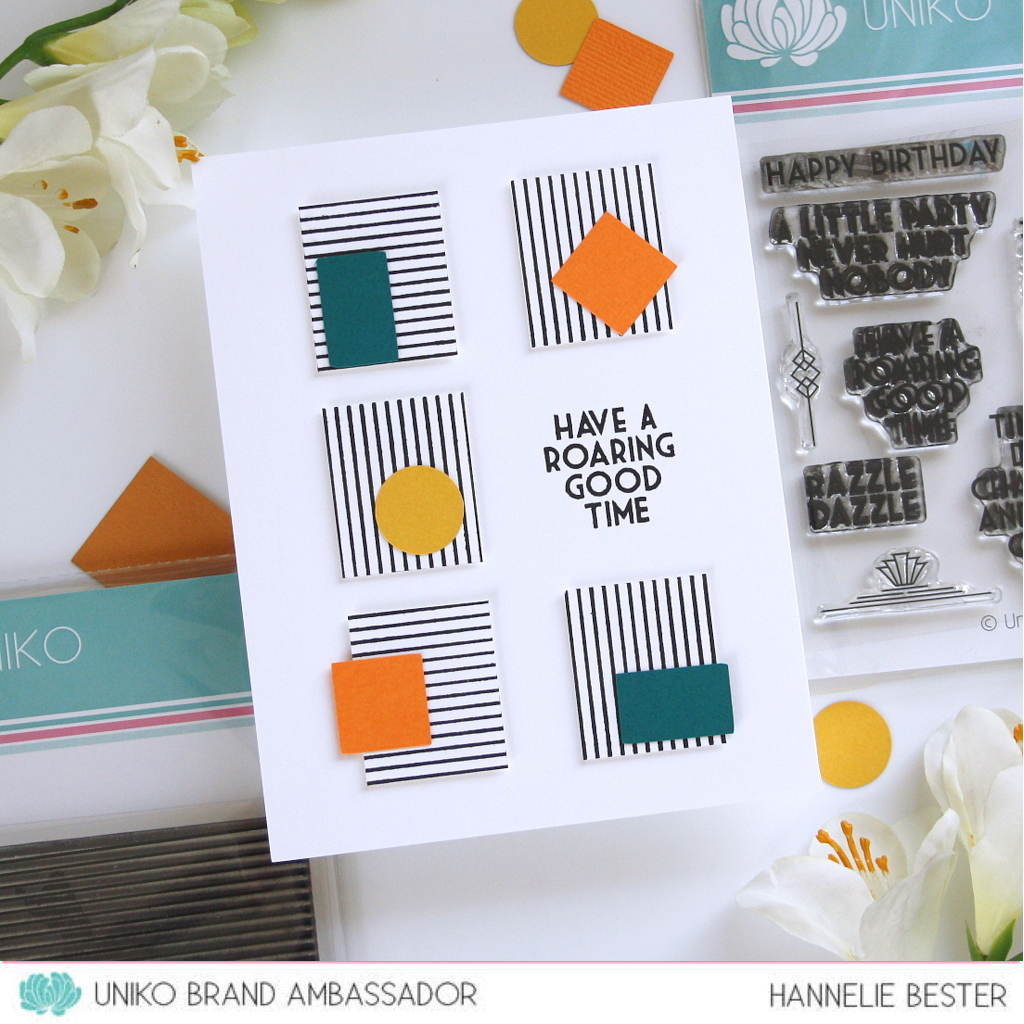
Hannelie here today with a set of cards so quick and so clean and so simple . I just realised again that cardmaking doesn't have to be complicated to be fun !

I started off with the intention to make five cards (the first five photos) and then the idea came to (sort of) combine a couple of them on one card... 

All you need is a background stamp, a sentiment stamp & some colored card stock . A couple of geometric dies or punches would make it even easier 😊

Inspiration for the designs come from some mid century posters like THIS pin combining bold color blocks with stripes. The color block provides a great spot to place the sentiment!


Here's the card with the combination of elements :


... and the complete set !


I used :


Thank you so much for popping in today! 

I hope you feel inspired ♥

Hannelie

Tuesday, 15 June 2021

Brand Ambassador Inspiration - Background Builders: Seeing Stars

 Hi everyone,

Steph here with another Uniko Brand Ambassador Inspiration post and today I am using the Background Builders: Seeing Stars stamp set.

It’s been a while since I inked this lovely set up and today I’ve made three completely different cards to show just how versatile these Background Builders sets are.


My first card is one for the children and a pocket shaker card. I’ve used a combination of large and small stars to create a background which I have given a watercolour wash and coloured with alcohol markers. I secured the acetate on three sides at the back of the stamped panel before adding the sequins and beads. I then closed off the fourth side and attached to the card blank using foam tape. All sentiments used on these cards are from the Uniko Anniversaire Arts Decoratifs stamp set.


With my next card I have tried to create the look of a parcel by using the long star stamps in a crisscross and adding the large stamped stars to mimic a bow or topper. Finally I have added a tag with the sentiment.


For my last card I kept the design simple but added Wow! Fab Foil for a touch of luxury. I think the teal looks great against the dark grey card. 

Hopefully I’ve given you some ideas to go off and ink up a Background Builders stamp of your own. There are a number of shapes available now the range so the possibilities are endless.

Much love
Steph x


Friday, 16 October 2020

Brand Ambassador Inspiration - Focus on Happy!

Hello there! 

Sarah here with a Brand Ambassador Inspiration post for you. 
I've been MIA for the last few months due to a complete lack of crafting mojo ... I'd love to know how you fellow crafters cope with these situations. For me it's been a long spell of short bursts in my craft room and a bin full of rejects!
In the end I treated myself to a couple of new goodies and that seems to have spurred me on a little, especially in the Christmas card department but more of that in a few weeks!
Anyway on to my cards for today and I suppose I inspired myself using the card I created for our current Anything Goes challenge, which can find it HERE It was a really quick card to create (which we all love) and the cheery colours always make me smile.


Instead of using the Background Block: Equaliser, which I used for the challenge card I inked up the Background Builders Classics set. I've hardly used this one but it's full of interesting patterned and plain stripes so I need to ink this up again soon.

I used Altenew Inks throughout and simply kept the stamp in place in the Misti whilst moving my cardstock slightly upwards / downwards before stamping. The same technique with the BIG 'Happy' sentiment, from the 'All Occasion Sentiments' range and is sadly now retired. The white-embossed 'birthday' is from the Art Decoratifs Anniversaire set and to finish I popped the die-cut sentiment panel up on fun foam then added some coordinating enamel dots.

Below are a few more examples ... exactly the same stamps and process but different colour-ways. They were quick and easy to make and always good to have in stock. 


Thanks for calling by and I hope you've enjoyed this little inspiration post and fingers crossed I'll be back soon.

Have a fun day!


Thursday, 27 February 2020

Brand Ambassador Inspiration: Two more birthday themed cards

Morning all.
Julie here with some more cards to keep the birthday party running here at Uniko.


As you may know, we're celebrating Uniko's 8th Birthday.  We've had the Birthday Linky Party .....


...and there's the amazing Birthday Giveaway where one lucky winner will receive a fantastic prize.


Today I have a couple of birthday cards to share, one feminine and one more unisex.

Here's my first card using the recently released Hello Lovely and a sentiment made up from elements from both Birthday Sentiments and Festive Sentiments stamp sets. Yes I said Festive, Happy is not just for Christmas!


I thought I would include some pics of the make for this post, I usually forget until I have almost completed the card but this time I made a special effort, not so much for this card but for the second!

 Here are my elements, the peony cluster stamped and heat embossed with white EP, watercoloured and then fussy cut, a 5 x 7 white base card and a 61/4" x 4 1/4 " panel of matching card with an oval cut out.


I arranged my spray around the aperture and then placed the panel over the base card and traced the outline of the opening with a pencil. I then placed my base card in my MISTI and added the sentiment, stamping in black Memento. You need to rub the pencil out now!


To finish I popped the panel up on pads over the base and added a few sequins.


Now for my second card. 
(Just to warn you, this is a photo heavy description)
It's an interactive one, inspired by this this video on You Tube.


I started by inking a 9.5cm x 14.2cm white card panel with the Scattered Polka Hexagons stencil in bright colours, then cut a slot in it 11/4" x 1/4" as shown below. I also cut a strip of card 1" wide from A4 and scored at 2" and 21/2". From some scrap card I also die cut some balloons and inked them with bright colours. You could of course use coloured card if you have it.


You need to ensure that your central balloon is the largest and you have a slightly smaller balloon in the same colour.
Now comes the assembly, looks way more complicated than it is.
The die cut balloons were added onto the stenciled panel, mainly around the edge and trimmed back to the edges of the panel. 
On the 2" end of the long strip I added some strong double-sided tape and then the smaller of the pink balloons which was stamped with a sentiment from the Anniversaire Arts set, the edge of the balloon is just touching the fold. I did have to trim the excess white card away, you can take away but never add!


On the large balloon, I stamped the sentiment from Birthday Wishes and then added it over the top of the first onto the 1/2" space on the strip with just the widest part hanging over the fold.


Now its time to add this mechanism to the card. 
The long section of the folded strip was slipped through the slot and secured to the base with more strong tape, just on the edge of the smaller balloon, making sure the large balloon was central on the panel.


Flipping the panel over I added more tape, keeping it away from the mechanism.


Then added it to an A6 black card which I had trimmed down by 1cm so that there was room for the pull element in an envelope.


By pulling the end of the strip the top balloon flips back to reveal the hidden sentiment.
I trimmed the excess card from the mechanism and added a pull instruction, some hi-lights with a white gel pen onto the balloons and some strings for the balloons with a black fine-liner.


And breath, told you it was a photo heavy post!
Well you may need a lie down in a darkened room after that but hope I've inspired you to have a go and perhaps join in with our birthday theme, you've only got a few days left!

Thanks for stopping to read until the end, see you back soon.