Showing posts with label Stunning Snowflake designer die. Show all posts

Tuesday, 5 October 2021

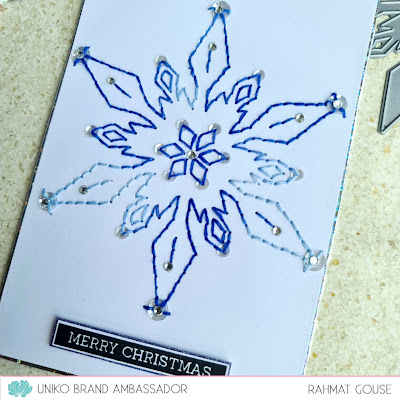
BA Inspiration - Stitched Stunning Snowflake die

 Hello friends, Rahmat here with an inspiration using the stunning snowflake die cut.


I wanted to do some stitching with this die cut, so here it is:


I have used dual toned  blue embroidery floss for the stitching here.
I did add some big and small size sequins to the corners of the snowflake to add some sparkle, along with a few jewels.
The sentiment is from the recently released build a tree set. the sentiment strip is framed with a blue glitter strip

The base card is prepped with a silver holographic sequin foil.


A close up at the shimmer of the foil

I  hope you like the inspiration from me today.

                    Thank you for stopping by, I really appreciate your kind feedback. Have a great day!     


Monday, 14 December 2020

Countdown to Christmas Day 14 - Still Dreaming...

 Happy Monday!


Eeeek... just 10 days till the BIG C! I can't believe how quickly these days are flying by. I feel fairly organised, but when I know I haven't got long the anxiety kicks in and my brain goes into overdrive thinking I've forgotten something, anyone relate?! 

Anyway, I'm still dreaming of that white Christmas! Though I don't think there will be snow this year. Fingers crossed we get some at some point this Winter. So, to make up for the lack of snow I have another snow themed card ;)


I made this similar card above a couple years ago and it popped up on my Timehop and it inspired me to recreate it using the Uniko Stunning Snowflake Designer Die.


Like the card before I used the snowflake builder strip from Background Builders: Christmas. I was going to retire this stamp set, its been on the sale page & retiring list for so long. BUT, it's such a classic and a set I turn to year after year and so its staying! 


My embossing went a little array and normally the perfectionist in me would do it again, but I actually like the dusty effect, it adds to the wintery snowy feel! 

Just this one clean & simple card from me today, but I'll be back tomorrow with more to share. Oh, and did you see the Uniko 2020 Christmas Party? There is plenty of time to join in on the fun HERE :)

Thanks for stopping by today.

Crafty Hugs Bev x

Monday, 28 October 2019

More Ideas using Sentiments as a Background - Brand Ambassador Inspiration

Good afternoon folks.
It's Julie here with a few more ideas using sentiments as a background.

On Saturday I shared a card using a panel created with lots of sentiment stamps. As it takes awhile to lay all the sentiments out, it made sense to stamp a load on different coloured card for use later. I even had another go at creating a slightly different one whilst I listened to the footy on a wet Saturday afternoon!

My first card uses one of my first layouts. As you can see there are lots of different fonts and sentiments which I laid out on my MISTI before stamping with Versafine and embossing with clear EP. This example was done on white card and inked over with Salty Ocean DOx in a resist technique.


I used the idea of a bauble, cutting out a circle from the inked panel and the slipped the large Sparkling Snowflake, die cut from holographic card, behind. A little bit of thin silver ribbon and a bow completes. The finished panel was popped up on foam over a white base card.

My second card uses a different layout, this time it has a more horizontal design to accommodate a landscape design.


I used the trapped colour technique to create this background, stamping and embossing as before but this time on a panel of watercolour paper previously inked with Salty Ocean DI that was left to dry well before stamping. After heat embossing, I spritzed the blue panel and then wiped off the ink leaving behind the colour trapped behind the embossing. The top panel was cut with a scalloped edge die and some snowflakes from Stunning Snowflakes were stamped in Salty Ocean and Blueprint Sketch DI. Finally, I popped up the white panel on pads over the inked one on a white base card.

Finally I went all silvery for a change!


This panel was stamped and embossed with clear EP before cutting out the central NOEL with an alphabet die set. After cutting, I added Weathered Wood to the base but left the letters clear. I glued my panel onto a base card then added some grey foam letters and then the white ones on top. To complete I added a small die cut snowflake from the new Big n Bold Snow dies and a few diamante gems.
Three different looks, all from the same starting point. Hope I've given you a few more ideas for your Christmas card making, I've still got a load more to make but I still have plenty of backgrounds to use!