Showing posts with label Winter Foliage stencil. Show all posts

Tuesday, 25 October 2022

Two for Tuesday, BA Inspiration

 Good afternoon, Julie here with two cards on Tuesday!

I was inspired by the sketch over at The Paper Players to create two cards using the same sketch, colours but different themes.

Here are the two I came up with.


Here's a closer look at the first card.


I love a sketch, they are a great way to get inspired when your mojo is not quite working as it should!
For this I started by stamping the small outline rose and two of the leaflets in Versamark and embossing with gold EP. Using some Candied Apple, Mowed Lawn, and Pealed Paint DI smooshed onto my craft mat, I water coloured before fussy cutting out. A little shadow was added using one of my Zig watercolour markers.

The central strip was stamped using a selection of Simply Said sentiments in Altenew Evening Gray on a strip of paper, before adding to an A6 base card. A piece of textured white card from my stash was mounted onto some gold card and the Floral Vines sentiment was added and embossed with the same gold EP. The rose spray was then added to the top panel and attached over the central strip.

My second card uses the poinsettia from Season of Beauty, Christmas Sentiments and the Winter Foliage stencil.


The central panel was a leftover from an other project yet to see the light of day and perfect for this card. After stencilling over kraft with Unicorn white ink, I cleaned the stencil and then when the white ink was dry, I inked again with DI, love the white shadow you get with this technique.

The poinsettia was stamped with Versamark then embossed with gold EP, bracts and flower center were then added. Using the same water colour technique and colours as the first, I then fussy cut it out when dry. 
This time I used a plain white panel for my sentiment, adding the fussy cut image in the left hand corner before adding the whole over the central band.

Two cards using the same sketch, colours but different looks. I think it's a layout that will come in handy again as I think it's very versatile. 

So that's it from me for the moment, hope I've inspired you to create something for yourself along the same lines.
Until next time, keep safe and keep crafting!

Monday, 22 August 2022

Merry Monday, BA Inspiration using Winter Foliage and Christmas Wishes

 Good afternoon, Julie here with a little festive inspiration for you. 

I was inspired by the latest challenge at CAS Christmas Card Challenge and a video I saw on You Tube. In the video the designer used homemade coloured card to create batch Christmas cards and the ladies at CAS Christmas have the cue word Pine, so off I went!

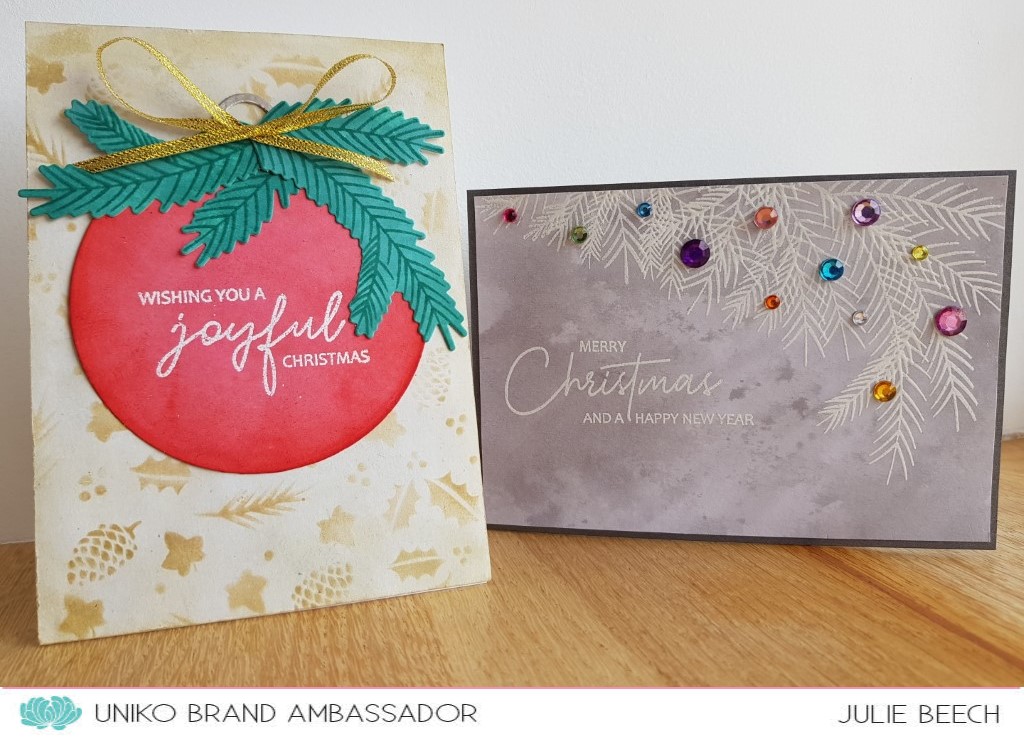
Initially I got out all my sets which included pine branches but mainly used the large pine branch from Winter Foliage to create my two cards. Here are my designs.


My first step was to create my coloured panels. I did this by washing a selection of festive and neutral coloured DIs over some panels of white card, smooshing the leftover ink onto the panels to use up the ink and create some subtle texture. Once these had dried overnight under a heavy weight to flatten the panels, I used two of the neutral panels to create my cards.

CARD 1

The soft grey panel was created using Hickory Smoke DI and I stamped the large branch from Winter Foliage with Versamark along the edge, embossing with white EP. A few of the gaps were stamped with the smaller pine branch from Season Of Beauty. The panel was then trimmed down from A6 to leave a border when added to my dark silver grey A6 card base and the sentiment from Christmas Wishes added to match. For decoration on the boughs, I used some old silver crystals from Home Bargains, that I coloured with Copics and attached them to my branches. The soft colours complement the grey and white of the base.

CARD 2

This time my background panel was made using Old Paper DI which I inked over with the Winter Foliage stencil and the same Old Paper DI and glued to an A6 base card.
From a panel made using Pine Needles DI I cut two branches using the Winter Foliage dies and stamped the foliage in Evergreen Bough DI a couple of times. I used a handmade jig, simply a piece of rectangular card with a die cut aperture, in my MISTI to make sure the die cut stayed in place. 
The bauble was cut using a circle die from a panel of card made using Festive Berries DI. I did 2 layers of red as the initial covering as it wasn't quite dark enough for my purposes. A silver hanger was cut using a magazine freebie die.
The red die cut circle was edged with some more Festive Berries DI and the sentiment stamped and embossed in white EP. The first branch was added as is, but the second branch was cut in two before being added. A small gold ribbon bow completes and the whole bauble was then added to my background.

So that's about it from me, I hope I've given you some ideas to create your own cards.
Thanks for stopping by.

Friday, 20 December 2019

Uniko Brand Ambassador Inspiration...Dreaming of a White + Pop of Colour Christmas

Hello,

Okay...I am still NOT done sending Christmas cards and, I suspect, still have a few more to make! OHMYSTARS, but I'm behind!  That said: Carol here welcoming you to my Uniko Brand Ambassador Inspiration post!

Fortunately, I have several lovely Uniko stencils and sentiments on hand, as well as some translucent gel and plenty of glitter to create cards (5 here) that are super simple AND super sparkly! While this isn't 100% mass-production - as I've used various stencils - the embossed sentiment fits that bill. I simply arranged the words on my Misti, die-cut my cardstock, added Versamark ink and white embossing powder and, in a few waves of my heat gun, had my sentiments all done. The hardest part: waiting for the glitter to dry! Yes, yes...I could have used pre-mixed glitter gels/shimmer pastes but my stock is running low. It was way more fun to 'glitter me (and Lily and my craftroom) silly'!

I did my best to capture the sparkle in my photos but didn't do them justice. Please use your imagination a bit...these really do shimmer and twinkle!

Uniko Products:

Sentiment: 

Stencils: 


To those receiving these cards...sorry/not sorry *grin* that some glitter may sparkle parts of you, too!

May the gifts of peace, love and joy be yours this Christmas and throughout the New Year!

Merry Christmas!!

~carol

Sunday, 8 December 2019

Stencil Sunday

Good morning and welcome to another Stencil Sunday at Uniko.
It's Julie here this month to share three cards using one layout but three different stencils and colourways.

Last year ,as part of the Christmas release, I made this card using unconvential colours and the Let it Snow Stencil, so I thought I would use the same layout and see what happens when you change up the colours and/or the stencil used. Here are my three takes using the same layout.


This card uses the In the Forest stencil and a trio of green inks from Altenew's Tropical Forest set.


Initially, I was going to use a gold die cut JOY but I preferred the green glitter card with a red background. The touch of red fun foam peeking from behind the green glitter card links it to the colour of the background panel and makes the green pop against the stencilled panel. This is a case of colours opposite on the colour wheel being used to make each of the colours stand out, the green looks greener and the red reder. The same would be true of Yellow/Purple and Orange/Blue combos.
The stencilled panel was made by simply attaching a panel of white card under the stencil then adding each green randomly until all the trees were inked, not worrying too much where each colour went. I think the effect is more interesting than using just the one solid colour. 
The die cut JOY was purchased from The Works but the stamped sentiment panel uses a retired Uniko set. Sequins from the stash complete.

This next card uses the new Winter Foliage stencil .


This time I used small make up brushes to add ink to each separate image. I picked them up at Lidl, as well as some larger ones, just like the Picket Fence blender brushes you can get, but a lot cheaper and there was a great range of sizes. You can really get into those small areas without getting ink into the wrong place. My background card was chosen to match the holly leaves and to keep with tradition, went with a red glittery JOY, minus snowflake, which like the previous card I fussy cut away before adding the fun foam. A few red Stickle berries complete this time.

My third card is virtually the same card using the Let it Snow stencil, as last year, but this time in shades of blue.


I think it's good practice to try to match inking to base cards and trim, if you are using them, it creates a more cohesive design. This time I used DIs in a mixture of Chipped Saphire, Blueprint Sketch and Salty Ocean. I didn't pop up the die cut on foam this time and also kept the snowflake, sequins from the stash complete.


So I hope I've managed to illustrate that simply by changing the colours used, the stencil or both, you can stretch your Uniko supplies and have some fun along the way!

Happy Christmas crafting!