
Showing posts with label Winter Foliage dies. Show all posts

Sunday, 22 October 2023

Stencil Sunday BA Inspiration - One design Three stencils

Bonjour !

Izzy here with a Stencil Sunday for my Uniko Brand Ambassador inspiration. As my dear teamy Steph was mentioning it in her last Brand Ambassador Inspiration post, Christmas isn't all that far and I then realised that I don't have a lot of Christmas cards in my stash !

If my mojo is very low at the moment, Steph, with her gorgeous Christmas cards made me want to play with my Uniko stencils. So I took off my stash my favourite Uniko's stencil when it's about Christmas and I made this first card.


I love the In the Forest stencil, since it has been released, I have used it every year for my greeting cards. Here I used it directly on the double white card and I brushed two shades of green and a bit of black. The result was nice but I wanted even more firs. So I turned the stencil and I brushed another layer of the same inks.

On a piece of white card stock I stamped Santa from the Jolly Christmas set, I coloured it with coloured pencils and I fussy cut it. I die cut a square of Vellum paper on which I stamped and I black heat embossed the sentiment coming from the Background Builders Christmas 2018.

To finish my card I foam mounted Santa on the Vellum. I turn the Vellum and I put squares of foam tapes behind before adhering it on the card base.

As I loved how we can see through the lovely design made with the stencilling, I kept this design for my two other cards.


For this second card, I used the Winter Foliage stencil that Bev recently used for her beautiful card (see HERE). With a small brush, I applied the different colours.

On the Vellum, I stamped and I gold heat embossed the sentiment coming from the Christmas Wishes set. I stamped the foliage from the Winter Foliage set and I die cut each piece with the matching dies.

I assembled the card in the same way as the previous one.


For this last card I brushed non-traditional colours through the Let is Snow stencil to make my background. 

After looking for what I could put on the Vellum, I tried these little trees from the Background Blocks Scandinavian Christmas set.


I coloured them with Promakers, I fussy cut them and I foam mounted them on the square of Vellum on which I previously stamped and black heat embossed the sentiment from the Christmas Sentiments set.

To finish my card and to make these little trees even brighter I put some Stickles on them.

Well, that's all the Jolly, Bright and Merry I have to share with you today. Have a lovely Sunday and thank you so much for stopping by.




Monday, 22 August 2022

Merry Monday, BA Inspiration using Winter Foliage and Christmas Wishes

 Good afternoon, Julie here with a little festive inspiration for you. 

I was inspired by the latest challenge at CAS Christmas Card Challenge and a video I saw on You Tube. In the video the designer used homemade coloured card to create batch Christmas cards and the ladies at CAS Christmas have the cue word Pine, so off I went!

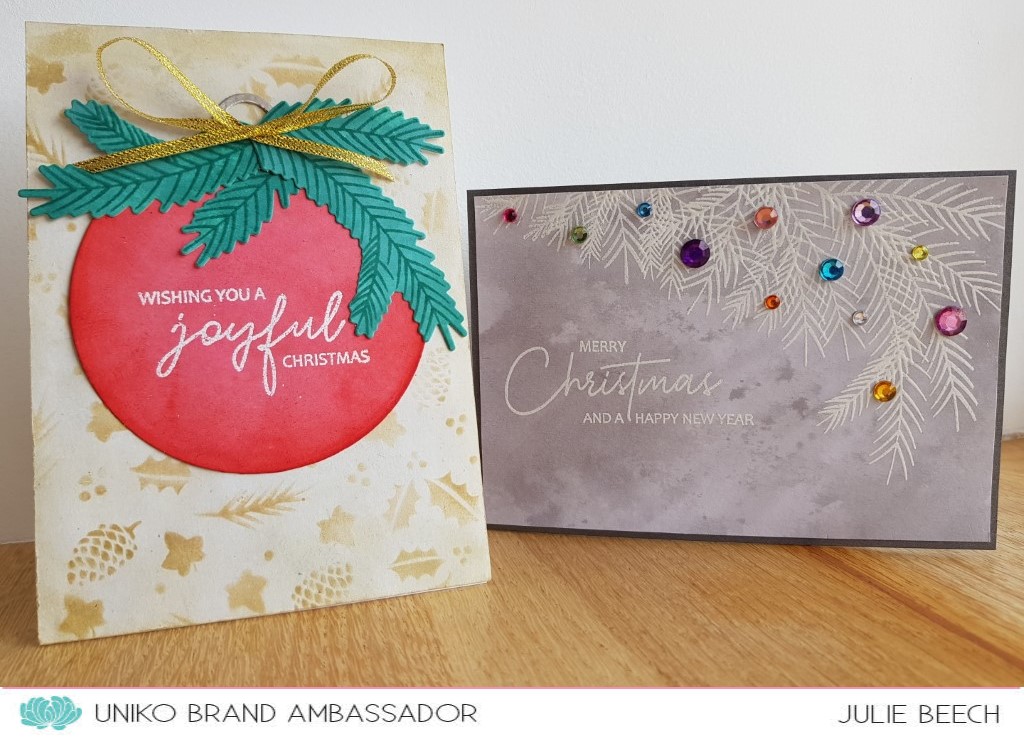
Initially I got out all my sets which included pine branches but mainly used the large pine branch from Winter Foliage to create my two cards. Here are my designs.


My first step was to create my coloured panels. I did this by washing a selection of festive and neutral coloured DIs over some panels of white card, smooshing the leftover ink onto the panels to use up the ink and create some subtle texture. Once these had dried overnight under a heavy weight to flatten the panels, I used two of the neutral panels to create my cards.

CARD 1

The soft grey panel was created using Hickory Smoke DI and I stamped the large branch from Winter Foliage with Versamark along the edge, embossing with white EP. A few of the gaps were stamped with the smaller pine branch from Season Of Beauty. The panel was then trimmed down from A6 to leave a border when added to my dark silver grey A6 card base and the sentiment from Christmas Wishes added to match. For decoration on the boughs, I used some old silver crystals from Home Bargains, that I coloured with Copics and attached them to my branches. The soft colours complement the grey and white of the base.

CARD 2

This time my background panel was made using Old Paper DI which I inked over with the Winter Foliage stencil and the same Old Paper DI and glued to an A6 base card.
From a panel made using Pine Needles DI I cut two branches using the Winter Foliage dies and stamped the foliage in Evergreen Bough DI a couple of times. I used a handmade jig, simply a piece of rectangular card with a die cut aperture, in my MISTI to make sure the die cut stayed in place. 
The bauble was cut using a circle die from a panel of card made using Festive Berries DI. I did 2 layers of red as the initial covering as it wasn't quite dark enough for my purposes. A silver hanger was cut using a magazine freebie die.
The red die cut circle was edged with some more Festive Berries DI and the sentiment stamped and embossed in white EP. The first branch was added as is, but the second branch was cut in two before being added. A small gold ribbon bow completes and the whole bauble was then added to my background.

So that's about it from me, I hope I've given you some ideas to create your own cards.
Thanks for stopping by.

Monday, 11 July 2022

Merry Monday, BA Inspiration with Winter Foliage Stamps and Matching Dies

Good morning, Julie here with some more ideas and inspiration to encourage you to make a start on your Christmas makes. Today I'm using the Winter Foliage stamps and matching dies and a new to me technique I stumbled across on You Tube recently. Here's a look at the three designs I came up with.


I was looking at a Marion Emberson video and she was raving about a video of a technique she'd just seen, so I went to look too. In the You Tube video, Ann Melvin uses Kitchen paper to die cut foliage to give a 3D effect. You Tube also suggested another video here that pre dates the first by the Memory Box guy. Thinking this looked something I could use for my post I had a play. 
I wont go into the process of making the die cuts as the video does it much better but I will explain how I made each card!

My first card uses a couple of the pine branches and pine cones, together with a text panel I made a couple of years ago.


Once I had cut out my elements, I added some water colour paint to the die cuts and left to dry. Using the left over from the die cutting, I placed it in my MISTI to use as jig to stamp my elements with the matching stamps. The boughs I stamped with Evergreen Bough DI and the cone with Ground Espresso DI. Now in the video there was no mention of the layers parting from one another which happened to mine, but a little dab of glue secured them back together! To make it more Christmassy, I added in some Inka Gold wax watered down with a little plain water, with a fine paint brush.
My panel was made for this BA post a couple of years ago, the process is quite involved so I made a load at the same time and kept them for use later! I trimmed the background panel, clear embossing on kraft, then added stamped and die cut elements. The finished panel was finished with a twine bow and added to my off white, A6, base card.

This second card uses two of the holly leaves and one of the berry clusters over another sentiment stamped background. This time I kept it very simple and just added a circle from the bits box, stamped with Season's Greetings from Christmas Sentiments and the holly and berries. 


My text panel was slightly too small for an A6 base card, so I trimmed it down to leave a thin, white border down both sides. The holly was painted as before with watercolour, then stamped in Pine Needles DI and the berries I left unstamped, just watercoloured and a few dots of white gel pen. This time I added some Wink of Stella to the die cut and stamped elements.

My final card uses the last of the holly leaves and berry cluster in a more contemporary slimline design.


After adding water colour and stamping the leaves as before, this time I added some Versamark and clear EP and heat embossed. It took a couple of goes as the paper towel is very absorbent. The definition on the leaves was lost in the embossing process, so I scored in the veins carefully, with a craft knife.
On a panel of white card I stamped the large sentiment from Festive Sentiments in black and added the embossed leaves and berries. A doodled border using a black fine liner completes this element. 
When I'd finished the panel and placed it on the plain white card, it looked a bit uninteresting, so I stamped a couple of the Background Blocks Wonky Stripes in black on another piece of card, then added that to my base card before the top panel.

Well I hope I've given you some ideas to kick start your Christmas makes, so for the moment, thanks for stopping by.

Stay safe and keep crafting!!