Showing posts with label Distress Oxide Inks. Show all posts

Tuesday, 16 July 2024

Brand Ambassador Inspiration - Christmas in July

Good morning, 

As it’s July, I’ve chosen to go with the Christmas in July theme for my Uniko Brand Ambassador inspiration. Uniko has lots of wonderful Christmas stamps and stencils (matching die sets available too!). 

For my cards I have focussed on the Uniko Let It Snow stencil. 


For my first card I have used Versamark ink through the stencil and heat embossed in white embossing powder, directly onto the Kraft card base. I then die cut a smaller rectangular piece of white card and used the inner word die from the Uniko Big & Bold Snow die set to cut the word snow towards the bottom of the panel. I used a separate piece of white card to stamp and heat emboss the snowflakes and 'let it' sentiment all from the Uniko Big & Bold Snow stamp set. 


For this card, I started with a panel of white card and used glitter paste to create a fabulous background (so sparkly!). On a smaller piece of white card I heat embossed the sentiment and snow swirls from the Uniko Big & Bold Snow stamp set. 

My final card uses a 'smooshed' background created using Picked Raspberry and Broken China Distress Oxide inks. Once dry I used Versamark ink through the stencil and heat embossed in white. On a spare piece of smooshed card I die cut the inner word die from the Uniko Big & Bold Snow die set and white heat embossed the smallest snowflakes from the Uniko Big & Bold Snow stamp set. I die cut the inner word from white card two more times and adhered them behind the smooshed one to create dimension. I adhered this to the outer word die cut from white pearl card, before adhering directly to the card front. Finally I added the rest of the sentiment from the Uniko Big & Bold stamp set, stamping this in Pickled Raspberry ink. 

Which one catches your eye?

Much love

Steph x

Tuesday, 27 June 2023

Brand Ambassador Inspiration - Monochrome Silhouettes

Good morning

Anita here and today I have three same but different cards, all using silhouette stamps and paired with the Pinstripe Background Blocks.

These were pretty quick to make and are one layer, apart from the sentiment strips and gems.  And for the first time I used Distress Oxide inks to stamp with.  They aren't the easiest to work with as they can be quite juicy but I chose them as I thought they would create better coverage of the silhouettes over the stripes, but what do I know...it didn't actually work!  The lighter colours ended up showing through but I do actually like that effect even though it wasn't what I was going for!  Hey, every day is a school day in the crafting world! 

So, here's the first one, using coral shades...


I began by stamping the Background Blocks Pinstripe II image in Saltwater Taffy Distress Oxide ink and, once dry, I stamped the foliage silhouette from the Just Because set in Abandoned Coral.  This took a few re-stamps using my Misti, lots of light layers is key with these inks.  I then added a sentiment from the Simply Said Blocks II set and some co-ordinating jewels finished the design.

You can see below how the lighter shade of ink showed through the darker shade, I think it gives a kind of 'looking through some blinds' effect!


My second card is in teal tones...


For this one I used the vertical stripes, the Background Blocks Pinstripe image, as my backdrop which was stamped in Salvaged Patina Distress Oxide.  The foliage silhouette this time is from the Season of Beauty stamp set, and I used Peacock Feathers.  The sentiment is from Simply Said Blocks and, once again, I finished with some co-ordinating jewels.


And finally, in shades of blue...


This time, the Background Blocks Pinstripe II image was stamped in Salty Ocean Distress Ink, and the foliage, from the Happy Days set was stamped in Prize Ribbon.  The sentiment is from Simply Said Blocks II and again, the blue jewels were added as a finishing touch.


So there you have it, three quick and easy, clean and simple cards with no complicated techniques.  Thanks for taking a look, have a lovely Tuesday.


Friday, 19 August 2022

Brand Ambassador Inspiration - grid-paper in different styles

Hi there,

here in Germany, in my federal state Brandenburg, the summer vacations will end soon... so I thought about getting crafty with some school relevant things - one of the first subjects in my mind was math - and grid paper!
Do you know the great Background Blocks Stamp with Grid pattern?

I made three different cards in different styles, but every one is made with this great background stamp and with grey as basic colour.


The first one is a masculine card, combined with the Background Blocks Cogs. Both Blocks I havn't used in the full size - I added a masking tape to my paper to keep the rest of the paper clean.
In the focal point I used a cool glaucous colour and different greys.

The upper half of the card is stamped with the patterns, in the lower part I added three times the same sentiment, embossed it in two different colours, fitting to the cogs.
To give the card a bit "more" I added some black dimensional dots in the centers of the cogs.
A quick card to make, anyway with some specials for guys!

UNIKO-BrandAmbassador-Inspiration

As occasion for the other two cards I've choosen "Get well soon".
In the first one I affirmed the stenciled and pencil coloured bloomy eyecatchers with two sizes of rhinestone drops and a metallic nuvo drop in the middle. The sentiment is embossed in silver - so it's a bit sealing with the grey wiped background and isn't dominating the scene.

UNIKO-BrandAmbassador-Inspiration

And for the last card for today I used similar stamps but in a different colour scheme. I returned to the more masculine colours light green, light blue, petrol.
The accents are big glittered half globes and hand drawn stamina.


The half globes are made out of selfadhesive clear rubber bumpers (or antishock dots?) from the DIY store (they are used to protect furnitures and/or doors from damages) and pure glitter.
They are bigger than usual crafty accents and you can mix your own choice of glitter or just use clear glitter and a coloured background to make them fit perfectly to your project!
Making them was a fun little extra crafting time!

UNIKO-BrandAmbassador-Inspiration

What kind of design you can imagine with a grid paper background?
Hope I was able to inspire you and try something new!

Have a creative time! 

Greetings from Wiebke


Tuesday, 8 March 2022

Brand Ambassador Inspiration - Balloon Bash Stencil

Welcome everyone! 

Steph here today. After all the fantastic birthday celebrations for Uniko’s 10th birthday in February, I didn’t feel like stopping the celebrations just yet! 

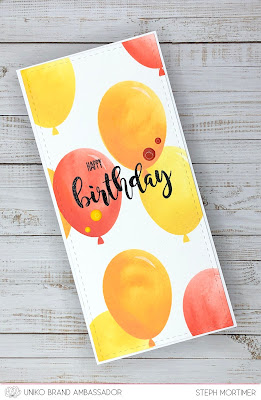
As I had the Uniko Balloon Bash stencil out, I decided to use this for my Brand Ambassador inspiration post. It is such a delightful stencil to use and you can create quick but stylish cards with it easily. I also focused on slimline cards for this showcase.


For my first card I have simply used one balloon shape and blended red, orange and yellow balloons in clusters up the card. I used watercolour card as I find  it easier to blend on, and distress oxides which I prefer to the original distress inks. I have added a sentiment from Uniko Birthday Sentiments set and finished off with enamel dots. 


Changing up my colours, I blended different shaped balloons across the top of my card, overhanging the edge. This time I added strings to the balloons using a ruler and metallic gel pen. The sentiment is again from Uniko Birthday Sentiments set which I have stamped in dark grey before heat embossing with clear powder.


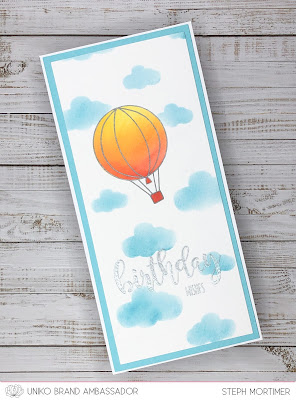
For my final card today, I’ve used the balloon stencil to create a hot air balloon. I did this by simply blending the balloon as usual but before I removed the stencil I outlined it with metallic gel pen. I drew further curved lines inside the balloon and joined them to a hand drawn ‘basket’. I masked off my balloon and used Uniko Rainbows and Clouds stencil to create my background. The sentiment, again from Uniko Birthday Sentiments set, is heat embossed in silver to finish. 

I hope this has reinvigorated the birthday spirit for you and that you can see just how simple and effective the Uniko Balloon Bash stencil is. I love it!

Much love

Steph x

Friday, 28 January 2022

BrandAmbassador Inspiration - Techniques with Kraft Paper, Stencils & Inks

Have you ever used Ranger Distress Oxide Inks on dark cardstock or Kraft Paper?
These Oxide colours are very different to the "original" Distress Inks.
For those of you who havn't worked with one or both inks yet I will try to give a quick description of the differences.

The "original" Distress Inks are water-reactive dye inks with an almost clear formula which soaks into the paper. They are perfect to work on white, very pale or light coloured papers. The darker your papers are, the more it's just like a kind of watermark print you can make with these inks and when the colour of the paper is too dark you can't see the ink any more, cause there is not enough difference between ink and paper.
These translucent Distress Inks are perfect to blend with a sponge, brush or blending tool. The colours overlap, can be reactivated again and again and you can create lots of new colour-shades.

The Distress Oxide Inks are a water-reactive dye and pigment ink fusion, You can use any colour of paper to work on - white, colours, black and also kraft. The Oxide colours are opaque, so they are covering the colours beneath. Many people say, the creamy consistence is even easier to blend than Distress Inks! (Be sure to use seperate blending tools and don't mix the different inks on one tool!)

That's only a very short introduction of these fantastic colours.
I think many crafters know them, so I don't want to write too much "old" stuff. But if you are new to these mediums and have more questions to the inks, please feel free to ask in the comments! I will try to help!


In this top picture you can compare the first three techniques I introduce today to each other.


Let's come to my used techniques!
I used different kind of Kraft Papers - a lighter one, a darker one and another darker one with a bit of structure.
All cards are made with the Uniko Flower Power #5 Stencil and sentiments of different Stamp-Sets like Wonderful Day, Simply Said Birthday, Floral Vines and All Occasion Sentiments #6.

For this first card I used the Oxide Inks directly on the  Kraft paper. They blended well with smoth colour gradients. The colours are: for the petals tumbled glass and salty ocean & for the center squeezed lemonade and mustard seed.
The sentiment is heat embossed in two shades of yellow - matchable to the middle area of the flower.
The details on the center dots are Nuvo crystal drops gloss in Buttermilk and English Mustard.

The all other cards I added a white Unicorn pigment ink from Hero Arts to the paper first, then cleaned the stencil and then I started to bring the colours to the flowers.
Here in the second card I've used the same colours than in the first one. The sentiment is heat embossed with white embossing powder.

For the third card I coloured the petals and the center with Kuretake/Zig Clean Color Real Brushes and then blended them with a watered brush.
The sentiment is embossed with white powder again.

For the fourth card I returned to the Oxide Inks, but to different colours - kitsch flamingo, picked raspberry, festive berries.
This card got a more distressed look! I softly wiped with the white inkpad over the paper and got these light planar marks. Then I used an old Distressing Tool to roughen the edges of the paper before I glued it to the cardbase. I added some white details to the center dots with a Gelly Roll pencil.

I think here with the pink colours it's even more obvious then with the blue colours how great the white ink base workes with the colours! They look so soft now!
I made another picture with a closer look for you:


On my last card for today I enjoyed the white pigment ink and just traced the outline-edges of the petals with metallic Gelly Roll Pencils. I used all the rainbow colours! The center circled I coloured too and added some Glossy Accents to every circle.
The sentiment is heat embossed with Ranger liquid platinum powder on a little piece of paper I then cut to a banner.


Hope you enjoyed this little techniqual journey with me!
Wish you nice and crafty days!

Greetings from Wiebke

Friday, 22 November 2019

Brand Ambassador Inspiration - Dramatic Outlines

Hello Sarah here, with my latest Inspiration post ... I was tempted to go festive makes but in the end couldn't resist playing around with the Pure Florals range and showcasing how fantastic these outline images can be without traditional colouring techniques.

Instead I've created multiple backgrounds using a combination of Distress Inks and Oxides which I think sets the floral outlines off a treat! I can't remember the exact colours I used as I just grabbed some of my favourites and started blending away.

These quick and easy makes use sentiments from the Simply Said Blocks range. The floral outlines are stamped using Versafine Onyx Black ink before embossing with clear embossing powder and just off the edge of the card panel so no masking required.

First up using the Pure Florals: Peony


...  a couple using the Pure Florals Lily


... and finally Pure Florals Rose


I hope you like these ideas and thanks for stopping by the blog today. 


Wednesday, 30 October 2019

Brand Ambassador Inspiration - Three the same ..... but different

Happy Wednesday ......

Good morning it's Linda here.  I hope you're having a good week. 
I don't want to cause a panic or anything but ..... eight weeks today and it will be Christmas Day!!!! 
Only EIGHT weeks ....... eeeek!!!!

Luckily my holidays are over, so I can finally start thinking about everything festive.  All the cards and tags that need making, all the presents that need buying .......... and the food!!!!  Is it too early to decorate the tree?  Maybe just a little.

I have made a start on some cards though.  The latest Uniko release is fabulously festive and perfect for the job.
The new Winter Foliage stencil is a great design for making quick and easy cards, that look fabulous.
Here's three simple designs, all the same but each one a little different .......


The finished card size is a cute 5x5 inch square, and there's not much in the way of layers so they're great for posting too!

I cut three squares of white cardstock slightly smaller than the front of my cardblanks, and masked around the edges of each one using low tack stencil tape.
I then used Distress Oxide inks to add just a touch of colour to each of the backgrounds ......... Evergreen Bough (love this colour) applied lightly with a brush


Weathered Wood ...... (another of my favourites). 

This time I used a stencil brush to add the colour, applying the ink in one direction, leaving brush marks to give the look of woodgrain


and finally Peeled Paint, lightly brushed over the card ......... it does look more green in real life!


I then inked through the stencil onto each of the backgrounds.
Different colours on the Evergreen Bough ......... Gathered Twigs for the pine cones, Festives Berries for the berries, Forest Moss for the ivy leaves, Mowed Lawn for the holly and finally Evergreen Bough for the fir


I used just the one colour on the other two ....... Evergreen Bough on top of the Weathered Wood ....


and Gold metallic ink on the Peeled Paint ......


You can see I've added a little crystal glitter to the designs to give the cards some sparkle


and also a few dots of glitter glue here and there and some white enamel accents ....


The new Festive Sentiments Outlined stamp set goes perfectly with the stencil and there's so many sentiments to choose from .......


Heat embossed and then coloured using glitter gel pens ......


Or, simply stamped in black ink and coloured .......


So many options, and so many colours to choose from ..... the choice is all yours.

Thanks for popping by ...... enjoy the rest of your day.

Cheerio until next time .....