Showing posts with label Simply Said Christmas. Show all posts

Tuesday, 9 November 2021

Brand Ambassador Inspiration - Creative Christmas

Good Morning all, 

Steph here today. For my Uniko Brand Ambassador post I thought it would be quite nice to showcase a different way to use some Uniko non Christmas stamps mixed with the traditional Christmas sets for creative Christmas projects. 

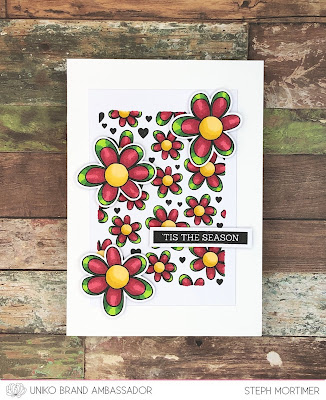
My first card uses Uniko Background Blocks Doodle Flower stamp teamed with the more recently released Uniko Doodle Flowers stamp set. I have used red and green for the petals to resemble a Poinsettia. The sentiment is from Uniko Simply Said Blocks Christmas stamp set

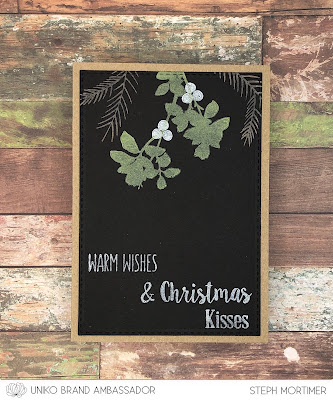
My second card uses the foliage silhouette from the Uniko Just Because stamp set and I have teamed it with some white berries to create a hanging stem of mistletoe. I have used chalk ink over the black card in order for it to show up. The sentiment is a mixture of Uniko Christmas Sentiments stamp setUniko Most Wonderful stamp set and Uniko Big & Bold Hugs stamp set.

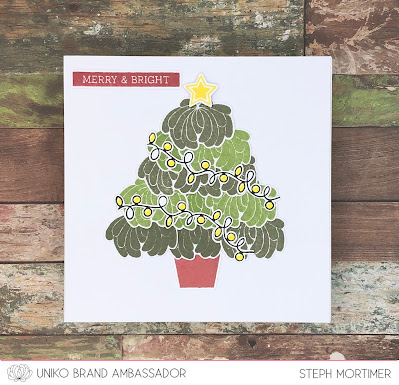
My final card for today uses Uniko Flower Power #3 stamp set. I have stamped the solid floral in two shades of green before fussy cutting and turning upside down to build my Christmas tree. The decorative elements have all come from the recently released Uniko Pattern Building Christmas Tree stamp set teamed with a sentiment from the Uniko Simply Said Blocks Christmas stamp set.
I hope you like my three cards today and that I have got you thinking about different ways in which to use your stamps. 

Much love

Steph x

Tuesday, 8 October 2019

Brand Ambassador Inspiration - Last chance to buy before retiring Sweet Baby

Bonjour !

Izzy here. Today I'm echoing Jane's post from last Saturday, as she explained, some stamp sets have to be retired to make room for the new ones. For this occasion, they are on sales with 50% off, so I'm here today to give you some inspirations on how to use the Sweet Baby stamp set.


As all the Uniko stamp sets, this one is very versatile, you can not only make Babies'cards but also cards for other occasions and that what I'm showcasing in this post.

The first trio are Babies cards using not only the Sweet Baby set but combining it with other Uniko stamps.

My first card uses the ducks of the Sweet Baby set together with the So Much set. I simply stamped the ducks, masked them and then I stamped the flowers. I coloured them with Kaleidacolor inks and a blender pen. I stamped the sentiment and I die cut a frame (x3) and glued it on the card base around the image.


Stamps: Uniko, Sweet Baby & So Much - Die: MFT, Stitched square scallop - Inks: Kaleidacolor, Baby Powder & Altenew, Industrial Diamond


My second card uses the onesie that I stamped in pink on a pattern paper. I made the background with the Scattered Polka Dots stencil and Catherine Pooler inks that have the same shades than the pattern paper. I matted this dotted background onto pink and then onto the card base. I die cut a scallop circle that I embossed with a dotted embossing folder. I then foam mounted the onesie on it. I stamped the sentiment onto a banner and I also foam mounted it.


Stamps: Uniko, Sweet Baby - Stencil: Uniko, Scattered Polka Dots - Die: Spellbinders, Classic Scalloped Circles Small & No brand, Tags and Labels - Inks: Catherine Pooler, Party Dress, It's a girl, It's a boy, Daydream & Versafine, Onyx Black.


My third card of this group is very simple and quick to make. I stamped the duck on a white cardstock, I coloured it with colour pencils then I fussy cut it. I glued a white feather on the double white card and I adhered the duck with a glue dot. To finish I stamped the sentiment.


Stamps: Uniko, Sweet Baby  & Simply Graphic, Planche Petit Trésor (sentiment) - Colour pencils: Faber-Castell Polychromos, #107, 108, 113.


Now with my second trio of cards, I show you how you can make cards for different occasions with this set. This time I used the teddy bear for the first two ones.

My first card uses the bear of this set and I combined it with the Background Blocks : Party Confetti and the Designer die BIG & BOLD Happy Collection. I stamped the party confetti block on a white cardstock then I die cut a square that I foam mounted on the double white cardstock. I stamped the teddy bear in brown on a scrap of paper and I fussy cut it. I die cut a party hat, I coloured it then I glued it on teddy's head. The teddy is glued on the background and foam mounted on the card. To finish I die cut the Happy word in black cardstock and I adhered it on the background. The rest of the sentiment is stamped.


Stamps: Uniko, Sweet Baby  & Birthday Sentiments (stamped sentiment) - Die: Uniko, BIG & BOLD Happy collection & Create a Smile, Cool Cuts Magical Frame - Inks: Kaleidacolor, Desert Heat & Cappuccino Delight - Promarkers: Lipstick red & Cardinal red.


The second card used again the bear but this time for a Christmas card. I combined it with the sets Background Builders: Vines Winter, Rustic Wreath and Simply Said Christmas. This is a One Layer Card. I stamped the bear in brown and I coloured it with colour pencils. Then I stamped the sentiment in black. At the bottom I used stamps from the Background Builders: Vines Winter and from the Rustic Wreath sets.


Stamps: Uniko, Sweet Baby ,  Background Builders: Vines Winter, Rustic Wreath & Simply Said Christmas (sentiment) - Colour pencils: Faber-Castell Polychromos, #103, 132, 189, 230, 231 - Inks: Distress, Mowed Lawn, Festive Berries, Vintage Photo.


And finally, for the last card I used the Sweet Baby set together with the Spring Botanicals Snowdrop to make a Spring card. I die cut a rectangle in a friendly watercolour paper, I stamped the duck once with Distress ink, I masked it and I stamped another one that I also masked. Then I stamped the snowdrops also with Distress ink. To colour this scene I used Zig Clean Colour Real Brushes. To finish I stamped the sentiment and I matted the image on a double card.


Stamps: Uniko, Sweet Baby & Spring Botanicals Snowdrop - Zig Clean Colour brushes: #050, 051, 052, 041, 045, 302, 303 - Inks: Distress, Mustard Seed & Shabby Shutters.


As you can see this stamp set is very versatile, useful for baby cards but also nice to be used for other occasions. So if you want to have a chance to get it before it is retired, you can find it HERE.

Thank you very much for stopping by and have a great crafty week !


Tuesday, 18 December 2018

Tartan Happy New Year

Good morning, Julie here to share a card I made for the current challenge over at Cardz4Guyz. The theme there is New Year - New Beginnings, so I thought of making a tartan inspired card to celebrate Hogmanay.


The background to this card was made using the stamp strips from Background Builders Christmas 2018 set. I was inspired by fellow Uniko DT member Sarah P to create the background after I saw this fab card
I used a panel of red card a gold liner pen and three of the strips, the 3 stripes, diagonal lines and the wrong side of the Ho ho ho!
The diagonal line strip was laid across the panel and inked in Versamark before heat embossing with white EP, repeating to get the required pattern.
The 3 line stamp was inked in Altenew's Hunter Green and stamped in a tartan pattern followed by the Ho Ho Ho stamp which I reversed to get a plain image in Altenew's Ruby Red. When dry I added some gold lines with a fine gold marker and a straight edge.
The panel was then trimmed down to size and added to a white base card. 
From some gold glitter paper, I cut the 2019 and added it to the same cut from red fun foam.
On a banner of black card, I stamped the sentiment from Simply Said Christmas and heat embossed with white EP and then popped it up on a strip of foam.

That's it from me see you again soon.

Saturday, 8 September 2018

DT inspiration - Extending your stamps

Morning all, Julie here with another idea on how to use those small stamps.
I'm up on my own blog with a card that uses the Originally Organic Additions and Big and Bold Hello stamps, as well as few hand drawn additions.


I've wanted the Christmas wreath stamps for awhile but as they are still out of stock I've had to think outside the box. I decided to show you that if you haven't got the exact right stamp, look at your stamps again and perhaps you can use those you have in ways that they weren't originally intended for!
I started by placing my handmade wreath maker, you could use the Gina K one if you have it of course, and a panel of card, in my MISTI.
Placing the small leaf element from the Originally Organic Additions set in the MISTI, I stamped.and rotated my card in the positioner and repeated 3 times. I was intending to stamp at every station but decided to keep it at 4, leaving out alternate positions.
To add more leaves instead of stamping I drew 2 in freehand on each spray, then added the flowers from Big and Bold Hello and the small berry clusters from Originally Organic Additions using the positioner and MISTI. To fill in some of the empty space I doodled a small flower by the stamped flowers and added more berries in various sizes, then coloured the elements with Copics.
My sentiment from Simply Said Christmas was stamped and embossed with gold EP.
To frame the wreath, I inked a slightly larger card panel with a Versamark pen and embossed with the same gold EP. Both panels were then added to a 5 x 5 white base card.

By the way there's a fab article featuring some of the DT in this month's Craft Stamper and a little extra on their blog here.

OK, that's it from me, thanks for stopping by,


Friday, 10 February 2017

Design Team Inspiration - Water Colours

Hello, it's Deborah here with you this morning, in another of our Design Team Inspiration series. I decided to have a play with my Brusho water colour crystals and try out different techniques with them. This is not a new technique as Sarah used them recently, but it's fun, so I thought it was worth another look. Here's a look at the final set of six cards:


I used water colour card for all the snowflake panels. I wiped over all the pieces of card with an anti static buddy.


I wanted to repeatedly stamp the same snowflakes on several water colour panels, so I used my MISIT, so easy! I heat embossed the snowflakes with white powder and then came the fun part. I sprinkled small amounts of Brusho crystals on the card and spritzed on some water.


The top row shows how the crystals react to one spray and then a couple more sprays of water. The bottom row shows how the green crystals actually contain so many other colours.


I used a couple of different methods to activate the crystals. On some of the card I simply spritzed water and allowed the crystals to activate. As you can see from the image above on the right hand side, you end up with patches of dark colour and swirling patterns. The two images on the left were created by wetting the card, adding crystals and using a broad brush to blend the colours. After the panels were dry I ran a wet paint brush across the top and allowed the paint to run down and create drip patterns.

To make the set I created two cards using the full panels, adding some detail to the sides with dies and stamped the bold sentiments at the bottom. For the next two cards I die cut shapes, stamped some more snowflakes on the cards and added greetings on the die cut panels. I finished off the set with some square cards, die cut panels and added the greetings to the card. As yet, I've not done the insides. I was inspired to create the snowflake cards by this week's challenge at Jingle Belles. Here's a close up of the corners of four of the cards:


Do drop back again soon. Hugs