Wednesday 30 June 2021

Brand Ambassador Inspiration - A special birthday card

 Bonjour !

Izzy here. Today I'm going to show you a special birthday card that one of my friend ordered me.

She has a couple of friends who have decided to celebrate their respective 50 years together. So I met their daughter who wanted to make her parents a surprise. We spoke together to find out what she wanted for her parents.


Here is the resulting card that I made using the Originally Organic collection (stamps and dies).


She wanted a CAS card and opted for a kraft card base. As she also wanted some dimension we finally chose the Originally Organic Additions stamp set which has the matching dies

As on the invitation cards they had mentioned "100 years", we took this idea for the inside of the heart.
We also put the initials of her parents into the place of two flowers. The flowers have been coloured with both Prismacolor & Faber-Castell pencils.

But it was not all...

... She wanted all the guests to write a little note to her parents and at the end to gather all the notes into the card to give it to her parents as memories.


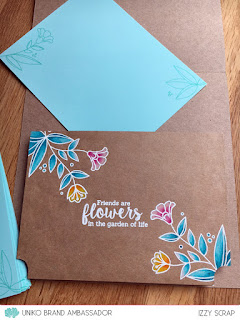
So I created a bellows that could hold all the notes inside the card. But to make it look prettier, I decorated it with stamps from the Originally Organic set and also stamped one of the wonderful sentiment of this set, which was just right for the situation.


Of course, I also created around forty notes on which the guests were going to write, always using a motif from the card.


The notes can be inserted one way...


...or the other way.


And finally, I also decorated the envelope in which the card would be offered.

The party took place last week-end, and at the time of writing this post I have no feedback on this card yet. Anyway, I know their daughter was delighted with her order and I had lot of fun making it, which is the best !

That's all for me today. Thanks so much for stopping by. Take care, and you too, give your Uniko's products some love !


Tuesday 29 June 2021

Two For Tuesday & a WINNER!

 Hello & Happy Tuesday 😊 


I'm back today with another Two For Tuesday to share with you, but first I have the randomly selected comment winner to announce from the recent June 2021 Stencil Release, Brand Ambassador Blog Hop & GIVEAWAY we had HERE.


Thank you to everyone who took the time to join in on the hop and for all the lovely comments left. Thank you also for all the wonderful orders, I look forward to seeing Uniko stencil creations pop up on social media.


So, without further ado let's get to the winner. I used a random number generator to select the lucky comment after I went through and totted up. AND the lucky comment is...


Tiina Kalliokoski / tweety.cardworld 

Hi Bev. I just love what you have done with the Pure Floral Rose and with the Butterfly. Gorgeous colours and so skilled colouring. Can’t really decide which of them would be my fav if I had to choose – luckily I don’t have to. I’m so happy I found your products and this blog. At the moment I have only one big gorgeous Uniko stamp but when I need to refill my stash I know where to find what I need. Regards, Tiina a.k.a tweety.cardworld (on IG).


Congratulations Tiina! 

Please send me an email (bev@uniko.co.uk) no later than10th July 2021, with your postal address to claim your prize.


Okay, now for some creative eye candy! 


Today I decided to ink up English Country Garden Butterflies clear stamps & dust of the coordinating Designer Dies too to create two cards. Both have a CAS feel to them but I've used colour in different ways on them.


For this first card I thought it would be fun to double up the large & small butterflies. I rarely reach to stamp on coloured card these days, so reached for my favourite trio of colours in my scraps box and got to stamping & die cutting. I added a little contrast by stamping the smaller butterfly on white card.


I haven't been one to jump fully on board with the slimline card, but in order to fit 3 larger butterflies on a card the slimline style was perfect. I added sentiments from the Simply Said Blocks series and some eagle eyes might notice something on this card?! 


Next up I wanted to use the butterflies more as and accent to a sentiment. It's been ages since I inked up BIG & BOLD Hello and it seemed the perfect choice. 


The bold hello is inked and heat embossed in clear sparkling embossing powder. I then stamped the trio of large butterflies and selectively coloured them in three colours using three shades of each colour. Super quick and simple colouring. 


I finished off this almost one layer card with an accompanying sentiment from BIG & BOLD Hello stamped and embossed in white, popped up with foam adhesive and a trio of rhinestones. 

It's been lovely inking up and playing with these older Uniko stamps & Designer Dies again. That's all from me today, thanks for stopping by today.


Crafty Hugs


Monday 28 June 2021

Mixed Media Monday - Guest Brand Ambassador Camilla

  Happy Monday & Shiny New Week! 


Today I am back with another Mixed Media Monday and I am delighted to have another guest joining us please give a warm Uniko welcome Camilla Nordqvist

Camilla has been a customer of Uniko since opening day. How do I remember this? Well, Camilla was the first customer to order all those years ago and as a small business owner, it's kinda one of those things you never forget! 

With age my short term memory might be a little wooly here and there, but as each order that comes in gives me this warm fussy feeling and I do a little happy dance inside, names of customers (usually) stick with me. 

Anyway, enough of my rambling, let me hand you over to Camilla...


Hello,


A few weeks ago Beverley kindly asked if I wanted to create a mixed media project for Uniko. So I decided to pull some prints from my gel printing plate and make some colourful tags. 


The gel plate is a super versatile tool that you can use with different kinds of mediums and tools. You don’t even need special tools, some of my favourite things to use are bubble wrap, cardboard and different caps/lids. If you’ve never worked with the printing plate, it’s very addictive and an afternoon passes quickly when you’re building up texture, playing with different techniques and colours. I recommend to go to YouTube and let yourself be inspired by the many talented artists there.


I normally use acrylic paints on my gel plate, but I’ve recently started playing a lot with alcohol inks. Some of you might have a gel plate in your stash but don’t want to buy new inks, but maybe you have refillers for your alcohol markers? They work very well on the gel plate. For my tags today, I have only used Copic refillers. They work the same as alcohol inks. 

Another great thing with the gel plate is that you don’t need yupo paper to pull a print. You just add a layer of acrylic paint on top of the alcohol inks; this will ‘lift’ the alcohol inks off the plate and transfer them to your choice of paper. I use a smooth, thick white paper (250 g/m2) to pull my prints.


Add your colours to the gel plate. Use a brayer to spread them a bit or use a straw to blow them around (don’t suck in!). Let dry. If you want, you can create your own pattern with stamps (the tags with arrows, flowers, leaves and paisley patterns were all stamped directly on the gel plate). Let dry. Then apply a thin layer of acrylic paint with the brayer and pull your print.


My final tag is a bonus tag, made from all the colourful scraps that were on my desk. Shame to throw them away! The flower is made with a Tim Holtz die.


Thank you Beverley, it’s been a pleasure and a privilege to create a mixed media project for you!


Uniko Clear Stamps Used:

Accent Essentials: Arrows (sadly retired)
Explosion!
Explosion! Additions!
Flower Power #7
Marvellous Mehndi
Paradise – Leaves
Simply Said Birthday (sadly retired)


WOW! 

I for sure am inspired. Mainly I want to go and get me a gel plate - haha! As would you believe I don't own one. I am really enjoying seeing Uniko clear stamps used in different ways and with different media. It's also been a delight to see some loved but sadly retired clear stamps still being inked up.

I hope you have enjoyed todays feature and a big THANK YOU to Camilla for inspiring us all. 


Crafty Hugs
 

Friday 25 June 2021

A Little Bit Of Kindness Blooms

 Hello & Happy FriYAY! 


It's always a good Friday when a bunch of lovely restocks arrive in the studio 😊 I've said it before, but I'll say it again, it always inspires me to dust these sets off and give them some fresh inky love ❤️  Today I managed to tear myself away from the July Release 😉 and was inspired to ink up Kindness Blooms...


I chose some summery colours to try and coax the sunshine back, but unfortunately it just brought rain today 😔 I used Concord & 9th inks in Buttercup and Honeysuckle, trying my hand at a little watercoloring too for the blooms adhered with foam adhesive.


The sentiment is from Floral Vines, I just love this font. Plus I added some white gloss Nuvo Drops to the flower centres to finish them. 

I know a few people are waiting for the Kindness Blooms Designer Dies (and others) to be back in stock. I am hoping to have a small batch ordered at the end of this month 🤞 

That's all the cards I managed to make, but here is a little recap on the restocks that have arrived...


Seeing as I have a Bean Free night tonight 👏 I will hopefully be back over the weekend with more creativity to share with you. 

Until next time, thanks for stopping by.

Crafty Hugs


Thursday 24 June 2021

BA Inspiration, English Country Garden Stencil Bundle

 Good morning peeps, Julie here with another card featuring the fabulous English County Garden Stencil bundle. Yesterday was my daughter's birthday, so when I saw the new stencils I knew I had to use them for her card, but as it was after the reveal and blog hop, I had to save it for later to share.


Nich loves a butterfly and these are her favourite colours, and of course which girl doesn't like a bit of bling too!
The design is much the same as this card I made for the big reveal on Sunday but with a totally different colour way.
Starting with a panel of white card, I stenciled over using the veined butterfly stencil with a mix of Salty Ocean and Wilted Violet DI for the wings and Black Soot for the body and antennae ends using a blending brush. The antennae themselves were added using the block outlined butterfly and a delicate brush of Hickory Smoke DI.
To create a sense of movement, I cut my panel with a rectangle die with the butterfly hanging off the edge. This is a simple but effective trick. First you decide where you want the butterfly then lay your die over it, marking where the image crosses the die. Remove the die then carefully cut around the image where it is outside the die and a small amount inside, about 5mm is all you need. These closeups show you what I mean as I forgot to take a pic as I was working!


Now you simply slide the die under the wingtips and cut as normal. Because the tips are above the cutting edge the remain in cut!
A panel of textured silver card was added below to create a bit of a sparkly frame and then the whole panel was added to a 5x7 white card base on foam pads. The sentiment from Birthday wishes was stamped in black and heat embossed with clear EP, much easier than trying to use black EP where there is always a tendency to get little dots of the EP all over despite using an anti-static bag! A few sequins complete.
Hope I given you another reason to get out that stencil, there's loads more ideas on the Uniko blog here and also on the BA's blog. There's still time to hop along with us for the chance to win the June release.

That's all from me for the moment, stay safe and keep crafting!

Wednesday 23 June 2021

WILD Wednesday!


Hello! 

It's been a wild Wednesday here in the studio and I am only just getting round to sharing some new WILD makes. This graphic I made inspired me to dust off the WILD clear stamp set, the Stencil - Zebra Print and some other wild products. So much so, I made a trio of cards to share with you.


First up is this super simple one layer card.


I've been wanting to practice softer inking and I thought today was the perfect opportunity to do so using the Stencil - Zebra Print. I rather like how this turned out. It isn't perfect and a little patchy in places, but I really like the effect. I used Distress Oxide Black Soot ink.


I then stamped the WILD sentiment & accompanying sentiments in black ink over the top. Super fun and any of the Uniko animal print stencils would work with this design. 

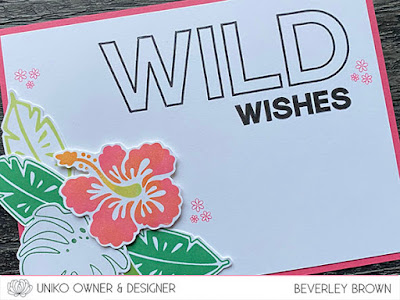
This lead onto my second card today. With creating something with maybe a more masculine feel above, I wanted to make something a little more feminine and also wanted to dust off Paradise and Paradise Leaves clear stamp sets! 


I feel like I have totally neglected these fun stamps, which is so easy to do when there are always new goodies coming out - haha! 

Anyway. I started by stamping a bunch of leaves and hibiscus flowers using Concord & 9th inks. I then played about to get a little cluster of leaves with the flower with enough room to fit the WILD sentiment. 


I think deciding on the layout and the accompanying sentiment which is from Festive Sentiments Outlined took the longest. Even longer than all the fussy cutting! 


For my final card today I felt I couldn't leave Bob the Toucan out. After all he does look down on me at my desk! 


This time I paired him up with the Large Background Tropical Paradise, which is partially stamped. I also used my stamping tool for this to ensure I could repeat stamp a couple of times to get good coverage.


I created a little sentiment perch for Bob, with the HAPPY sentiment, also from Festive Sentiments Outlined. This time I heat embossed the sentiment in white. I finished the design off with another Hibiscus flower and leaves from the Paradise clear stamp set. 

That's all I have to share with you today, I hope you have enjoyed this WILD post and I don't think it'll be too long before you're seeing more of these products 😉 

Thanks for stopping by. 

Crafty Hugs
 

Tuesday 22 June 2021

Two For Tuesday - Stencil Mixed Mini Geometrics

 Hello & Happy Tuesday! 


I was surprisingly organised yesterday and managed to squeeze in a little creative time. So with having all the recent Uniko Stencils still in arms reach I set to making a couple more cards using the Mixed Mini Geometrics stencil.


If you've been MIA and missed the release you can catch up HERE. There is still time to join in on the Brand Ambassador Blog Hop & GIVEAWAY! 

Anyway, let's have a look how I have used the stencil today...


For this first card I had already stamped and coloured the Pure Florals Cosmos flowers in this pointillism colouring technique and hadn't got round to adding them to a card. So I decided to create soft subtle background using the stencil and Altenew Mountain Mist ink.


I fussy cut the flowers, adhered them using foam adhesive and finished the card off with the 'Make a Wish' sentiment from the Pure Florals Cosmos stamp set.

For my second card today I have gone to the opposite end of the spectrum and gone for bright and bold...


I recently treat myself to the Altenew Detail Ink Blending Brushes and they make it so easy to apply ink to small areas and prefect from creating a rainbow effect. I selected 5 colours of Altenew inks and coloured each of the geometric shapes with a different colour. I then moved the stencil slightly and then drew inside the shapes to create this cool effect. 


As you can see I adhered my panel to a black piece of card before adhering to my bas card. I finished the bright design off with the BIG & BOLD Wish die cut sentiment and white heat embossed accompanying sentiment.

I love how different these cards are, I hope you have enjoyed them too. 

Crafty Hugs


Monday 21 June 2021

Mixed Media Monday - Alumni Guest Brand Ambassador Lindsey Bowe

  Happy Monday & Shiny New Week! 


Today I am back with another Mixed Media Monday and today I have another guest joining us who is also a Uniko Brand Ambassador Alumni.  Please give a warm Uniko welcome to Lindsey Bowe.


Lindsey Bowe


Hello Everyone, Lindsey here and it's good to be back at Uniko. Today I have some watercolour, stamping & stitching mixed media projects to share with you.


And here is how I made them. I started by painting random stripes of harmonious watercolours on some straightforward copier paper. I often paint a couple of shapes at the same time (you never know if they’ll come in handy later on 😊)


I then stamped on top of the strips with the Background Blocks Mid Century Modern and Background Blocks Mid Century Modern II, using similar ink colours to the watercolours.  As you can see my stamping wasn’t perfect but usually with mixed media projects you end up adding lots of different media as you progress,  so I wasn’t overly worried!


I tore the strips apart (again, there’s no need for precision!) and decided on those that I liked the look of best & glued them to a piece of A6 card. 


Then it’s a case of starting to tie everything into one harmonious whole 😊. I do love using machine stitching for this. Paint splatters are also good, as is doodling with paint pens or felt tips. I’m also rather fond of gold or silver acrylic paint!  I’ve used a small lid here to stamp & link the strips together. 


To give the whole piece a final focus I added a stamped flower using the Mid Century Modern Florals clear stamp set, sequins, a spot of glitter and one of the aforementioned little hearts!  The sentiment is from the Pure Florals Peony clear stamp set. 

If you’ve never dabbled with mixed media before I wholeheartedly recommend it. It can be absorbing and lots of fun. It can also help free up your style.  You really don’t need to splurge on lots of new materials (unless you get the bug that is!). If you’ve got children you can probably find crayons, felt tips, poster paints & glitter lurking somewhere in your house.  I’ve even been known to use emulsion paint before!  It’s just a case of starting with some sort of colour on paper and taking it from there, one different sort of media after another. If you don’t like something, just collage another piece of paper on top or paint over it. 

Have fun!


WOW! Are you picking your jaw up off the floor like I am right now? 

I love the soft subtle colours Lindsey has used for her projects today. AND what I especially LOVE is how Lindsey has shown that Mixed Media doesn't have to be complicated and you don't need a lot of specialist supplies.

I hope you have enjoyed todays feature and a big THANK YOU to Lindsey for inspiring us all. 


Crafty Hugs