Showing posts with label Distress Inks. Show all posts

Wednesday, 29 November 2023

Brand Ambassador Inspiration - Rustic Christmas

Good morning!

Anita here, so sorry it's been so long!  I'm sharing two cards today and I decided to dig out an "oldie but goodie" stamp set for these, Rustic Christmas.  I just love the perfect little tree in this set so have kept these cards clean and simple so it takes centre stage.

First up, I've tried to create a northern lights sky as my backdrop...


I used some low tack tape to mask off a vertical panel and then randomly ink blended the areas of light using Distress Inks in Twisted Citron, Mowed Lawn and a touch of Picked Raspberry.  I then filled in the rest of the panel with both Black Soot and Chipped Sapphire, blending over some of the lighter colours.  I then stamped the tree in Versafine Clair Nocturne ink for a crisp dark image.  Once dry I used an anti-static powder tool at the top of the inked panel and stamped and heat embossed the sentiment, also from the same set, in white.  I finished by adding some falling snow using a white Sakura Gelly Roll pen.


My second project is another one layer card, again, super simple...


To enable the solid baubles to appear as if on the tree and in the foreground, I stamped them first in pigment ink and heat embossed in clear, this then created a barrier when stamping the tree over the top.  I used Versa Color inks here.  As you can see below, the pink ink didn't hold as much of the embossing powder so let some of the green ink through but I like the effect it gives of the baubles being amongst the needles.  To clean up the green ink I just used a slightly damp cotton bud to wipe away the ink from the baubles.  I simply stamped the sentiment below and added a gold, sparkly enamel star.


I hope this gives you some inspiration and encourages you to have a rummage through your stash to see what older stamp sets you have that could be inked up.  Thanks for taking the time to visit and I wish you a lovely Wednesday.

 

Saturday, 8 July 2023

Brand Ambassador Inspiration - Christmas in July!

  Hello everyone!

Happy Saturday!

Vinita here presenting two inspiration cards using the same stamp set for Christmas in July celebration! Love the Season of Beauty clear stamp set from Uniko so much with so many variations and detailed stamp set it is!!!


Card 1


Sometimes I really love the card with lots of white space!


I started by stamping the outlined poinsettia flowers and heat embossed them using Primary ebony regular Wow EP.


Stamped solid flower image inside using crackling campfire DI and added some splatters here and there using fired brick DI.


Can you see the shine of the black EP! Finished it off with a sentiment using the same stamp set!


Card 2


I love experiments and came up with this art print idea using the same stamp set with stripes!


On a piece of white CS, I stamped the Horizontal stripes to create the background using cracked pistachio DI.


Stamped some solid big poinsettia flowers randomly using abandoned coral DI


And then small poinsettia filler flowers on the same flower designs using crackling campfire DI.


Now stamped the outlined flower image overlapping with stamped images and heat embossed using opaque bright white EP. Added the dots in the flower centre using fired brick DI. Before adhering this focal panel to my card base added a red CS layer with an embossed sentiment.

Hope you like the artistic look of the repeated pattern and are inspired to create yours!
Happy crafting!

Have a wonderful weekend!

Friday, 7 July 2023

Brand Ambassador Inspiration - Background Blocks Arts Decoratifs

Good morning and happy Friday!

Anita here, back with some colourful inspiration for you today.  I'm not going to lie, this card took quite a while to create but I'm so pleased with the result so I'm glad I persevered with it.

The main image here is Background Blocks Arts Decoratifs and the sentiment is from the Bauhaus Blocks stamp set.


I began by stamping the main image in a grey dye ink so it wasn't too dark and then left the stamp in my Misti to return to later.  Next came the intricate part...I used lots of little post-it notes to mask off each section and then ink blended within each section with various combinations of Distress Inks.  Initially I was going to fill every section but in the end chose to leave some white.  Once dry I re-stamped the image using VersaMark ink and heat embossed with Platinum embossing powder.  The sentiment was heat embossed using the same powder. 


I love how this has a stained glass window look so I think I'll revisit this technique again using different colours.

Thanks for popping by.  Wishing you all a lovely weekend, we're almost there!


Wednesday, 12 October 2022

Brand Ambassador Inspiration - Dies, Stencils & Stamps

 Bonjour !

It's Izzy here with two inspiration cards that I'm combining with the current challenge over at Addicted to Stamps and More where it's all about Stencils and/or Dies.

 As I used Uniko products to make my DT cards, I wanted to give even more love to my Uniko dies, Stencils and Stamps. 

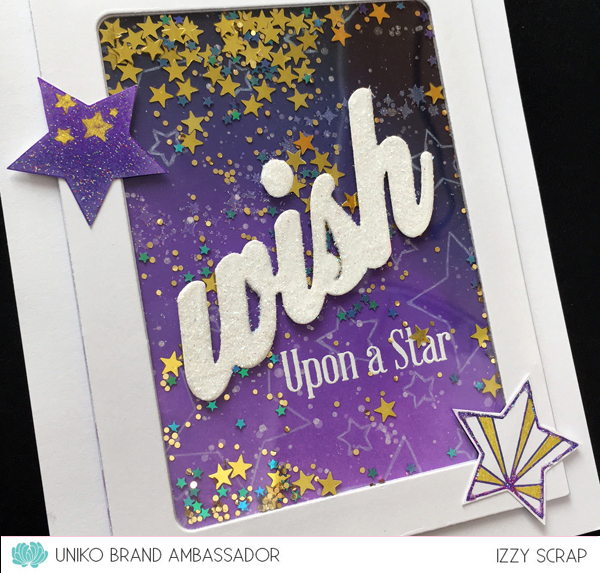
For my first inspiration, I went with a shaker card. I get inspired by the Dream Factory challenge where it's about Stardust movie.


I started with the background blending purple and dark blue distress inks to make the sky. Then I used the star galaxy wave from the Reach for the Stars set that I stamped and heat embossed with clear glitter embossing powder. 

Then I used the Seeing Stars stencil and with a white pencil, I drew the stars onto the background. And to give more shine, I speckled with a brush a mix of water and Perfect Pearls. Then I stamped and white heat embossed the second part of the sentiment that comes from the BIG & BOLD Wish clear stamp & die bundle.


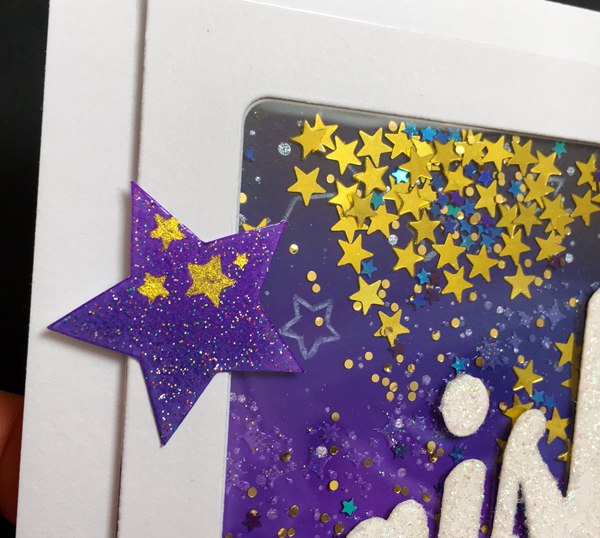
I die cut (x3) a frame in white card stock and I glued an acetate sheet on the back to make the shaker card window. I put some tiny stars sequins on the background then I glued the window on top. In a white glittery paper, I die cut the Wish word from the BIG & BOLD Wish clear stamp & die bundle and  I glued it on the window.


To finish my card, I stamped with purple ink two stars from the Background Builders: Seeing Stars set. I  heat embossed them with clear glitter embossing powder, then I filled the blank with a gold gel pen before adhering them on the card.

With the end of year being in a bit more than two month away, I made my second card with one of my favourite stencil from Uniko : In the Forest.


On a watercolour card stock, I played with some Brusho powders. On top I stamped the swirling snowflake wave and the sentiment from the Snowflake Serenade set. Once everything was dry, I used the stencil In the Forest with Versamark ink and I white heat embossed the trees. 


To finish my card, I flat adhered this panel on a double white card. In a white glitter paper I die cut the Sparkling Snowflake and I glued it on the card.


Now here is a sneak peek of the card I made for the Addicted to Stamps and More challenge, still using Uniko dies, stencil and stamps...


I hope that my cards inspired you to go and play with your Uniko products and to come and play along at Addicted to Stamps and More.


Thanks so much for stopping by and have a fabulous day !


Saturday, 13 August 2022

Brand ambassador inspiration : Hello Lovely : Three ways

 Hi there!

Hannelie here with inspiration on how to use a large floral stamp in three different ways... all with alternative ways to add color !

First card :


Second card:


Third card:


I used Hello lovely clear stamp set on all three cards, stamped with my Misti and Versafine Black Ink.
Inks used : Distress ink : Picked Raspberry - Spiced Marmalade - Mustard Seed

For the the first card, I used a piece of torn paper/card stock to mask the area where I wanted to add color. I then started the ink blending and stamped the image over the blended ink area. I finished off the card with a birthday sentiment from Simply Said Blocks.

For the second card I used octagon dies. I used the smaller die to cut a mask for ink blending. I removed the mask and stamped the image. After stamping I used the larger die to cut it out, leaving an uncolored , but stamped frame. I layered it over glittered paper, also cut with the larger die, but rotated to only show a glimpse of glitter. The sentiment is from the same floral set.

For the third card, I used the Bright Butterflies stencil to add color, and stamped just a part of the large floral image on the bottom part of the panel. The birthday sentiment is from the Floral vines clear stamp set

Thank you so much for looking! I hope you leave with a lot of inspiration to get more out of those large floral stamps... without 'real' coloring!

Enjoy the weekend ♥
Hannelie

Sunday, 26 June 2022

Brand Ambassador Inspiration - Stencil Techniques Trio

Hi there

Happy Sunday!  Anita here with some stencil inspiration for you.  I love getting creative with stencils and, not only are they an inexpensive addition to your craft stash, they can be used in so many ways, in addition to the traditional ink blending method.

So I've got three different techniques for you using three different stencils from the Uniko range.


Using Pigment Powders and Water


For this technique I always use watercolour paper.  Lay the stencil flat to the paper, I used Flower Power #5 here.  There's no need to use tape, in fact it's best if you don't as the stencil will need to be lifted away easily.  Gently sprinkle pigment powders over the design.  I used Brusho here and just gently tapped the pot and used it very sparingly as there is so much pigment.  Then use a fine mist water sprayer to cover the design and to activate all the pigment.  Do not over-saturate or the water will start to migrate under the stencil.  Just lift it away and leave it to dry.

I finished off by stamping a sentiment from the So Much Clear Stamp Set.


Using the Ghosting/Watercolour Lifting Technique


I ink blended a background using Distress Oxide inks.  For this technique I used the Stylised Floral Stencil.  The stencil was placed over the ink blended panel and then spritzed with water.  Carefully lift the stencil away and leave for a few moments before blotting with a paper towel.  The water will activate the ink and allow the colour to be lifted away.  This generally works best with Distress and Distress Oxide inks as they react with water.

I die cut the panel with a stitched rectangle and heat embossed a sentiment from the Simply Said Clear Stamp Set onto a strip of vellum which was wrapped around and secured on the reverse.


Reverse Stencilling


For this card I've used the Flower Power #1 Stencil.  This technique involves inking up the stencil directly with ink pads and then spritzing well with water before placing it onto the cardstock.  I chose Strathmore Bristol Smooth cardstock for this as it takes water well.  I inked it up with Distress Inks in three shades.  Once placed onto the surface I left it for a short while to let the ink settle into the cardstock.

I trimmed it down and matted it onto a panel of co-ordinating cardstock, leaving a slim border, before adding the sentiment which is from the Simply Said Blocks Clear Stamp Set.  I then added some clear gems to finish.


Thanks for taking a look, hopefully these have given you some creative inspiration.  I hope you enjoy the rest of your weekend.

Crafty hugs

Thursday, 26 May 2022

Brand Ambassador Inspiration - WILD

Good morning

Anita here with some inspiration for you.  More often than not when crafting I reach for florals so I decided to go off on a tangent this time and picked out the WILD clear stamp set and a couple of co-ordinating stencils.


For my first two cards I combined the stamp set with the Tiger Print Stencil.  Here's the first one...


Rather than go with the traditional tiger stripe colours I thought I'd try tone on tone with black, and I love how this turned out.  I laid the stencil over some black cardstock and pressed through it with my VersaMark ink pad, going over it a few times to ensure all the areas were covered.  I then heat embossed the stripes in black, but this would work equally well with clear embossing powder too.  I die cut the panel with a stitched rectangle and then went over the surface with an anti-static powder tool before stamping the sentiment and paw print also in VersaMark, which were then heat embossed in gold and copper.  I then popped the panel up on 3D foam onto my card base.


And for my second card, a one layer card with a completely different feel using the same Tiger Print Stencil...


This time I used a heart die to make an aperture out of a scrap piece of card and used this as a stencil.  I ink blended onto my card base, first with Kitsch Flamingo Distress Ink, before placing the Tiger Print stencil over the top and inking over it with a Festive Berries Distress Ink.  I then simply finished by stamping the sentiment in black and adding some gems.


And for my final card I combined the stamp set with the Giraffe Print stencil...


I began with a die cut panel of light coloured kraft cardstock and stamped the word WILD in the centre.  I then masked the inside of the letters, by cutting out the sentiment which I had stamped onto post-it notes.  Next I masked off around the edges of the panel to leave a slim border and then ink blended through the Giraffe Print stencil using Distress Inks in Tea Dye and a touch of Rusty Hinge.  When all the masks were removed I then stamped the remainder of the sentiment in black.  To help the sentiment to stand out a little I added some Wink of Stella for some sparkle.


I had great fun making these and I hope you like them.  There is a third stencil in the series, the Zebra Print stencil, which I'm yet to get my hands on.  It's currently out of stock but please do check back at a later date if you want that one, I'm sure Bev is working to get this one back asap.

Thanks so much for joining me today, I hope to be back with more to share very soon.

Take care


Thursday, 17 March 2022

Brand Ambassador Inspiration - Spring Botanicals Tulip

Good morning

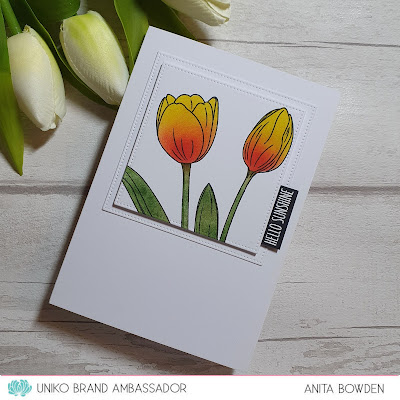
Anita here with my very first Brand Ambassador Inspiration post!  There are so many wonderful products in the Uniko range I was spoilt for choice but, with the official start of Spring this coming Sunday and this being my favourite flower, for my first post I had to share some inspiration using Spring Botanicals Tulip.  So I have a trio of makes for you today, all quite different.


Wonderful colouring with markers isn't one of my talents so for this first card I've used ink blending...


On some white cardstock I stamped the tulips image and then stamped it again onto some masking paper.  Instead of masking the image, I cut out the negative space and masked the background.  I then ink blended with Distress Inks.  I cut out the image using a pierced square die and another slightly larger from plain white cardstock.  I heat embossed the sentiment, also from the Spring Botanicals Tulip set, using white embossing powder on black cardstock and adhered it like a tab.  The die cut panels were then layered up with dimension.


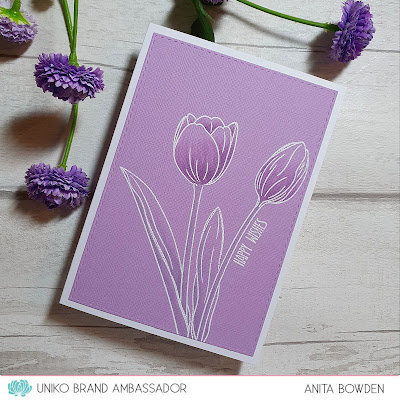
For this next card I used very simple tone on tone colouring...


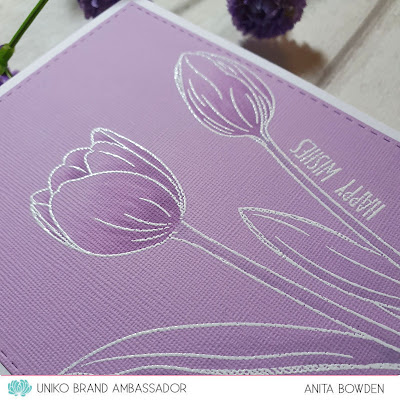
My first step here was to stamp the image in a pale lilac ink onto some lilac textured cardstock.  I left the stamp in my stamping platform as I would need to re-stamp later.  I added some tone on tone colouring with alcohol markers, lilac shades for the petals and I chose grey for the leaves just to add a little shading.  Once complete I placed the panel back into my stamping platform, stamped in VersaMark ink and heat embossed in white, along with the sentiment, also from the same stamp set.  It's so much easier to emboss afterwards so you don't have to avoid the embossing and I've heard that embossing isn't too good for marker nibs either.  To finish this one the panel was die cut with a stitched rectangle and adhered flat to the card base.


And for my third of this trio I left the image uncoloured and just added colour to the background...


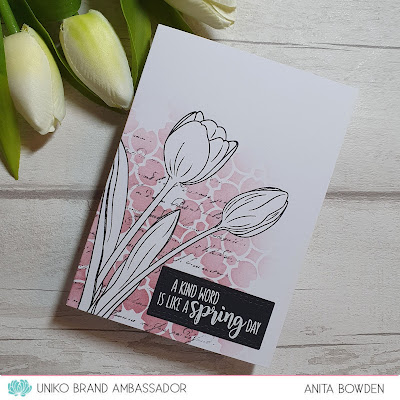
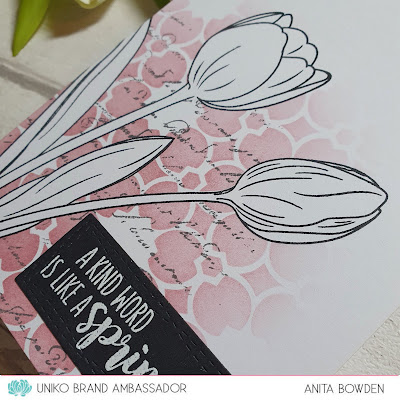
I stamped the image and masked it using the mask I'd previously cut from the first card.  I then laid the Stylised Floral Stencil over the top and blended through with Distress Ink, fading it out.  For a little more background interest, with the mask still in place I lightly stamped in grey with the Large Background French Script Stamp, just keeping the stamping within the area of the ink blending.  To finish, I used a sentiment from the Spring Botanicals Tulip set, heat embossed in white on a black die cut panel.


I hope you find some inspiration from these.  I'd love to be more creative with my alcohol markers but much more practice is required so, while I'm still learning, I'm always looking for different ways to add colour.  I had great fun making these.

I'm so glad Spring is (almost) here, it's my favourite season.  The daffodils are in full bloom in the UK and the tulips won't be far behind.

Crafty hugs to you all