
It's Linda here, with a fun little project using the English Country Garden Butterflies clear stamp set, and the matching Designer Dies that were released earlier this month.
I'm sure you've seen, what some people are calling ........ Floating Die Cut Frames. A really fun technique of using stamps with matching dies to create cards where the die cuts look like they are just floating.
It's also a great way to create two fabulous cards in one, which is always a winner for me.

I first saw Jennifer McGuire using this technique on YouTube, and thought it would be perfect to use with these stamps and dies
To start, stamp a whole bunch of the butterflies, using both sizes, onto plain white cardstock (if you don't like colouring, you could always stamp these directly onto coloured cardstock instead)
Using the matching dies, cut out each one.
Cut a piece of white cardstock to fit the front of your cardblank (mine was a 14cm square card) On to this arrange the die cut butterflies, filling the whole piece of card, leaving a little bit of space in between each of the butterflies, and making sure that some of them go over the edges.
Now for the magic ingredient ...... GLAD Press n Seal
I discovered this through Jennifer McGuire and I managed to find it on Amazon. It's kind of like cling film, but one side is sticky, a bit like low tack tape.
Place this over the top of the butterflies, trying not to move them around, and press down.
Trim off any excess around the edges of the card.
Next, use a die to cut out the centre, I used a square but you could use a circle, a rectangle, an oval, even a heart. Place this on top of the Press n Seal and secure with low tack tape.
Before running it through your die cutting machine, remove the piece of cardstock from the back. Don't worry, your die cuts will stay in place.
Once you've die cut the centre, take the middle bit out, and then place foam pads on the back of each of the pieces left, forming the frame (this is where I realise I should really have taken step by step photos, but hopefully you're following me)
Place the frame back onto your piece of white cardstock and carefully remove the Press n Seal. The foam pads will hold the die cut pieces in place and they will look like they are just floating on your cardstock .......
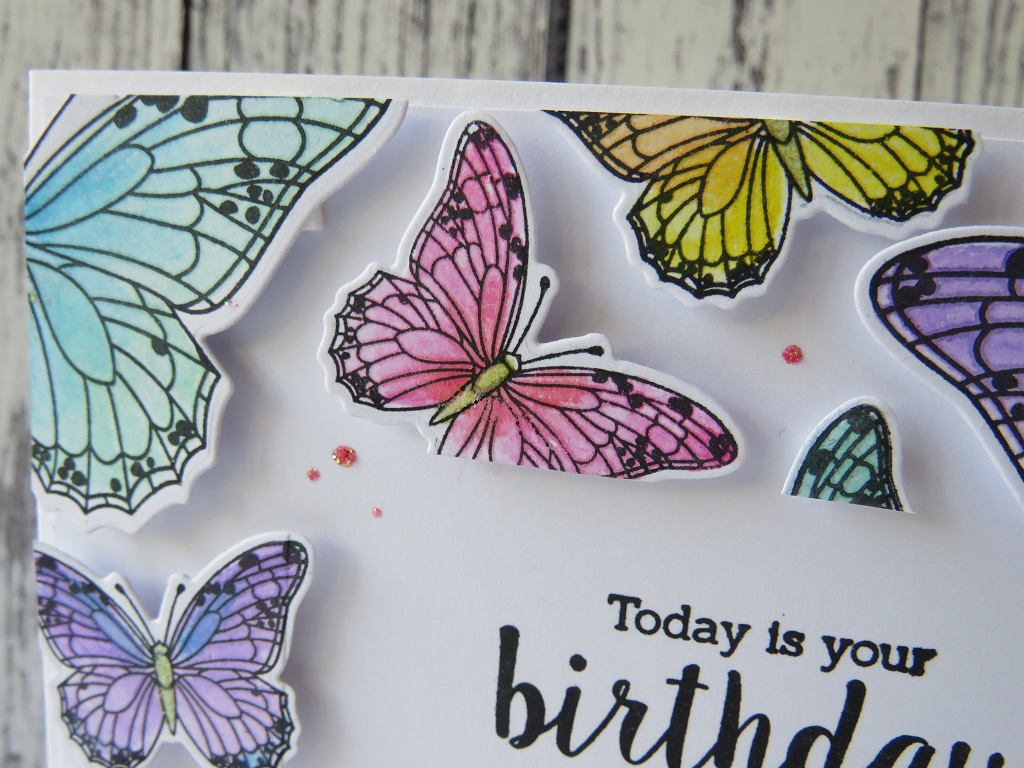
I only coloured my butterflies after I'd placed them onto my card but, if you find it easier to colour them before all the die cutting that would work too.
I stamped a sentiment in the centre of the frame .....

and added some dots of glitter glue in between the butterflies.

I love how this turned out ......

I did mention a twofer ....... well check this out

Take the left over die cut piece (the center bit) which will still have all your die cuts in place on the Press n Seal. Simply add foam pads to the backs of all the pieces as before, and then attach it to the front of a cardblank. Gently peel off the Press n Seal ...... and voila!

Floating butterflies in a perfect square!
Add some colour (if you've not already done so) and a simple sentiment ......

And finish with a few splatters of matching ink

I hope that all makes sense.
If you're like me, you'll give this a go, and then start looking through your stamps to see which have matching dies that you can use for this fab technique.
Have fun!
Thanks for popping by ...... have a great day.
Cheerio until next time ....

I love the technique Linda. I too have looked to get some of the Glad wrap, its been too expensive where I've seen it before. I will have to investigate again! Great cards. :)
ReplyDeleteGorgeous cards, Bev!
ReplyDeleteI need to try this. Fab cards. Hugz
ReplyDeleteWhat a gorgeous card using this technique Linnda - your butterflies are beautiful!
ReplyDeleteThese are gorgeous. And a lovely technique. (I have Press n Seal in my craft room!).
ReplyDeleteThese are amazing Linda! Beautiful and delicate cards using this wonderful technique. I hope to try this technique! xx
ReplyDeleteWow..wow..wow. love it. Such elegant cards.
ReplyDelete