Thursday, 20 May 2021

New Brand Ambassador - A Warm Welcome to Steph!

Happy Thursday! 

I am delighted today to be giving a warm welcome and introduction to our newest Brand Ambassador, Steph Mortimer. I'm sure you are familiar with Steph's work around blog land as she is on a few challenge design teams and is a frequent participant in previous Uniko Challenges. If not, I am passing you over to Steph for a little introduction....


Hello, my name is Steph and I am over the moon to be joining the Uniko team as a Brand Ambassador. It has been a dream of mine for a while so I don’t think it’s really sunk in yet! So, here’s a little about me by way of introduction. 


I live in Derbyshire with my husband and twin girls. Like many crafters I have been creating in one form or another since I was a child but what first captured my heart was cross stitch. It wasn't until I was looking for wedding stationary that I caught the paper crafting bug. Not being able to find anything that I liked, I purchase a Big Shot machine and a few staple items and set about making my own. 


My first papercraft obsession was stamps, quickly followed by dies, but I have since managed to amass ink pads, alcohol markers and now it seems patterned papers a plenty! My natural cardmaking style is CAS, but I am always looking to learn new techniques and push myself out of my comfort zone so I do occasionally like to throw everything at a card in a very un-CAS like way! 


I was first introduced to Uniko by Brand Ambassador Alumni, Lyndsey Bowe and I have spent many a happy hour crafting in her dining room and routing through her Uniko collection. I now have an impressive Uniko collection of my own and I’m so happy I will be using them even more now I’m part of the team.


Welcome Steph! 


I asked Steph to choose a few of her favourite Uniko makes so that I could share them with you to give you a flavour of her style if you are unfamiliar with her creations. Let's have a look...


Absolutely love this combination of Uniko Peonies and English Country Garden Butterflies. I think you would agree with me that the colouring and colours are stunning.


Simple Art Deco elegance with this card using our Background Builders Arts Decoratifs and Arts Decoratifs stamp sets. 

And lastly but by no means lease this beautiful starry sky CAS card...


Now you can see why I am delighted to have Steph join us here at Uniko and I am sure you are all as excited as I am to see Steph in action, so keep your eye out for Steph's first inspiration post coming soon here on the blog.

I would love it if you would leave some welcoming comment love and be sure to pop back tomorrow for the start of our next challenge - yay! 

Until then, thank you for stopping by today.


Crafty Hugs
 

Friday, 14 May 2021

May 2021 NEWS, Restocks AND Discount Code!

 Happy Friday!


It's always a good day in The Studio when a bunch of restocks arrive 😊 and today is that day! A few of these clear stamp sets have been out of stock for a while - my apologies for that. 


I feel like things are getting back to 'normality' and I am able to spend more of my day in The Studio now  that The Beans are back at school, I finally have more time to start investing and restocking again. However, I am taking things slowly and at a speed I can manage, it's just me here in The Studio! Plus I always want to bring you new stuff too!! 


I've had a few emails about when Designer Dies will be restocked, so to hopefully answer some future emails I will post here! I will be restocking dies, but I don't currently have a date as to when this will be, my apologies for this I know you love dies and it's frustrating when they're out of stock. 


Uniko dies are manufactured in the US, so along with this factor and the pandemic, they are also a BIG investment for a small business like Uniko. With not attending any craft shows since October 2019, plus being closed to orders during lockdown in 2020 due to the pandemic, I have had to decide what to feed Uniko funds into and currently my decision is for restocking stamps, stencils and new releases of these products. I hope you understand my decision and believe me, it isn't easy making them. 


Anyway, lets have a look and see what clear stamp loveliness is lining the Uniko shelves again...


I'm excited for these stamps to be back, a selection perfect for those masculine cards needed for Fathers's Day and the Gerbera Daisy perfect for all those Summery cards! 

I hope there is something back in stock that you've been waiting for. If you have emailed me about a particular restock, they're on the list for the next batch in June. 


Before I go today, it's my BIRTHDAY and I'm 21 again - haha! So in celebration I have a discount code AND a selection of birthday products are on SALE


Ok, it must be time for cake now! Have a lovely day and weekend 😊 


Crafty Hugs


Wednesday, 12 May 2021

BA Inspiration - Wonky Stripes Rule!

 Morning all, Julie here with a little bit of Wonky Stripe inspiration! Here are four cards made using the two wonky stripe stamps and the wonky stripe stencil.


My first card was inspired by the challenge at CAS Mix up, where their theme is stencils and rainbow colours and a GD spot over at ATSM where the theme is stencils and die cuts.


I used a selection of DIs to ink my rainbow on an A6 panel of white card through the Wonky Stripe stencil, stamped the die cut Originally Organic Additions elements and coloured them with Copic markers. A couple of strips of linen effect card frame half the stenciled panel. I used scrap pieces of linen effect card and they were just a little too small so added a couple of slivers of gold mirri card to fill the gap. A sentiment from Pure Floral peony was stamped on black and embossed with gold EP, picking up the gold strips.

My second card uses the other half of the inked panel and a fussy cut large peony bloom.


A panel of linen effect card was glued over the stenciled panel and the fussy cut bloom added. I decided to leave the peony uncoloured as I thought it would detract from the rainbow edge. The sentiment is from the same Pure Florals- Peony set.

As with the last card I used a rainbow panel but this time I used the BB Wonky Stripe stamp.


It's difficult to use embossing and Copics without making a mess of your pens, so the trick is to stamp in a pale coloured ink, I used Altenew's Limestone, colour the image and then add the embossing over the top. If you use your Misti, just leave the stamp in place and make sure that you put your stamped panel back exactly where it was before. Don't cut it down until the embossing is complete!
Again as the background was quite lively, I used the simple outline of the small peony bloom from Pure Florals -Peony over my trimmed down panel. The coloured panel and bloom were added to an A6 note card on pads and a sentiment strip stamped with a greeting from the same Peony set completes.

Finally, I just had to use the large gerbera stencil again with the solid BB Solid Wonky Stripes as an accent along the bottom.


After inking the stencil with Mustard Seed and Twisted Citron in the center and Spiced Marmalade DI for the petals, I added detail with a matching Zig watercolour pen and blended the center of the flower with a little more Twisted Citron. The stencil doesn't have a stem, so I added one free hand and coloured it with green Zig pens.  
On a strip of white card, I stamped a couple of times with the BB Solid Wonky Stripes stamp in Altenew's Obsidian ink. My pad is still quite new and juicy so there is a little splatter where it shouldn't be but I think I got away with it! On another A6 note card, I added the stamped panel, then the trimmed down gerbera. 
My sentiment strip is made up from the words from two different sets Beautiful and Bee Happy. Once I got them laid out on my Misti, I stamped a few more to use in other projects, as its quite tricky to get the words lined up. You never know when you'll need a sentiment strip!

And take a deep breath... 
Hope you liked the ideas here, I sort of got carried away with my theme!

Anyway, look after yourselves and keep crafting until next time.

Tuesday, 11 May 2021

Two For Tuesday - Hello Lovely

 Happy Tuesday!


It's been a little while since I did a Two For Tuesday and as the weather at the weekend was absolutely dismal I spent some much needed creative time in the studio to cheer myself up! 


I was inspired to dust off Hello Lovely and a few of my Distress Oxide inks as it has been a while since I have used both! 


With Hello Lovely being such a large detailed stamp with a bold statement it can be used in so many ways. You know I am not an expert when it comes to colouring AND these days its a tie between not having enough patience OR being needed for something! So opting for a quick colour solution is always welcomed - haha! 


I didn't time myself making these cards, but at a guess I'd say they took me 15 mins each, so half an hour max. I think the longest part was the masking. 


On this first card I masked a rectangle in the centre of my card base. There are lots of masking type stencils out there, but I don't have a rectangle and I have a roll of Post-it tape that works wonderfully. It can sometimes be a little over sticky and take off card with it (see the bottom right corner of this card) when removed, but only if I forget to go slow.


I used Distress Oxides in Worn Lipstick, Festive Berries, Picked Raspberry and Abandoned Coral from top to bottom to create this beautiful background. I then simply stamped the Hello Lovely peony cluster in black ink over the top. I added a sentiment also from the set and my current favourite accent stamp, the trio of circles from Floral Vines.


This lead me onto my second card today...


I wanted to keep my colours and layout the same, so for this card I created ink blended stripes and I absolutely love how it turned out. Again I used Post-it masking tape and it worked really well. I took it slow to peel off this time ;)


I'm loving this colour combo of pinks and reds too, I think this card shows each of the colours off better and it's more striking. 

What do you think? Are you a fan of red and pink together?

That's all from me today, its a busy week in The Studio this week with some restocks coming - yay! Plus it's my birthday on Friday AND I get my first Covid vaccine on Saturday so I am trying to get ahead a little. 

Thanks for stopping by.

Crafty Hugs
 

Sunday, 9 May 2021

Stencil Sunday - Party Confetti

 Happy Sunday!


Before I get to my cards & post today I'd like to wish a Happy Mother's Day to those celebrating today. I wish you all a wonderful day.


It has been a while since I have done a Stencil Sunday post and I think it is partly because I overthink things and especially when it comes to using stencils. As you know from following me at Uniko all this time I am naturally a clean & simple card maker. I find 'mixed media' a challenge. 


Having said this, I have listened and taken note of the polls I do over on Instagram and I will be sharing some of 'my style' mixed media on the blogs.


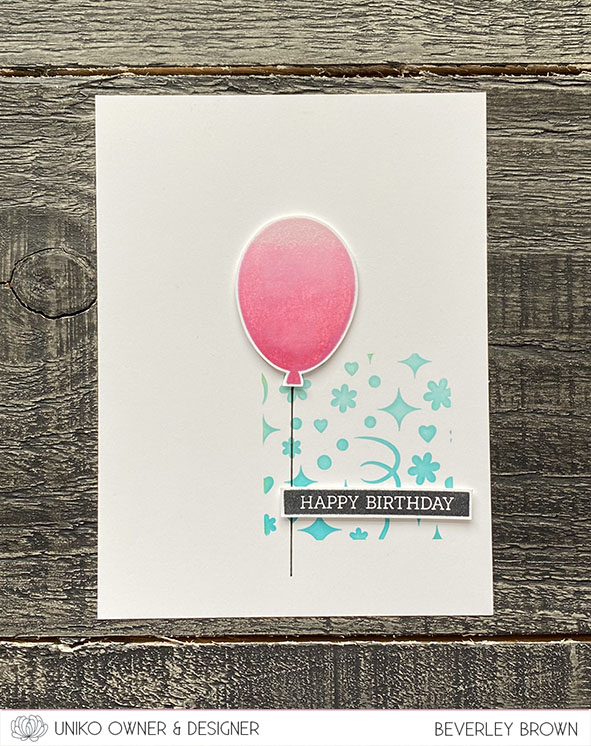
Anyway, back to my cards I created for today. So instead of over thinking things I selected my Uniko products, Stencil - Party Confetti, Balloon Bash and Simply Said Blocks. I then selected my colours, pinks & aqua and I had also selected a couple of card making challenges to play along with. 


For this first card I used the sketch over at Freshly Made Sketches seen HERE and below. Often when I see the elements on a sketch I am drawn to use similar products. However, stopped myself and kept to my birthday card theme.


I used Post-it masking tape to tape off a small square. I then used 3 shade of aqua ink to stencil through the Party Confetti design. I added an ombre pink stamped & fussy cut balloon from Balloon Bash and finished off with the Happy Birthday from Simply Said Blocks.


With my card being so CAS I went on to make a second card. This time I used the challenge over a AAA Cards seen HERE and below. As you can see I chose not to use the optional twist! 


For this card I kept all the colours the same and simply inked through the Party Confetti stencil so it filled the top 3rd of my card. I added another ombre pink balloon and the same sentiment. 


No overthinking and much more creativity! 


That's all I have to share with you today. I will be back later this week with a Two For Tuesday, plus a restock announcement AND a Birthday Special offer, so keep an eye on the blogs & social media ;) 

Have a wonderful day.

Crafty Hugs


Friday, 7 May 2021

Friday Focus - Floral Vines

 Happy Friday! 


It's been the longest shortest week for me, like the week has gone pretty quick, but I am feeling tired at the same time! 

Anyway, I managed to squeeze in some creative time yesterday and decided to create a couple of cards using Floral Vines.


I've my usual CAS style for these cards today and chose summery colours to shine through these Spring showers!


I started with simple design using the Floral Vine focal image along the side of my card with a simple 'smile' sentiment. I added trio of circles to emphasise the sentiment and add a little finishing touch.


This lead to my second simple card design...


This time I used a little masking and then used a border / building stamp from Background Builders Arts Decoratifs and the 'Just For You' sentiment. 


As you can see I kept the colours the same as my first card for ease and continuity. I really love how this simple duo turned out.

Thats all from me today, I hope you have enjoyed this little Friday Focus on Floral Vines today.


Crafty Hugs


Tuesday, 4 May 2021

Brand Ambassador Inspiration - A Trio Of Mini Slimline Cards

  Hey!

It's Jane here today with a trio of mini slimline cards.


Have you tried the new craze for slimline cards yet? Well today I've made three mini slimline cards - an even more recent and current trend.

Each finished mini slimline card measures 3.5" x 6", so I started with card toppers measuring 3.25" x 5.75". 

This first card uses the new oxide colour kitsch flamingo - thought I'd start with another new! I die cut two sizes of circle and added kitsch flamingo ink to the larger one and stamped using Uniko's Background Blocks Mid Century Modern onto the smaller circle.


I then stamped the images from Passiflora and used the matching dies to cut them out. Finally I stamped a greeting from Simply Said Blocks II and matted it onto the card base.

I've used exactly the same layout and stamps for my next two cards. First my favourite monochromatic look......


..... and finally a Kaleidacolor ink pad to get an ombre effect. I inked up the larger circle using two of the colours from the pad.


All the stamp sets I've used were back in stock as I write this post, so hopefully if I've inspired you they will still be available to purchase.

Thanks so much for your time today.

Stay safe and keep crafting!

Jane
x