Saturday, 12 January 2019

January Non-Release Design Team Blog Hop & GIVEAWAY!

Hey & Happy Weekend!

Welcome to the first Non-Release Design Team Blog Hop & GIVEAWAY of 2019 - Whoohoo!! For those of you who are new around these parts I will explain what this post is all about...

Here at Uniko HQ it is just myself behind the screen, blogging, designing, packaging stamps & orders through the Uniko online shop, customer service and all the things in between. I *usually* release new product every other month for a number of reasons, but mainly so I can keep up with everything!

On non - release months like this month I like to set myself and the Design Team a challenge to look back at a previously released product and give it some more love. 

Usually I choose just one product that was released the previous year or a once favourite that hasn't seen much air time. However, like last January, I have given the Design Team a huge task of choosing to use their favourites from those released in 2018. Thats a total of 23 new clear stamp sets, 2 re-introduced clear stamp set, 14 stencil designs and 2 new designer die collections to choose from!

Let's see what the design team favourites are and how they have been inspired to use the products. Be sure to comment along the hop for your chance to win a Uniko £25 eGift Certificate. You have until Midnight (GMT) Saturday 19th January 2019 to comment, winner will be announced Sunday 20th 2019.


Bev
(Using Wonderful Day & sentiment from Pure Florals: Peony)


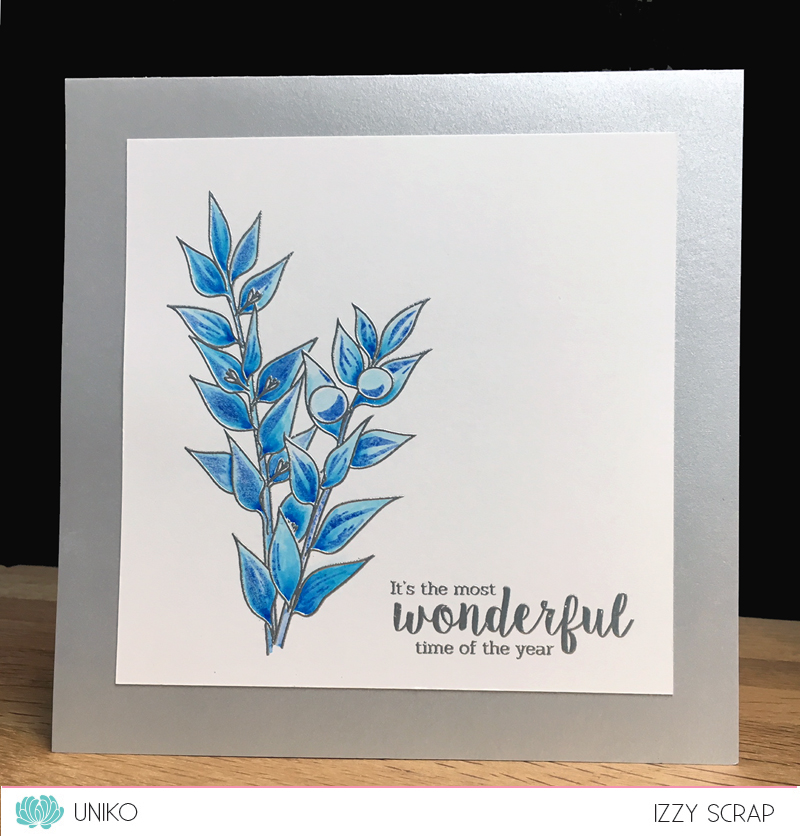
Izzy 
(using Winter botanicals: sweet broom)


(using Beautiful)


(Using Pure Florals = Peony and Wonderful Day sentiment)


Linda
(using Nature's Treasure's II stencil & Just Because)


(Using Pure Florals: Peony)


{Coming Soon}


Sarah P
(using Beautiful)


Wiebke 
(using: Natures Treasures II Stencil - (2018/05) & Pure Florals - Rose Stamps (2017-12))


WOW! Wasn't that a fun hop. It certainly looks like all the florals were a BIG hit with the Design Team. 

I'd LOVE to know what your favourite product released in 2018 was, be sure to add it to the comments, I might just pick a random winner to win their favourite ;)

Thanks for joining in on the fun.
Hugs


Thursday, 10 January 2019

Peony Love

Hello friends, Rahmat here.
I am up with my inspiration using the recently released Pure Floral - Peony.
I got these stamps much later than the release, so thought of sharing it with more inspiration for you guys.
I am hooked with coloring for past 2 years, and I am still very much enjoying it, its pretty therapeutic.

Today I have 2 cards, One with plain colored image and white BG and the other with colored image and a colored BG.

The first one is stamped and colored using the distress inks.
I have let the image be the star here, didn't feel like adding anything else here. I had stamped the sentiment on the image.

----------------

If you follow my instagram @rahmat.ccc, you would have seen how I am experimenting with backgrounds nowadays. So I did one for the peony as well.
I stamped the image in Versafine ink and used a pink alcohol marker to color it, adding some shading as well.
Then I masked the image and did some inking and stenciling, followed by white pigment ink stamping for the Bokeh effect. After going back and forth I decided to add the sentiment onto the image, and I like how it looks. I added the front panel with foam adhesive.


I hope you guys like my Inspirations with the peony stamp, and if you already haven't got it, maybe you should consider getting it.
Its a beauty whether colored or left uncolored.

        Thank you for stopping by, I really appreciate your kind  feedback :) Have a great day!


Wednesday, 9 January 2019

DT inspiration - Eraser technique

Bonjour !

Izzy here. Today I want to share with you a technique that I recently discovered on Papierelle's blog and that I particularly love. This is the Eraser technique.

For this technique I used the Pure Florals Peony stamp set released this past December together with the Large Background French Script stamp released in May 2018.


All you need for this technique is a pencil, sandpaper, a sponge, an eraser and a stamp. And the process is very easy : 

  1. Rub off some graphite of the pencil over the sandpaper.
  2. Pick up the graphite with a sponge and sponge it onto your card stock
  3. Stamp the image you chose on top of this sponging
  4. And to finish, erase the surfaces of your image you want to be white
Easy peasy, no ?

To make my card I cut a rectangle of Strathmore Bristol and I sponged it with the graphite. I stamped the gorgeous peonies with Memento Tuxedo Black ink. I also stamped them on post-it notes to use them as masks to be able to stamp the French Script Background with a light gray ink.

Then I erased the inside surface of the peonies and I used my new loved pencil brushes to colour them. If you try this technique you will notice that the choice of the paper is important. Depending on the paper, it is sometimes hard to completely make the surface white. For this card I've used Strathmore Bristol because it's a very smooth surface and I knew it's compatible with the use of the Zig Clean Colour pen brush as watercolour pencils.


Even with this smooth card stock I didn't succeed to totally erase the graphite on the peonies. But I loved the vintage look it gives mixed together with the pink watercolour that's why I went on. To finish I sponged Black Soot Distress ink on the edges of the card stock. Once everything was totally dry I sprayed a fixative to be sure that the graphite would not smear everywhere.

I adhered this panel on top of a white card stock and I stamped a birthday sentiment which comes from the Pure Florals Chrysanthemum set. I love how this card looks, the peonies really stand out over the grey background !

I hope I inspired you with this gorgeous stamp set. It completes so beautifully the Pure Florals collection. It's my new favourite and a must have !

Thanks so much for stopping by and have a fabulous day !

Izzy xx


Sunday, 6 January 2019

Stencil Sunday - One Stencil Three Ways!

Hey!

I do hope you are all having a wonderful weekend, we are making the most of chill time at home before normal schedule resumes on Monday as the Christmas Holiday break comes to an end. Can you hear my cheers already as I get back 2 hours a day to work & create! 

Don't get me wrong, it has been a memorable Christmas and New Year, with lots of fun and games. However, this Mummy needs a routine again & scheduled time to work! 

Anyway, today I am introducing a new regular feature here on the blog, Stencil Sunday. With Uniko having 22 stencil designs available HERE on the website, I thought it time we give them some more inky love and air time! One Sunday a month a Design Team Member or Guest Designer will share some stencil inspiration with you. 

I'm kicking things off today using the Let it Snow stencil from the December Release and I have used it three ways, creating three cards. 

Let's have a look...


First up I decided to go colourful. I reached for my favourite Distress Oxide Inks in Picked Raspberry, Peacock Feathers and Fossilised Amber. I blended them through the stencil and before removing the stencil I then added some glitter paste over the top for added sparkle - yum! 


With plenty of Winter birthdays coming up, I decided to use the panel to create a clean and simple birthday card. The die cut is a Papertrey Ink die and the sentiment is from Wonderful Day, also from the December Release.

Next up I decided to dust off more of my dies, and stencilled the snowflakes through a heart shaped aperture...


Valentine's is not an occasion I go overboard on making cards for, but I thought it would make a nice congratulations card for an anniversary or similar occasion.


The sentiment from Simply Said Blocks II is stamped in SU! Real Red ink and adhered to the card using foam adhesive. 

My final card today was the result of a happy accident! I was attempting to ink through the stencil with my white pigment ink, onto a distress ink background. However, my stencil moved and ruined the piece :(


So instead of giving up (which normally I would), I decided to carry on inking the stencil and laid it inked up side down onto a piece of kraft card stock. I then laid a plain piece of printer paper over the top and smooshed down to transfer the ink. 


The result of a mottled, distressed snowflake BG was perfect to pair with my recent Snowflake Die purchase from The Stamp Market. As I am still in need of thank you cards post Christmas, I used the sentiment from Simply Said Blocks II.

That's all I have to share with you today, I hope I have inspired you a little to ink up your stencils today ;)

Thanks for stopping by & Hugs

Saturday, 5 January 2019

DT Inspiration - A trio of THANK YOU cards

Hi! It's Jane here today with a little inspiration to help you along with those THANK YOU cards that we all seem to need at this time of year.


Just like Christmas cards it's helpful to have a go to design that can be made in a hurry and that's exactly what my trio of cards is all about today. They all use the same stamp set, so you can set the stamps on your misti tool and then stamp away.

Here's the stamp set I've used today - So Much:

SoMuchPP

And here's the first and quickest of my cards:


I die cut the stitched aperture first and then stamped the florals onto the cut out rectangle and the greeting straight onto the card base. The cut out was then popped back into the aperture. A perfectly flat and post friendly card.


The second card was created by die cutting the stitched rectangle and I stamped the greeting in exactly the same place as the first card without needing to remove the stamp from my misiti tool. I then used the aperture as a guideline and stamped the florals onto a polka dot card stock.


My last card has a little more bulk than the first two, but is still quite post friendly I think.  Once again I die cut the stitched window, stamped the greeting in exactly the same place and used the aperture as a guideline to stamp the florals. I then popped the aperture card up on foam tape for more dimension before attaching it to the base card.

And that's me done for today. Quick, easy and each one a tiny bit different. Of course if you have time there's always the option to colour the floral stamp - would look really special then!

Thanks for looking today. Be sure to scroll on down and check out the post which has all the winner details from our last challenge.

Happy New Year

post signature

Friday, 4 January 2019

Uniko Challenge #50 Winners

Hey!

I'm here today to announce the WINNERS of Challenge #50 Celebrate, optional twist of GOLD. 

A huge thank you to everyone who played along with this challenge.

First we have our overall WINNER chosen by the Design Team...

Congratulations Trina!

Here is your winner's badge:


You have won a £25 eGift Certificate to spend in the Uniko store. Please contact me at bev@uniko.co.uk by 18th January 2019.

We would also love to have you join us as our Guest Designer for a future challenge. If you are interested please contact Jane at jane.taylor52@btinternet.com by 11th January 2019.

 Next up is the random winner who twisted with us....


Congratulations Darnell!

You have won an in stock £4 clear stamp set from the Uniko store. Please contact me at bev@uniko.co.uk by the 18th January 2019, with your choice of stamp set and your postal address.

Here is your winners badge:


Then we have our randomly selected winner who used Uniko products on their creation...

#47 Anna S (flickr)

Congratulations Anna!

You have won an in stock £4 clear stamp set from the Uniko store. Please contact me at bev@uniko.co.uk by 18th January 2019, with your choice of stamp set and your postal address.

Here is your winners badge:


Now for our Top 3 chosen by the DT and in entry order:

#9 Marianne


Congratulations to you all & here is your Top 3 badge:


You have all won 150 loyalty reward points.

Please contact me at bev@uniko.co.uk

Congratulations to ALL the winners & EVERYONE who joined in on the fun!

The next Uniko Challenge starts on Friday 18th January.

Hope to see you come back and join in on the fun :)


Tuesday, 1 January 2019

Happy New Year!

Happy New Year!


Thank you for an awesome 2018 and being part of the fun here at Uniko. Here's to another fun filled year ahead and I am super excited to share more of what I love with you all in 2019. 

As I didn't quite get all the Christmas cards made that I wanted to, due to too much procrastinating, I thought I would make some Happy New Year cards to send out.


This is a pretty quick CAS card using Organic Wishes and Simply Said Blocks Christmas clear stamps. The seed head bursts in Organic Wishes double up nicely as fireworks too ;) 

I stamped the seed head in VersaFine Onyx Black ink and heat embossed them with Stardust EP. The small open circles on the ends were coloured with Stampin' Up! markers and I simply adhered the panel to a Bermuda Bay card base. The sentiment from Simply Said Blocks Christmas is also stamped in VersaFine Onyx Black ink and adhered to the card using foam adhesive.


This card makes up for the fact that I went to bed at 10pm last night and missed watching the fireworks in London on the TV! All the fun and excitement with The Beans over the past few weeks (plus a few glasses of Prosecco) caught up on me and an early night was required!

That's all I have to share with you over here today, however I will be over on the website blog a little later with the first part of a little project that I / we made at the last Uniko Stamping Retreat back in November.

I hope 2019 has begun well for you all & thanks for taking the time to stop by today.
Hugs