Tuesday, 20 September 2022

Brand Ambassador Inspiration - Techniques with Embossing Glaze

 Hi there,

 do you love Embossing Powders as I do?
Have you ever heard of the special one called Embossing Glaze?
If not - it's a translucent but colourful Embossing Powder with some more special effects.

In the first card I made for you I created amore or less translucent rainbow with the "Rainbows & Clouds" Stencil over a very soft pastell blue background.
But first I had stamped and heat embossed the "Large Background - French Script" in white.
After the melting process of the powder I used the Stencil again and added some fluffy clouds with white Embossing paste.
The sentiment "Time to celebrate the good times" is one of the "Birthday Sentiments", heat embossed in a fitting light blue.
For some more interest I added some clear little rhinestone drops as raindrops.


The second card has a very similar layout, but I stamped the script background in gray (without embossing), just added the rainbow with the same Embossing Glaze colours as before.
I planned to add embellishments in the same colours, so I took twelve white sequins, added sticky ink to them, dipped always two of them into one of the powders and heathed them up. Then I put a drop of clear glitter glue to them.
The sentiment of the "All Occasions Set #3" is stamped with the same Ink I used for the background on Vellum and then I added the same colour of Embossing Glaze to it (hickory smoke).
I glued the edges of the Vellum on the backside of my layer and embellished it with my "special gems".

For the next card I created a blended Sunset scene and added plants and shadows with different stampsets - "Just because", "Happy Days" and "Natures Treasures I".
The lighter shadows of the black embossed plants are made with the Glazes.

For this glazed "Pure Florals - Peony" I added several times Embossing Ink with a Dabber and then thin layers of Glaze.
I was able to mix and match the colours with every layer and then melted every one on top of the black stamped flower.
With every layer it went darker and more intense! So beautiful! Love this kind of "watercolour look".

 
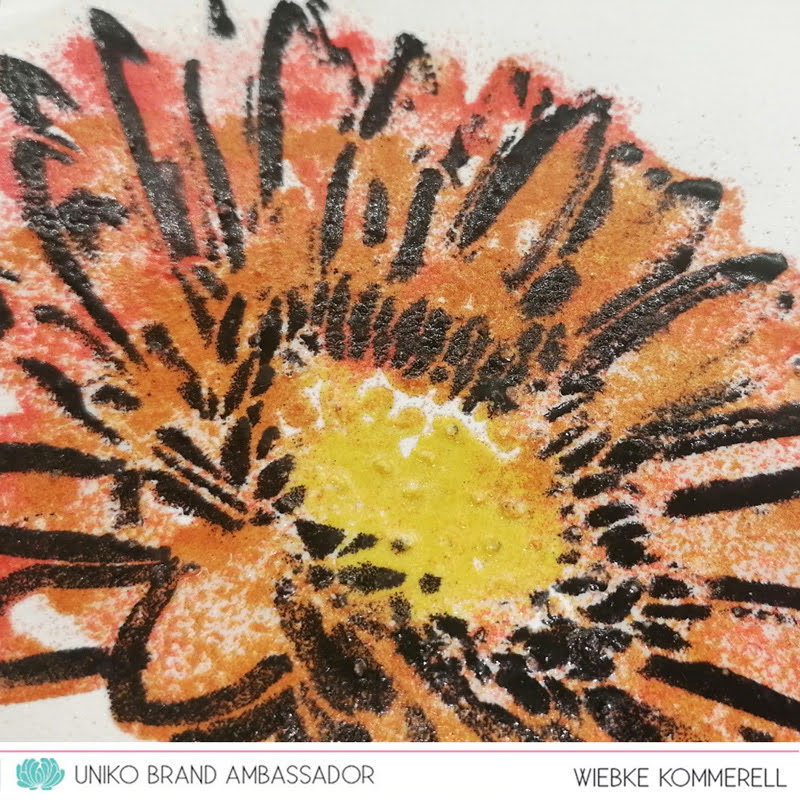
The last card is a bit different to the peony. I used the "Pure Florals - Gerbera Stencil" and one of the Peony sentiment stamps.
This time I didn't add the embossing Ink with a dabber (I tried, but it was too much ink for a stencil and turned out in a mess!), instead I used a pen and "coloured" the areas very quick and in a distressed way. I added and mixed the red and orange Glaze powder for the petals and the yellow for the center.
Melted every layer and as a last step I added black Embossing Powder to get some wild and dramatic lines to the flower.
Love this big and bold flower!

Hope I brought you some ideas to use the Glazes in different ways... there are many more to try!
For those of us who love Embossing Powders they are a very "nice-to-have" and "test and try" medium to play with.

Greetings from Wiebke

Two For Tuesday - You Are, Yes You

Happy Tuesday! 

A few weeks ago when the clear stamp restocks arrived, I had a little creative spell and I made a few cards for the Harrogate Crafterama show, which I forgot to share here on the blog. 

One of the stamp sets I reached for was You Are, Yes, You. Here are two cards I made using it...


First I started out by creating a mask of both the single leaves. I then stamped and masked to create branches. Colouring them with Copic Markers and fussy cutting them out. I then stamped the flower and did the same.


I adhered the branches onto my card base which I had softly ink blended with a light blue. The flower is adhered with foam adhesive. The sentiment is from Simply Said Blocks II and I added a few rhinestones to finish.


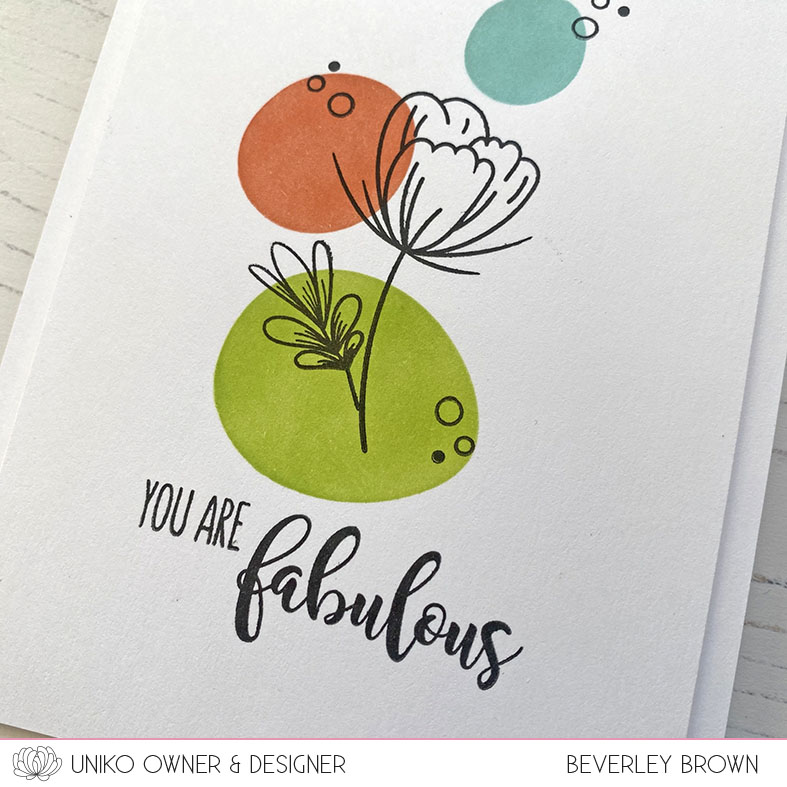
For my second card I kept things really simple. I started by using the Mid Century Modern Shapes stencil, inking the 3 circular shapes in lime, orange and aqua.


I then stamped the flower and leaf in black ink, along with one of the mix and match sentiment choices. I felt it needed a little simple embellishment, so stamped the trio of dots from Floral Vines. This panel was then adhered to the card base using foam adhesive.

Such a fun little set that has lots of pairing opportunities, but also has a lot of potential on its own. 

Thanks for stopping by today.

Crafty Hugs


Monday, 19 September 2022

Brand Ambassador Inspiration : Pure Florals Gerbera

 Hi there!

Hannelie here with inspiration using the ever so popular Pure Florals Gerbera stamp and die set !


On the first card I used :


On the second card I used :


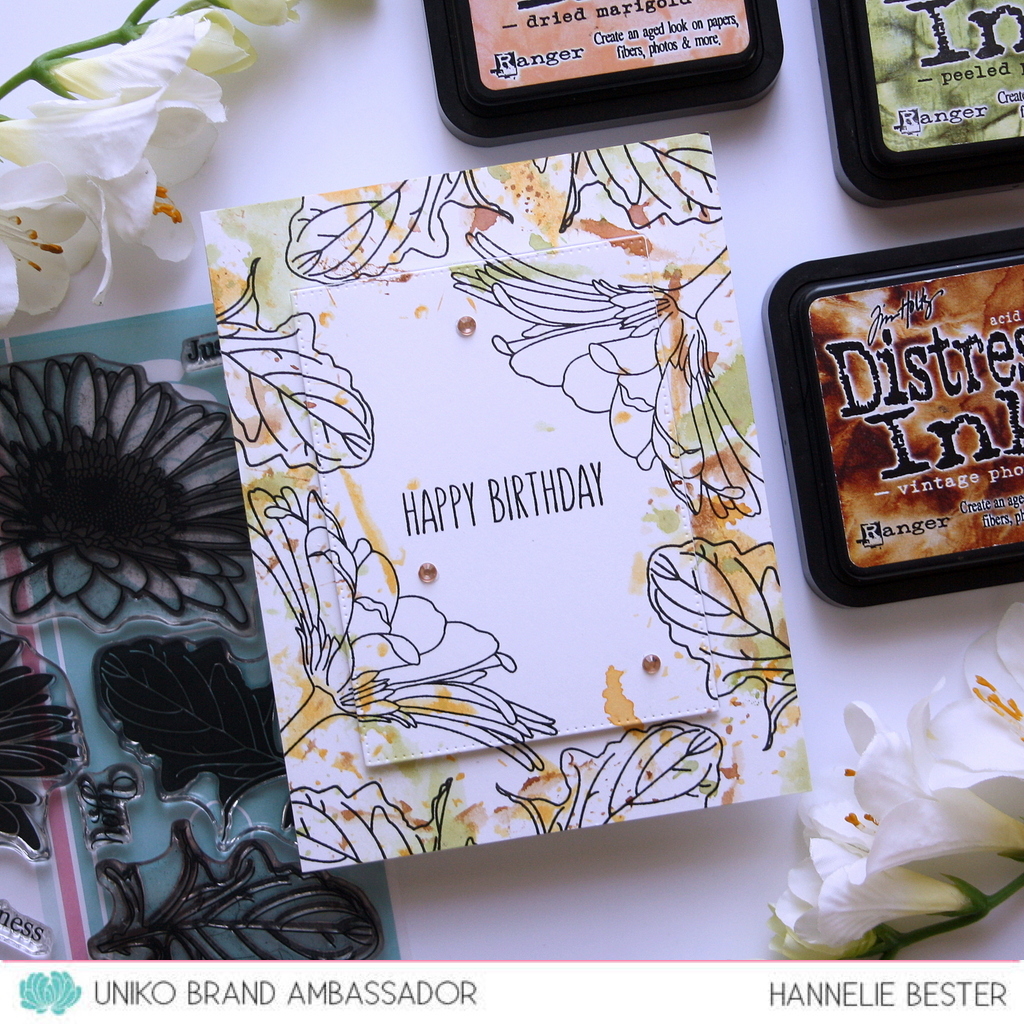
On the second card I used the background block splatters to stamp the watercolors all around the edge of the card. I first applied the distress ink to my glass cutting board, spritzed it with water, and stamped with the three colors randomly around the edge. After it dried completely I used my Misti to stamp the outline images and sentiment. To add some interest, I used a die to cut out the rectangle and popped it up with some craft foam.


On the third and last I used :

I sometimes think we forget to use all the stamps from a floral set. The leaves in such sets are so valuable especially during Autumn when we love to make cards showing off the the splendor of the season !

Thanks for popping in today! 

I do hope you leave here inspired   ♥

Hannelie


Tuesday, 13 September 2022

Brand Ambassador Inspiration - Peace on Earth

Hi all, 

Thanks for joining me, Steph, today for my Uniko Brand Ambassador inspiration post. I seem to be on a roll with Christmas cards at the moment so I have chosen to use the Uniko Peace on Earth stamp set. I have however, made one card that isn't a Christmas card with this set...read on! 

Here I have kept to a very traditional layout, stamping one of the doves and fussy cutting. I stamped the olive branch twice and fussy cut also before layering them and the dove onto a navy blue die cut circle. The sentiment is also from the Peace on Earth set and is heat embossed using white embossing powder. 


For my next card I have white heat embossed the edges with snowfall from the Uniko Background Builders: Winter Wonderland stamp set. I then heat embossed the two doves onto navy card and fussy cut. The olive branch is stamped directly onto the card using green ink as is the sentiment using navy ink. 


For my final card I wanted to show how this stamp set could also be used for a congratulations (or wedding) card. I stamped and heat embossed the doves using black ink and fussy cut. I then used the outline heart from the Uniko Background Builders: Hearts stamp set and heat embossed in clear before infilling with glossy accents. (I think it looks a bit like the middle of a jammy dodger!!). I stamped and heat embossed the sentiment from the Uniko Flower Power #3 stamp set before adhering all the elements to a green die cut stitched rectangle and then onto the card front. 

Hoping I have given you some useful inspiration today and that you are where you want to be in terms of your Christmas crafting!!

Much love
Steph  


Friday, 9 September 2022

Brand Ambassador Inspiration - Zesty Birthdays

 Bonjour !

 Izzy here. In recent months I haven't been much present on blogland neither in my craft room. So after this involuntary break, it is quite hard to find inspiration. And that's where I bless all blogland challenges because that's where I draw my inspiration from.

Today I'm going to show you how I've been inspired by several challenges to use the Organically Zesty Clear Stamp set and the Layering Stencil Zesty.


The last Color Hues and Seize the Birthday challenges inspired me for my first card : Navy & Green Lime. 


The word Lime was enough for me to use this beautiful set and to stamp the lemon on white paper , to colour it in lime shades with colour pencils and to fussy cut it. To finish my card, it was easy to choose a double navy card to adhere it on top and to stamp the sentiment with Distress Oxide.


For the final touch, I put some glossy accent on the lemon drops.

For my second card, I've been inspired by the sketch of the Freshly Made Sketch challenge and the colours of CAS Colours & Sketches.


Here is my card


For this one I used the Layering Stencil Zesty in two ways. I first used the four layers with the colours Grape, Mango and Pink to make the foreground panel. Then I used only the "drops" layer stencil as an embossing folder to make the white background panel.


To finish my card I die cut two slices of lemon and coloured them with the same inks and I stamped and black heat embossed the sentiment on a strip of paper that I fussy cut.

So that's it from me for today. I really love these two products. They both match very well together but at the same time they are versatile so that you can use them separately. 

I hope I've encouraged you to have a look on the current challenges and to give some love to your Uniko's products. And thanks for visiting Uniko today !


Tuesday, 6 September 2022

Two For Tuesday

 Hello & Happy Tuesday.


It's been a while since I did a Two For Tuesday post and it just so happened I made a couple of one layer cards using a mix of Flower Power and Sentiments Outlined. I kept the layout the same for both, but just switched up the flowers and sentiments.


I started by stamping the sentiment in black ink from Sentiments Outlined and then scattered the solid flower from Flower Power #7 in Sorbet and Honeysuckle C9 inks. 


The leaf is from Flower Power #6 and stamped in C9 Parsley. I finished the design with some Gloss Dandelion Yellow Nuvo Drops to the centre of the flowers. I also coloured the sentiment with an aqua shade of Copic Marker.


For my second card I used the rose from Flower Power #6 and this time stamped them in Poppy and Honeysuckle C9 inks.


I thought the 'Have a Perfect Day' sentiment was a nice choice and this time I stamped it in turquoise and coloured in the closest match of Copic Marker.

Two fairly quick cards and wonderfully mail friendly! 

That's all from me today. Thanks for stopping by.

Crafty Hugs


Sunday, 4 September 2022

Brand Ambassador Inspiration - A Heat Embossing Technique

 Hello!

I have three cards to share with you today using a really cool heat embossing technique.


This technique works best with solid stamps. Here's the lowdown on how it's done:

1. Ink all over a piece of card with some bright colours.


2. Stamp all over and heat emboss using clear powder. I used Background Blocks Layered Modern Floral.


3. Ink over the top in a darker colour - I used villainous potion. It's best to choose a contrasting colour for the darker shade to allow the background colours to shine through really well. See where I used the wilted violet with villainous potion on top? Not so good.


4. Polish off the darker colour using a cloth to allow the underneath colours to stand out even more.


5. Use the panel to create a card. Because the wilted violet didn't stand out so well I decided to cut my panel down for the front of my card. I then had enough left over to cut a tag as well.


I finished off the card with a greeting from Birthday Sentiments stamped onto vellum.

The next two cards were created using the same technique. This one uses Framed Florals and a greeting from Simply Said. 

I masked off round the frame of the stamp before adding in the darker coloured ink so that the outside frame just shows the bottom colours.


I selected blues and greens for my final card and used Background Blocks Cogs. I then die cut the panel into a banner and added some ribbon and enamel dots as well as a greeting from Everyday Sentiments.


Thanks so much for looking today. 

Remember to share anything you make using Uniko products on social media using #unikoltd.

Stay sae and keep crafting!
Jane
x