Showing posts with label Christmas Sentiments. Show all posts

Saturday, 19 July 2025

Seasonal Sentiment Saturday - 12 Days of Christmas Giveaways Day 9


Happy Seasonal, Sentiment Saturday! 

Welcome to day 9 of the 12 Days of Christmas Giveaways. The days of inspiration and giveaways are just flying by. This time next week we will have started the countdown to the Christmas in July New Release!

Today I thought it would be nice to let those sentiment stamps shine and take the stage for our Christmas cards and here is what I came up with.

I started by selecting my sentiment from Christmas Sentiments, Holly Jolly. And because I chose this one I selected the holly leaves and berries from Winter Foliage

And here are the 3 cards I came up with using this combination.


When I know I want to make more than one card with a product or a combination of products like this,  I always sketch out some layouts. That way the creativity flows better. Let's have a closer look at each of them.


One thing I need to start doing, is using more coloured card in my crafting. Even if it's just a little bit like this for a sentiment. I think this just helps draw the focus to the sentiment and adds impact to a CAS card.


Next I wanted a repeating sentiment. I've done this before with the Let it Snow sentiment from this set. You can see the sample on the Christmas Sentiments product page.


Once I stamped the sentiment I created my own stamped patterned paper look with the holly and it was quick and fun to do. 


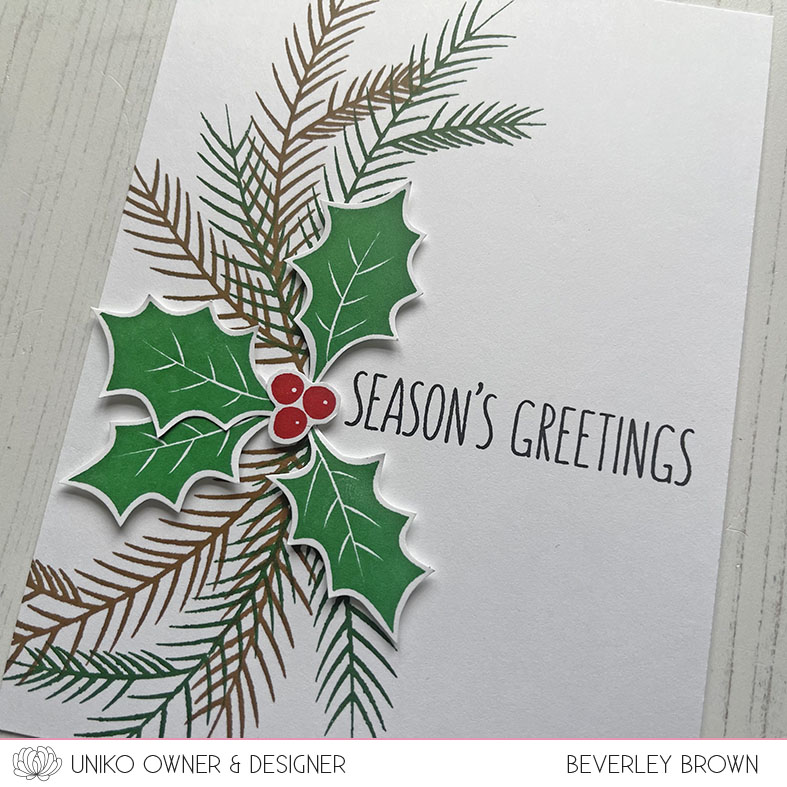
Lastly I wanted to create a fun focal point with the holly and berries, so I came up with this fun flower style arrangement to add impact to the sentiment.


I started by stamping the holly leaves, 5 of each colour, plus some berries and fussy cut them out. I set these aside until it was time to assemble next to my sentiment once stamped, which I stamped to a thinner panel of white card. This layer again gives a little extra interest to a CAS card. 


If you fancy watching me make these 3 cards in less than a minute, real time 30 mins. Then head on over to YouTube HERE.

Before I go, the giveaway. Be sure to leave a comment by 31st July 2025 for your chance to win the Christmas Sentiments stamp set I've used on this card If you are the lucky winner picked randomly from comments left across Uniko’s social media and already own the products, an alternative will be offered. 

Winners will be announced first week of August 2025.


Crafty Hugs


Tuesday, 1 July 2025

Christmas in July - Brand Ambassador Inspiration with Background Builders Christmas 2018

 Afternoon, Julie here with the first of many posts celebrating Christmas in July with Uniko!


Over at Color Hues their new colour combo is red and white, so I thought I would use that to spark an idea using Background Builders Christmas 2018, some red card and white heat embossing. Here's what I came up with.


I've used this set a couple of times to make 'jumper' style cards as the patterns always remind me of Christmas sweaters! There are a few strips which you could combine to make a pattern but I stuck with just two.
For this card, I simply stamped and embossed three of the stylised snowflake strip onto an A6 panel of red card and bookmarked it with the hatched lined stamp strip. A simple partial circle die cut out of the red panel followed by a die cut welt made from two stacked circle dies, suggests a neckline. The red panel was then trimmed to leave a border when attached with glue to my A6 white base card.  A simple white heat embossed sentiment from Christmas Sentiments completes, a very simple card in the end.

Here are a couple more ideas along the same lines from a few years ago.


This uses a zipper die set from MFT and the tags below are simply strips of card with fussy cut collars, die cut circles, butchers twine, a couple of buttons and some ribbon bows!


So that's all from me today but don't forget to look out for more Christmas inspiration to kick start your Christmas stash from the BAs as well as a new release later in the month.

So for the moment I'll say bye and happy crafting!


Saturday, 7 December 2024

12 Days Of Christmas Inspiration & Giveaways - Day 7 Background Blocks With Festive Twists

 Hello & Happy Weekend.

With the announcement of yesterday's Fabulous Festive Offers, it got me inspired and changed the whole plan for todays post! 

If you missed the offers, keep reading I will give a recap at the end of todays post. So, a while back I did a Background Blocks 3 Ways, I thought I would do that again, but add a festive twist to them. Let's have a look...


For my first card I chose Background Blocks Layered Stripes. I think this block pattern works wonderfully to look like wrapped gifts under the Christmas tree. That what the look I was going for with this card. 

I used my stamping platform to stamp the block on the angle in Poppy and Cranberry inks, I finished with a sentiment from Christmas Sentiments and added a festive bow from Mid Century Modern Baubles.


Next I decided to use a recent restock, Background Blocks Pinstripe. Again I was going for a fun festive look, but this time decided to overlap the pattern. I used cranberry and Evergreen to stamp the block. 


I chose a different sentiment from Christmas Sentiments to adorn this card and stamped the same bow in Poppy.


For my third card today be sure to watch todays video over on Uniko's YouTube Channel HERE. I've used a different Background Block and added a fun festive twist. 

The giveaway today is 3 Background Blocks (in stock) of the winners choosing. My question today is, which is your favourite Uniko Background Block. 

Now for some Fabulous Festive Offer Reminder...

Firstly, FREE Worldwide Shipping minimum spend has reduced to just £30 to qualify for free shipping. This is normally £75 for those outside the UK and £60 in the UK.

This is perfect for my lovely customers in the EU and Northern Ireland.

PLEASE NOTE - Due to GPSR that come into effect on 13th December 2024, I will no longer be able to ship orders to these destinations. The last day to order is Midday GMT Monday 9th December 2024 to give time for your orders to be processed through the Royal Mail system.
 It's a busy time of year, so can take longer. 

I am looking into this to try and find an option that isn't too expensive and I am attending an online event that will hopefully answer questions and give me more insight. Please stay in touch via this newsletter and Uniko socials for updates 😊

Special Offers 🎉

THREE for £15 on the following £6.50 value collections, BIG & BOLDEveryday SentimentsFlower Power and Simply Said Blocks. You can mix from any of these collections to qualify for the discount. 

THREE for £12 on stencils valued at £4.50

Discounts will automatically be applied to qualifying orders, so no code necessary. Offers expire at Midday GMT Monday 9th December 2024.

Crafty Hugs


Friday, 29 November 2024

Brand Ambassador Inspiration - Quick Christmas Cards

Merry Christmas! 

Hopefully everyone is in full Christmas mode now but don't panic if not. I have used Uniko's Background Builders Christmas 2018 stamps to create some fairly quick cards (the heat embossing makes these a take a little longer but you could reduce time by simply stamping with ink instead).

Here I lined up four of the stamp strips and carefully inked and stamped them one at a time. The sentiment is from the Uniko Christmas Sentiments stamp set. 

This card took only slightly longer to make than the last as the striped stamp was used twice so it had to be cleaned and repositioned between colours.

On this card I have used clear embossing powder over the red and green ink and gold embossing powder for the centre strip but of course you could just use the ink and leave out the heat embossing. The sentiment this time is from the rereleased Uniko Pure Florals Poinsettia stamp set. 

Following on from making my last card I discovered that I had red and green embossing powder in my stash (doh!) so I made the card again using these rather than ink and clear embossing powder, changing the rotation of the background builder strips. 

Hopefully these have helped if you are a little pushed for time or behind in your Christmas card making.

Much love

Steph x

Friday, 15 November 2024

Brand Ambassador Inspiration - Pure Florals Poinsettia

Morning all Julie here with another festive idea. I'm helping out at Sparkles challenges again this month where their theme is Christmas Florals, so I thought I would combine it with a Uniko Brand Ambassador post.
When I saw the theme I knew exactly which stamp I was going to use, the fab Uniko Pure Florals - Poinsettia, so happy that Bev has reintroduced it. I was unsure about what design I would use until I stumbled across a You Tube video by Michelle Short CASEing Therese Calvird and the rest as they say is history! Here's my CASE of a CASE!


In the video, Michelle used some pretty marbled DP but I didn't have any, so decided to make my own using alcohol ink and Yupo paper, I used what inks I had including Valencia, Flamingo, Dandelion and Coral, with a little bit of gold foiling. Whilst the alcohol ink was still tacky, I dabbed a piece of used gold foil over the panel, just enough stuck to give a little added texture. 
In both their cards, the outlined blooms form the front of the card but I didn't go down that route. Have you come across Ardyth's LIMES mnemonic for CASEing, COPY and SHARE everything? Here's a link to her video where she explains her ideas, I found it really helpful.

I loved the bold black outline on white of the blooms, the marbled paper, gold pearls and bold sentiment. I left out the front panel bit but used the layout and a gold on black fussy cut sentiment instead of a die cut one. The rest was pretty simple, two large images, black on white, fussy cut and mounted over the inky panel. The Uniko stamped sentiment was embossed with gold EP on black card before being fussy cut. The sentiment was popped up with foam tape and some silver crystals coloured with yellow Copic marker were added to the centers to complete.

That's it from me for today, hope I've given you yet another idea on how to use this fab stamp set.

Monday, 29 July 2024

Merry Monday, some more Christmas in July BA Inspiration

Good morning, Julie here with a few 'krafty' ideas for some Christmas makes. Here are my ideas using various Uniko stencils and stamps and kraft card.


I was looking through my stash the other day and came across a couple of panels of kraft card that I'd made a while ago and not used, so decided as my Christmas card pile is not what it should be, I should turn them into cards.

This first card started off as a stencilled panel using Winter Foliage stencil. I made it and used a snippet for this card back in 2022, so it's about time I used it!


I first secured the stencil to a panel of kraft card then inked through with Hero Arts Unicorn White pigment ink. Carefully removing the stencil so as not to smudge the ink, I set it aside to fully dry and washed the stencil. Using the white ink allows the dye ink I used after to pop off the kraft, otherwise it would soak into the card and be rather dull in comparison.
Once completely dry, I replaced the stencil over the panel and inked through with a mix of Evergreen Bough DI for the holly leaves, Festive Berries DI for the berries and Mowed Lawn DI for the ivy leaves. The evergreen sprigs were a mix of both greens. My pine cones were inked with Ground Espresso DI.

To make this card, I cut the panel into two, and attached it to a kraft base card, for sparkle a strip of red glitter paper was added and finally a sentiment embossed with gold EP.

This second card uses the smaller of the two panel pieces, glued to a red base card, a thin strip of gold mirror card and a large heat embossed sentiment in gold.


Finally I had a sentiment panel that had gone wrong, the top half was smudged but I didn't throw it away, just cut the messy section away and trimmed it to form the central panel of my card.


Trying to think what to do with the piece I had left, I went looking through my ideas folder and found this.

No name so I can't link back but I also found this by our old BA Hannelie, here, so mine is a bit of a mashup!
I found some tape in my stash, Lidl I do believe, and cut a triangle from the sentiment panel. Here is one using blue that I made at the same time. It's so easy to make loads at the same time as arranging the small individual sentiments does take some time, even in a MISTI! The tape was wrapped around a panel of kraft then the center panel added over on pads, a simple punched white card star and gold embossed sentiment completes.

So that's all from me for today, hope I've given you some ideas to get your Christmas makes up and running.

Tuesday, 29 August 2023

BA Inspiration - Technique Tuesday, Using Sentiment Stamps For Backgrounds

 Good morning Uniko fans, Julie here with another BA post using sentiment stamps in a background. I love using sentiments for a background and have shared many ideas over the years such as here, here and here but this time I've been inspired by Jennifer McGuire to use a turnabout jig to create one.

Here's my first idea, using English Country Garden stamps and dies and some birthday themed sentiments.


I started with an A6 panel of white card and using a freehand cut shape to match my jig middle, I glued it temporarily onto the center of my panel and secured my jig into my MISTI. To get a feel for my layout, I started with the largest sentiment stamp and set off, turning the panel after each time I stamped. Once I could see where the gaps were, I used smaller sentiments to infill and repeated the stamping and turning. 
I stamped my butterfly on one of 3 white butterfly die cuts and coloured it with Copics. From the remaining die cuts, I removed the antennae and lower half of the body and folded them in half down the middle. These were then glued to each wing, meeting at the center and the other flaps were glued over the turnabout panel.  My panel was trimmed and added to an A6 white note card.

I rather liked the effect of the dancing butterfly over the sentiments, so tried another idea out, this time using the Sparkling Snowflake die and some appropriate sentiments.


This time I used Altenew Iceberg ink for the stamping, some of which I double and even triple stamped to increase the saturation of colour. Instead of using all 8 points of my stamping jig, I just used every alternate one, it gives a slightly different effect and I was able to use more sentiments.

The main snowflake was cut from holographic silver card and two others from matching white card folded down the middle and attached the same as the butterfly. One of Bev's sentiments describes the effect perfectly, Snowflakes are winter's butterflies!

So that's all from me for the moment, hope I've given you some inspiration for you to give it a go
Stay safe and keep crafting!

Tuesday, 11 July 2023

Brand Ambassador Inspiration - Mid Century Modern Christmas

Good morning and welcome to another Christmas in July post! 

Over at Cardz4Guyz challenge, their theme is Christmas in July and here at Uniko we are also getting our festive hats on in the run up to the new release. I decided to put into practice one of the ideas I had for the MOD Background Builders Circles stencil I didn't use for the release back in January. Here is my first take.


I created a Christmas tree using the stencil and a tip I saw on Jennifer McGuire's You Tube channel. Taking an A6 panel of white card, I placed the stencil on it so that the 4 units of the middle section created my bottom branch, leaving enough room for a sentiment. Then using a mask created by cutting a small square from some scrap acetate, I went ahead and inked the elements in, moving the mask as I went. The inks I used were the 3 darkest of the Altenew Tropical Forest set and also their evergreen ink pad. Once complete, I moved on to the next row and so on until I got to the top where I used the extra elements found on the edge of the stencil.
The sentiment, Christmas Sentiments, was stamped and embossed with gold EP and a few red punched foil circles complete.

Pleased with my first attempt, I decided to make another, this time using the MOD Background Builder stencil and the same Altenew inks and the acetate mask.


This time I used some larger gold punched circles to decorate and the same sentiment completes.

OK, that's all from me for today, hope I've given you a few ideas to kick start your Christmas makes. I know I am falling behind in my Christmas card makes!

Happy crafting. 

Tuesday, 22 November 2022

Brand Ambassador Inspiration - Water Coloured Stencilled Christmas Trees

Good morning, Julie here with few festive ideas for quick Christmas makes using the Christmas Pop Trio stencil and the Christmas Pop stamp set.
I've rediscovered my love of water colour these past few weeks as the days shorten, temperatures drop and gardening is on the back burner. It's great to get lost in You Tube and then have a play!!
Here are three cards that started out as three outlines made using the open tree stencil.


In theses two examples, I traced the outline of the tree using the basic outline from the stencil without the trunk, one onto card the other onto watercolour paper. I wanted to see if the technique worked on card and it does! Can you pick out the w/c paper from the card? The one on the right is the one using w/c paper.


The answer here is to be prepared before you start painting. I used water colour paint but I could just as easily have used DIs or reinkers. I made up pools of three shades of green and then painted the outline triangle all over with plain clear water. YES you read correctly WATER! Not too much if you are using card though. 
Before it dried, I dropped drops of colour randomly in the triangle and let the water do it's thing. You don't do the mixing, the water does, no two will ever be the same. This is great for mass production as each one will be drying whilst you do the next! 
I could have stamped the pot from Pattern Building Christmas tree but used a pencil and ruler to draw mine. I filled in the shape as before first water then some red in a couple of shades. The painted panels were then left to completely dry.

When dry I needed to decorate them and decided to use the elements from Christmas Pop with gold embossing powder. To complete, I added stars from the same set and the first tree I stamped the sentiment from Christmas Sentiments in Jewelled Gold EP to match the tree.

For this last card I drew the triangle using the same stencil but this time placed Washi tape around the outline. I used a slightly textured card for this panel and the same pools of green from the other two cards. 


Starting with a pale green, water added to the strongest one, I painted across with size 6 watercolour brush in various thicknesses and angles. When dry I repeated using progressively darker greens, waiting for each layer to dry. Again this would work well for batch making. When dry and before removing the tape, I splattered some Inka Gold over the paint for a bit of festive sparkle. I hadn't used it for awhile and it was set solid in the pot but I broke a few bits into a dish and added some water to make a thin paste for splattering! The pot was done the same as before.
I didn't add a star this time but added the same Christmas Sentiments sentiment in plain gold EP.

So that's it from me, hope I've inspired you to get a little arty but still keeping the designs clean and simple!

Keep safe out there and happy crafting!

Friday, 18 November 2022

Festive Friday!

Happy FriYAY! 


I'm jumping on the early Black Friday bandwagon with our best discount code of the year. Save 30% on all orders of £10 or more, plus shop the sale and save up to 40%. Code is valid until Midnight GMT Saturday 26th November 2022. 

Royal Mail have planned postal strikes next weekend, so get in early to (hopefully) receive your order before then! 

Now onto my inspiration for the day...

Can you tell I am starting to panic that I've not made nearly enough Christmas cards, as usual?! I really need to get the international ones posted and probably the ones for family & friends in the UK ;)

Anyway, back to what I have made today. It's been ages since I inked up Winter Foliage, it's an oldie, but still a firm favourite.


I started off by stamping the holly leaves in Concord & 9th Clover ink. I then stamped the berries in Cranberry ink. The holly leaves are really easy to cut out, so I created a mask for each of them from Eclipse paper, so that when I stamped the pine branches they appear behind the holly leaves.


The pine branches are stamped in Evergreen ink and my chosen sentiment is from Christmas Sentiments and adhered to the card using foam adhesive. 

As I had all the colours and supplies out, I decided to make another quick and simple card using them. The layout is roughly the same, but I started by stamping the sentiment first and then building the cluster around it.


This time I started with the pine branches and I stamped them in both Evergreen and Altenew Espresso ink. The holly leaves and berries are fussy cut and adhered to the card using foam adhesive.


That's all from me today, I am sure you will be seeing more of this set in the coming days/weeks! 

Crafty Hugs