Showing posts with label Embossing Powder. Show all posts

Friday, 7 July 2023

Brand Ambassador Inspiration - Background Blocks Arts Decoratifs

Good morning and happy Friday!

Anita here, back with some colourful inspiration for you today.  I'm not going to lie, this card took quite a while to create but I'm so pleased with the result so I'm glad I persevered with it.

The main image here is Background Blocks Arts Decoratifs and the sentiment is from the Bauhaus Blocks stamp set.


I began by stamping the main image in a grey dye ink so it wasn't too dark and then left the stamp in my Misti to return to later.  Next came the intricate part...I used lots of little post-it notes to mask off each section and then ink blended within each section with various combinations of Distress Inks.  Initially I was going to fill every section but in the end chose to leave some white.  Once dry I re-stamped the image using VersaMark ink and heat embossed with Platinum embossing powder.  The sentiment was heat embossed using the same powder. 


I love how this has a stained glass window look so I think I'll revisit this technique again using different colours.

Thanks for popping by.  Wishing you all a lovely weekend, we're almost there!


Monday, 28 November 2022

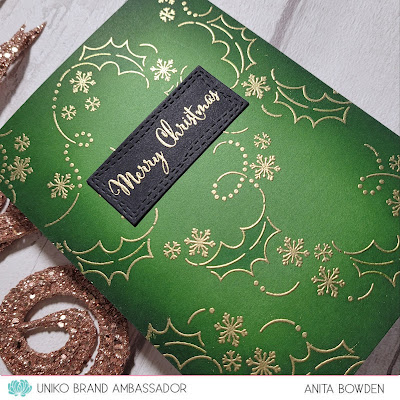
Brand Ambassador Inspiration - Snowflake Serenade

Good morning

It's Anita here and today I'm sharing some cards using a great Christmas set, Snowflake Serenade Clear Stamp Set.  The main image has so much movement and you also get some extra snowflakes and some fab mixed-font sentiments.

Ok, here's my first card, and my favourite of three I'm sharing today...


I started with a piece of green cardstock, very unusual for me not to reach for white!  I then stamped and embossed the main large image in gold, before then filling in some gaps to create a full background.  I then ink blended in from the edges of the green panel and faded it out toward the centre.  I then grabbed a green marker and coloured in all the holly images, just to add some tone on tone detail.  I then finished with a gold embossed sentiment from the Rustic Christmas Clear Stamp set, on a black die cut.


My second card...


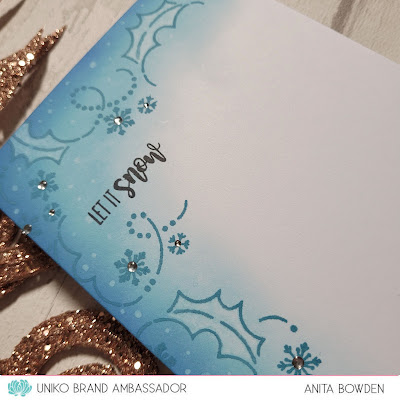
Directly on the card base I stamped the main focal image in blue dye ink.  I then ink blended in from the edges using a few shades of Distress Oxide ink.  Next I 'painted' the holly leaves with water and blotted with a paper towel to remove some colour, this works well with blended Distress and Distress Oxide inks as they react with water.  I also used a wet paint brush to add the 'snow' dots which were also blotted away.  The sentiment, also from the set, was stamped in black ink and I finished with some smooth gems in the centres of the snowflakes.


And my final make...


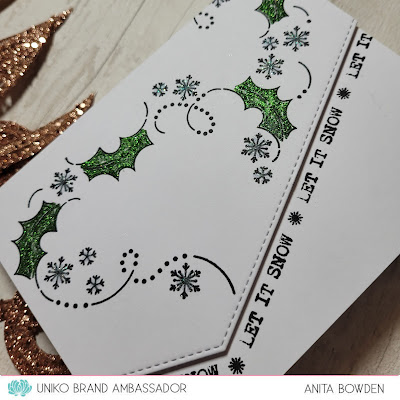
I kept this one fairly simple, just ink and glitter.  I used an angled panel die cut with a stitched border and stamped the main image in black ink.  I adhered this to my card base and then used a glue pen to add glue, first to the holly leaves, which I sprinkled with super fine green glitter, and then added some touches to the snowflakes and sprinkled with pale blue glitter.  I then finished the card by stamping the sentiment, from the Background Builders: Winter Wonderland set, along the edge of the panel.


So there you have it, three very different cards using the same focal image.  I'm still way behind with my Christmas cards this year so I hope this has provided you with some inspiration if you are too!

Thanks for taking a look, I hope you have a wonderful week! 


Thursday, 26 May 2022

Brand Ambassador Inspiration - WILD

Good morning

Anita here with some inspiration for you.  More often than not when crafting I reach for florals so I decided to go off on a tangent this time and picked out the WILD clear stamp set and a couple of co-ordinating stencils.


For my first two cards I combined the stamp set with the Tiger Print Stencil.  Here's the first one...


Rather than go with the traditional tiger stripe colours I thought I'd try tone on tone with black, and I love how this turned out.  I laid the stencil over some black cardstock and pressed through it with my VersaMark ink pad, going over it a few times to ensure all the areas were covered.  I then heat embossed the stripes in black, but this would work equally well with clear embossing powder too.  I die cut the panel with a stitched rectangle and then went over the surface with an anti-static powder tool before stamping the sentiment and paw print also in VersaMark, which were then heat embossed in gold and copper.  I then popped the panel up on 3D foam onto my card base.


And for my second card, a one layer card with a completely different feel using the same Tiger Print Stencil...


This time I used a heart die to make an aperture out of a scrap piece of card and used this as a stencil.  I ink blended onto my card base, first with Kitsch Flamingo Distress Ink, before placing the Tiger Print stencil over the top and inking over it with a Festive Berries Distress Ink.  I then simply finished by stamping the sentiment in black and adding some gems.


And for my final card I combined the stamp set with the Giraffe Print stencil...


I began with a die cut panel of light coloured kraft cardstock and stamped the word WILD in the centre.  I then masked the inside of the letters, by cutting out the sentiment which I had stamped onto post-it notes.  Next I masked off around the edges of the panel to leave a slim border and then ink blended through the Giraffe Print stencil using Distress Inks in Tea Dye and a touch of Rusty Hinge.  When all the masks were removed I then stamped the remainder of the sentiment in black.  To help the sentiment to stand out a little I added some Wink of Stella for some sparkle.


I had great fun making these and I hope you like them.  There is a third stencil in the series, the Zebra Print stencil, which I'm yet to get my hands on.  It's currently out of stock but please do check back at a later date if you want that one, I'm sure Bev is working to get this one back asap.

Thanks so much for joining me today, I hope to be back with more to share very soon.

Take care


Wednesday, 16 February 2022

Brand Ambassador Inspiration - Special Birthday-surprise for Bev!

Hello there,

today, I have something special to share with you!
Something what makes me proud and thankful and happy in the same time!

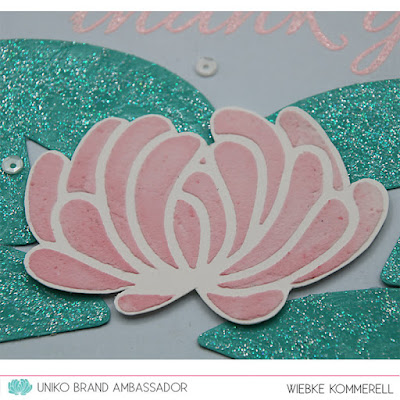
KomMa-designed_K1-1459_WaterLily#3
Sneak Peek of the Mini UNIKO Logo flower

It's a planned surprise for Bev, so I just put the directe link to the post on my KomMa-designed Blog to avoid her peeking into the post, before I put it online at 11:00!
😉


Hope you like it!

Greetings from Wiebke

Thursday, 26 September 2019

DT Inspiration ....... Quick and Easy Christmas cards using Uniko Stencils

Happy Thursday ........

I hope you're having a great week.
It's Linda here, with a little festive inspiration for you this morning.

I can't believe we're nearly at the end of September ..... the festive season is going to be here before we know it (and I still haven't been on holiday yet!)

Have you made all your Christmas cards?  Or are you like me, still thinking about ideas?
Need something quick and easy but still want fabulous results?
Well, how about using your Uniko stencils.   Team them up with some texture/stencil paste, and a few different finishes, for some fun, all over, festive designs


I started with some coloured cardstock cut slightly bigger than the Uniko stencils.  I then used white texture/stencil paste through each one of the designs and added a different finish.

In the Forest, on the green card, I sprinkled over the top of the paste, whilst it was still wet, with some Platinum Embossing Powder and set this to one side to dry.


Once it was dry, I used a heat tool in the usual way to melt the embossing powder.  I love the texture that came through.


I cut off the edges around the stenciled design, and inked around the piece using Forest Moss Distress Ink to add a little shading.
I then cut the panel into two pieces so that I could stretch the design to fit on the front of my 7x5 inch cardblank


I added my sentiment into the gap I'd created, and added a few dots of glitter glue here and there.


Let it Snow on the blue card, was the paste sprinkled with Crystal Glitter this time, again whilst the paste was wet, and then left to dry.
Depending on your texture paste, and the temperature of your room, drying time will vary.


Once everything was dry, I brushed off any excess glitter and then cut the panel as before in, only this time I cut on a sort of diagonal ......


I added a sentiment and a few sparkly sequins ......


The Scandinavian Christmas on the red card I did leave overnight to dry.  The reason for this was I wanted to hot foil it.


Now I'm not sure if this will work with all brands of texture/stencil paste ...... I do know it works beautifully with the Sweet Poppy one though.

So, once it was dry I covered the stenciled design with some pretty gold foil, then with it in between pieces of copier paper I ran it through my laminator on a hot setting.


The results are gorgeous!

I cut the panel down as before, inked around the edge (Aged Mahogany Distress Ink) and then cut it into two sections giving me space to add my sentiment.


Three designs, all done in the same way, but each one with a different finish .... which one is your favourite?


Thanks for popping by ..... enjoy the rest of your day.

Cheerio until next time ......

Wednesday, 13 March 2019

DT Inspiration - Stencils and patterned papers

Hello, Wiebke here with a brand new stencil-project for you!


Like most of us, I have kind of a "comfort zone" when I create my cards. I use similar materials - most of the time I'm crafting with stamps and stencils, inks and markers and some embellishments.
And sometimes I almost forget there are also other ways to craft...!

A while ago, I recieved a card, made with a mix of patterned papers combined with punched elements, embossing paste, stamping and sewing! Not my own usual style of crafting - but so beautiful! 


So this other card inspired me for my current card!
I tried this new-to-me technique mix and show you the result!


I grabbed some patterned papers, cut them in pieces, adhered them onto a thin paper and went to my sewing machine to sew them all together with two different stitching-lines.
The next step was to add three different embossing pastes on the paper. One is an opaque white glossy paste, one a less opaque matte white paste and one a mix of a golden colour and the matte paste. 

I moved both stencils - the Party Confetti Stencil and the Bright Butterflies Stencil - around to get exact the shapes I planned on the different areas. I wanted many of the small hearts! 💕
So it was important to let one paste dry before moving the stencil and start adding the next one to avoid smearing them around!

In the center I kept a free area to add the sentiment "You are Amazing" of the new You are, yes you Stamp Set with white embossing powder (fitting to the glossy white paste).


After everything was finished, I cut the layer down to my card size and adhered it with a strong adhesive tape.
Cause there are so many different materials which give enough interest, I think it's not necessary to add some extra embellishments to a card like this one.

The full list of all supplies you can see on my Blog.


Hope you can give some "new-to-you" techniques a try one day too.
Thanks for stopping by today, have a great day and lots of fun with all your art supplies!

Kind greetings from Wiebke

Sunday, 13 January 2019

DT Inspiration - stenciled resist technique

Hello, Wiebke here to share some inspiration with you!

For today I made a colourful "sound card" with a stenciled resist technique.
The Uniko products I've used are the Equaliser stencil and a combination of the stamp sets Life is a Song & Most Wonderful.
:-:-:-:-:-:-:-:-:-:-:-:-:-:-:-:-:-:-:-:-:-:-:
Magic of Music
Magic of Music - Detail
:-:-:-:-:-:-:-:-:-:-:-:-:-:-:-:-:-:-:-:-:-:-:

About this card & technique:
For the stenciled resist technique I first applied a clear embossing paste through the Equaliser stencil onto the paper. After it was complete dry I started adding the colours - this time I used Zig Clean Color Real Brushes and blended them with a moisturised cloth and a brush and some water.
(When you don't have clear embossing paste you can also use clear embossing powder - apply the embossing ink through the stencil and then add the powder - don't forget to use a antistatic powder tool before!)

The embossed areas will stay white / in the colour of your paper and pop out of any colourful background!
Some colours tint clear products - if you want it really clear you need to check the combination of your materials before!
In this case it was ok for me to get some staining, it reminds me more to the old "Winamp Music tool"! ;-)

I cut down my paper in the shape of the equaliser blocks (with a similar edge around) and adhered it to my cardbase. The sentiment is a combination of two different Uniko stamp sets - Life is a Song & Most Wonderful,
To repeat the clear part of the background I used clear embossing powder for the first part of my sentiment "believe in the magic of" and white powder for the "music" and the note.
To add some sparkle, I drew a slim line around the sentiment with the amazing Sakura Gelly Roll - clear star pencil.

The headphones are a die cut (sorry, I have no brand name). I combined a normal black and a pearlescent black paper to get some optical dimension. The shells are adhered on the card with some 3D pads, for the rest I used a strong fluid glue.


To get the full list of all used supplies please hop to my blog.
:-:-:-:-:-:-:-:-:-:-:-:-:-:-:-:-:-:-:-:-:-:-:-:-:

Musical greetings from Wiebke.