Showing posts with label MOD Background Builder stencil. Show all posts

Monday, 31 March 2025

March Meet The Maker - Product Story

 Hello & Happy Monday.


Today is the final day of March Meet The Maker and the final theme is product story. So far I've talked about the Originally Organic Collection, Ink & Flip Stencils & the popular Mid Century Modern Collection. 

There are lots of products that have stories, but I thought for this final day I would highlight the Stencil - MOD Background Builder


This stencil was the start of my 'builder' style stencils. The idea being that you can have an instant focal pattern, but that you can also move it around easily to fill a larger space.

I happened upon this 'builder' style from my surface pattern days and learning Adobe Illustrator in that this is a similar format to use to create and seamless pattern. And this was one I had created in my portfolio of designs. 


This shows the stencil used as an instant backdrop/focal point for the flower from Flower Power #3, accented with a sentiment from Simply Said Blocks.

This next sample shows how the stencil can be used as an all over pattern. I've accented with elements from the corners of the stencil and a sentiment from Everyday Sentiments.


Lastly for today I thought I would make a new card to share with you. 


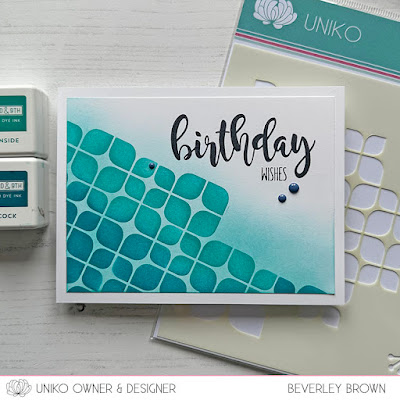
I went for a little tone on tone ink blending for this card. First ink blended some Oceanside onto the white card panel, but faded it out towards the top. 


I then used Peacock from the bottom, through the stencil and then Oceanside towards the top. For my sentiment I used Birthday Sentiments as I still had it out on my desk. 

I love this stencil format and it was the spark that gave me the inspiration to go on to design the Stencil - MOD Background Builder Circles and then I expanded the format to design the Stencil - Layering Bauhaus Blocks. I can confirm there will be new designs coming in this format this year!

And that wraps up March Meet The Maker. I hope you have enjoyed the blog series as much as I have and it's given you a little more insight behind the scenes. 

Crafty Hugs


Friday, 9 August 2024

Floral Friday - MOD Pure Florals Rose 🌹

Happy Floral Friday.


This week Pure Florals Rose is featured on The Card Of The Week and I've had this idea all week to combine the rose stamps with the Stencil - MOD Background Builder. So that's what I did...


It's been a while since I've used paste of any kind through a stencil, so I decided to reach for my favourite Moonstone Glimmer paste. I just love the sparkle of this stuff and it's also super smooth applying through stencils.


While the paste was drying, I set to stamping the smaller of the full roses. I started with the solid rose, inking with Sorbet and then using a sponge to apply Honeysuckle to areas. Once I was happy I overlayed the line rose to stamp the outline in Honeysuckle as well.


but 


For the leaves I stamped them in Evergreen ink and then created a negative mask, which was quite time consuming, but worth it for the inking with shades of Parsley & Sprout ink! To finish I chose a simple sentiment from Simply Said Blocks and a few Sorbet enamel dots.


Don't forget that the Pure Florals Rose clear stamp set is 15% off until Monday. 


Crafty Hugs


Monday, 1 July 2024

Summer Inspiration with Guest Designer Joanna Laverty

Hello, Happy Monday & Happy July! 

Here at Uniko we are not only kicking the month off with a new release landing in store this past weekend, (if you've not seen all the fun & newness check HERE and HERE). We are also starting it with an amazing Guest Brand Ambassador, please let me introduce and hand you over to Joanna Laverty.


My name is Jo, but also known as Have Faith In Cards, and I have been crafting for over 10 years now. What started out as a way to avoid buying a generic Birthday Card, has turned into such a beautiful journey of improving my creativity and trying out new styles and techniques. The crafty community is a beautiful community to be part of, and I have been inspired by so many crafters, and I hope that I have been able to inspire back.


For this first card, I used the Ink and Flip Geometric Butterfly stencil and the help of the Sarah Renae Clark Colour Cube to create this Butterfly filled design. The color scheme is not something I would have ever thought of to pull together but it works so well, especially with the flip design element of the stencil! 

I used a variety of Distress Oxide Inks to stencil in the butterflies over a square piece of white cardstock, and once complete, adhered the cardstock to a larger dark blue/grey square cardstock using foam tape. Next I took some burnt orange cardstock and using the 'Everyday Sentiments' stamp set, embossed 'Thinking of You' onto the card using a white embossing powder. I die cut the sentiment and placed it onto the centre of the design with some foam tape.


To finish off the design, I adhered some enamel dots to the front centre of each butterfly, choosing dots which matched the colour palette chosen for this design.


Taking the Ink and Flip Geometric Butterfly stencil, I first used the background stencil to start my design. Taking a white cardstock and side one of the background builder, I used Distress Oxides in Squeezed Lemonade and Ripe Persimmon, working yellow from the centre into the light orange red. Once complete,I cleaned side one of the stencil, flipped it over, and started to complete my background using side two. For side two I used the Distress Oxides in Festive Berries and Wild Honey, working the golden yellow from the centre into the gorgeous red.


Next I took the butterfly stencil and embossed two different powders for each side. For side one I utilised yellow and orange powder, and for side two I used a sparkly golden powder. Once complete, I die cut the layer using a stitched rectangle die cut and adhered the layer onto a card base.


Next I took some burnt orange cardstock and using the 'Everyday Sentiments' stamp set, embossed  'Congratulations' and 'Celebrate' onto the card using a purple/red embossing powder. I die cut the sentiments separately and adhered on the base layer using foam tape. To finish off the design, I applied some embellishments to the card in matching colours. 

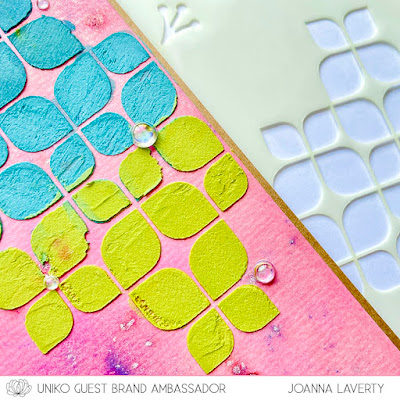
For my last card I took some watercolour cardstock and some pink shimmer powder, I lightly covered the card with the powder and sprayed water over it to create this gorgeous background. Once dry, I took a rectangle die cut to create the base.


Next, using some paste and the MOD background builder stencil, I started to build on top of the base layer. Taking shimmer powders in blue, green and gold, I mixed some powder separately into some opaque white paste to create  3 unique colours, then with a small spatula, applied the paste over the stencil.


I don't use paste often, but when I do, I am always reminded of how much I enjoy the results. One the paste layer was dry, I took the  'Everyday Sentiments' stamp set, and stamped 'With Sympathy' to the top left using Pink ink. To finish off the design I adhered some rainbow bubbles randomly to the design. 


WOW! I think you will all agree with me how stunningly beautiful and eye catching these cards are by Jo, using these popular Uniko Stencils and clear stamp sentiments. The colours are simply wonderful and I am inspired to check out the colour cube! 

Thank you so much Jo for agreeing to Guest Design and give such wonderful creative treatment to these Uniko products. 

What a wonderful way to start of a new month, I am inspired to get creating.
Crafty Hugs


Tuesday, 11 July 2023

Brand Ambassador Inspiration - Mid Century Modern Christmas

Good morning and welcome to another Christmas in July post! 

Over at Cardz4Guyz challenge, their theme is Christmas in July and here at Uniko we are also getting our festive hats on in the run up to the new release. I decided to put into practice one of the ideas I had for the MOD Background Builders Circles stencil I didn't use for the release back in January. Here is my first take.


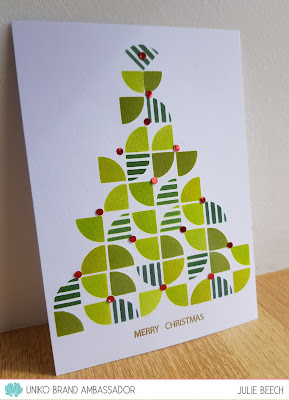
I created a Christmas tree using the stencil and a tip I saw on Jennifer McGuire's You Tube channel. Taking an A6 panel of white card, I placed the stencil on it so that the 4 units of the middle section created my bottom branch, leaving enough room for a sentiment. Then using a mask created by cutting a small square from some scrap acetate, I went ahead and inked the elements in, moving the mask as I went. The inks I used were the 3 darkest of the Altenew Tropical Forest set and also their evergreen ink pad. Once complete, I moved on to the next row and so on until I got to the top where I used the extra elements found on the edge of the stencil.
The sentiment, Christmas Sentiments, was stamped and embossed with gold EP and a few red punched foil circles complete.

Pleased with my first attempt, I decided to make another, this time using the MOD Background Builder stencil and the same Altenew inks and the acetate mask.


This time I used some larger gold punched circles to decorate and the same sentiment completes.

OK, that's all from me for today, hope I've given you a few ideas to kick start your Christmas makes. I know I am falling behind in my Christmas card makes!

Happy crafting.