Showing posts with label Pure Florals Cosmos. Show all posts

Friday, 17 May 2024

Stencil Restock & NEWS.

Hello & Happy Friday! 

Thank you for all the birthday wishes earlier this week and for all that have kept me busy order wise, taking advantage of the discount code I offered. 

If you've not signed up for Uniko's newsletter, I do recommend it as it's the main way I let you all know about codes, restocks and new releases. I do by best not to send too many emails, 2-3 a month, depending on how busy the month is! You can find the sign up at the bottom of the website homepage. 

Talking of the website. 

I'm super excited to share with you that I have a brand new website launching soon. I'm so excited to have a fresh design and new features.

Unfortunately, I am unable to take your account information over to the new website. So if you would like to save any information for your personal records, such as order history and wish list. I encourage you to do so by Sunday 19th May 2024

If for any reason you are unable to do this or you would like some assistance, please drop me an email (bev@uniko.co.uk) with your account email and I can save and forward you the information. 

Stencil Restocks.

I apologise for the HUGE delay on stencil restocks. It's been a bumpy road with manufacturers. My original manufacturer is flying high with their business and was struggling to accommodate my needs. So as good as the manufacturer is of my stamps, their quantity for older designs is a bit too much, so I've been testing out new small business suppliers and I have hopefully found the one who can accommodate me. 

Anyway, I am pleased to say I have a small number of the following restocks, that landed in the studio today...


Clear Stamp Restocks.

I will be updating the website this weekend with expected clear stamp restocks and make them available for backorder. These are due in the studio 29th May 2024. 


Now, I couldn't let the day go by without making a card, so I dusted off the Quilted stencil as it's been a highly requested and anxiously awaited by a few crafters...


Unusually for me I opted for some softer pastel shades, Nectar and Powder. I love the quilted pattern and white spacing, so kept my card pretty free of colour other than the stencilled design and background mat layer.


Pure Florals Cosmos has been neglected a bit and so I opted to ink it up and pair it with the Thank You sentiment from Everyday Sentiments


That's all I have for today. Now back to work on the new website.

Crafty Hugs


Tuesday, 27 September 2022

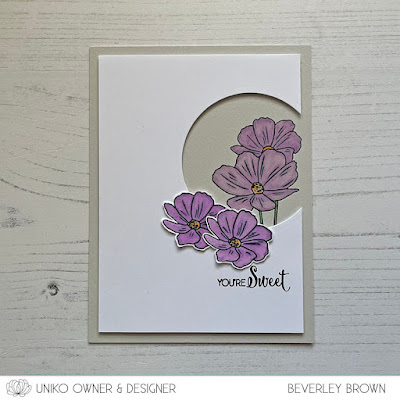
Two For Tuesday - Pure Florals Cosmos

Happy Tuesday! 

I seem to be on a creative Two For Tuesday roll, and this week it is Pure Florals Cosmos getting the creative attention. 


It's been a while since I took my time and did some Copic colouring. I kept things simple, just choosing a trio of purples to colour the cosmos blooms. But created a little interest by making a window style card and also colouring onto a stone coloured card base. 


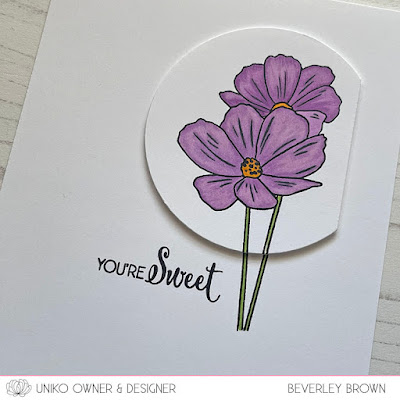
Having cut a window on this first card, this sparked the idea for my second card. This one is very CAS and uses the partial cut window for the spotlight effect.


I kept the cosmos colours exactly the same, just shading and adding more of the darker purple for the cosmos layered behind.


Pure Florals Cosmos is just one of the clear stamp sets coming in the next batch of restocks due in the studio, if the order goes to schedule, on Friday. 


That's all from me today.

Crafty Hugs


Friday, 1 April 2022

BA Inspiration, Spring Botanicals - Tulips Three ways

 Good afternoon folks, Julie here with a little bit of Spring BA inspiration.

It's the 1st of the month, so there's a new colour combination over at Color Hues and as soon as I saw that it was pink and green I knew I had to use the Spring Botanicals -Tulip set. These cards all use the same stamp but I've used a different method of colouring in each.

My first idea uses a slimline card base and watercolour. On a panel of white card, I stamped a row of tulips in black and embossed with a clear EP before washing in some pink DI over the petals and green over the stems and leaves. Detail was added with matching pink and green Zig watercolour markers. 

Taking the slimline card base, I added a strip of black and white DP to the open edge before adding my watercolour panel and a strip of silver mirror card. The sentiment from Pure Florals Cosmos was stamped on a strip of black card and heat embossed with white EP.


The second card started with an A6 panel of Copic friendly card, on which I stamped all over with the tulip flowers in Altenew's Limestone ink for a no line effect.


Using pinks, RV00, 10, 13,14 and 17, I coloured the blooms, the leaves were similarly coloured, this time using YG17, 21 and 25. For added dimension I added a bit of shadow with a dark grey Copic.
The sentiment, from Doodle Flowers, was stamped onto a square panel of grey card and heat embossed with white. I realised that if I double mounted the sentiment as I had intended, then the central bloom would be totally lost, so instead I added a separate white frame, allowing a peek of the bloom behind. The completed panel was added to a panel of the same grey card and then on pads to a 5 x 7inch white base card.


Finally, I did a loose watercolour version to go with the snowdrop one from my January BA post.


To get the look of no line, I first stamped my tulips onto a panel of scrap copy paper then scribbled the back with graphite pencil and traced through with a sharp pencil onto an A6 panel of MM paper, you could try a pale ink and simply stamp but you run the risk of it bleeding into the paint unless it's a waterproof ink!
I then painted over the tulips with masking fluid.


Once the masking fluid was dry, I washed clear water over the panel and dropped a variety of greens into the background, darkening areas around the blooms.
When dry, the masking fluid was removed and I started work on the blooms.


I worked on each petal in turn before starting on the leaves and stems. Lots of water is the key to the loose watercolour effect and patience!! Find something else to do while the different layers dry.
When I was happy with the painted panel, I mounted it behind a die cut mount and added a simple sentiment on pads.

When I chose the tulip image for these cards my own in a pot on the patio were just showing signs of life but hopefully they will soon burst forth into bloom.

That's all from me for today, hope I've inspired you to get out those stamps and paints out and have a play, it is only paper at the end of the day! If you don't like your attempts leave it a few days and come back to it, it's amazing how different it will look, you may surprise yourself.

Until next time, stay safe and keep crafting!

Monday, 16 August 2021

Mixed Media Monday - Alumni Brand Ambassador Lindsey Bowe

 Hello & Happy Monday! 

Today I am back with another Mixed Media Monday and I am delighted to have our Alumni Brand Ambassador Lindsey Bowe joining us again. If you missed Lindsey's first projects, be sure to hop on over HERE.


Lindsey Bowe


Hello everyone, I am delighted to be back today to share a Journal Page with you.


On watercolour paper (requisite sorry - ordinary card will warp!) I painted several squares, letting the colours run a little, added some paint splatters & sprinkled over table salt in a couple of areas.


To finish the project off, I added some machine stitching and iridescent sequins. For my focal point, I chose a couple of blooms from the « Beautiful » stamp set.  These were stamped on tissue paper stuck onto card to make them more manageable.  


I shaded around the bottom RHS of the flowers with a soft graphite pencil to make them more grounded - no need to shade around the whole shape just think of where 5 is on a clock face!  


If you want a hint with your final composition, remember the rule of thirds and triangle placement. The flowers were placed in the bottom RHS third where the eye is automatically drawn to and my sequins were placed in a triangle to encourage the eye to move around the finished piece.  

Try positioning your pieces in different areas on a project & hopefully you’ll see what I mean. You need to entice the eyes to keep moving around your project and you can manipulate this with strategic placement of your focal piece and embellishments!  


I hope you have enjoyed todays feature and a big THANK YOU to Lindsey for inspiring us all. 


Crafty Hugs


Tuesday, 13 July 2021

Brand Ambassador Inspiration - English Country Garden Butterfly II Stencil

Morning everyone,

Steph here with a Brand Ambassador Inspiration post and today I’m using the newly released Uniko English Country Garden Butterfly II stencil. I loved all the butterfly stencils when I received them and had lots of ideas of how I’d like to use them so here they are:


I have used Distress Oxide inks to sponge through the stencil one at a time from lightest to darkest. Each time I repositioned the stencil further to the right before inking. After the inks had dried I stamped the sentiments from Uniko You Are, Yes You stamp set in white ink over the butterflies. As it’s a flat make, I mounted the panel onto a card blank with foam tape for some dimension.


My next card uses the inner part of the stencil as a mask. For this card I have simply sprayed some solution made up from Peacock Cosmic Shimmer Pixie Powder and water. I also tapped the powder over the card and sprayed again to get some more concentrated areas. I stamped the sentiment from Uniko Pure Florals: Cosmos stamp set and layered the finished panel onto green card stock and then a card blank.


My final card uses the outer stencil again but this time I have stamped the Uniko Background Blocks Party Confetti with the stencil in place. I removed the stencil to stamp the sentiment from the Uniko Birthday Sentiments set and added a butterfly stamped using Uniko English Country Garden - Butterflies set. I then mounted the panel onto a black card base. 

I hope these have given you a few ideas of your own to have a go with the gorgeous stencils. I’d love to see what you create.

Much love

Steph x


Tuesday, 22 June 2021

Two For Tuesday - Stencil Mixed Mini Geometrics

 Hello & Happy Tuesday! 


I was surprisingly organised yesterday and managed to squeeze in a little creative time. So with having all the recent Uniko Stencils still in arms reach I set to making a couple more cards using the Mixed Mini Geometrics stencil.


If you've been MIA and missed the release you can catch up HERE. There is still time to join in on the Brand Ambassador Blog Hop & GIVEAWAY! 

Anyway, let's have a look how I have used the stencil today...


For this first card I had already stamped and coloured the Pure Florals Cosmos flowers in this pointillism colouring technique and hadn't got round to adding them to a card. So I decided to create soft subtle background using the stencil and Altenew Mountain Mist ink.


I fussy cut the flowers, adhered them using foam adhesive and finished the card off with the 'Make a Wish' sentiment from the Pure Florals Cosmos stamp set.

For my second card today I have gone to the opposite end of the spectrum and gone for bright and bold...


I recently treat myself to the Altenew Detail Ink Blending Brushes and they make it so easy to apply ink to small areas and prefect from creating a rainbow effect. I selected 5 colours of Altenew inks and coloured each of the geometric shapes with a different colour. I then moved the stencil slightly and then drew inside the shapes to create this cool effect. 


As you can see I adhered my panel to a black piece of card before adhering to my bas card. I finished the bright design off with the BIG & BOLD Wish die cut sentiment and white heat embossed accompanying sentiment.

I love how different these cards are, I hope you have enjoyed them too. 

Crafty Hugs


Wednesday, 3 March 2021

Brand Ambassador Post : English Country Garden Butterflies

 Hi there!

Hannelie here today with a trio of butterfly cards !


It's been a while since I tried a new technique. I tend to stick to my usual ways. Time to do something about it...  I'm talking about print making with die cuts! So easy with a fun watercolor look! I will definitely do it more often in the future.


Card #1


Card #2


Card #3


All together!


I used : 


Thank you so much for popping in! I hope you'll leave here feeling inspired to try something new (to you) !

Hannelie

Monday, 23 March 2020

Brand Ambassador Inspiration - Pure Florals Cosmos

Good morning crafters, Julie here with a little bit of BA inspiration.

During these very difficult times we need to keep ourselves busy the only way we can, so why not indulge in learning a new technique? I found the following technique whilst seeking inspiration for this post, courtesy of the girls over at CAS Mix-up, acrylic paint backgrounds.

Many years ago I tried using acrylics for painting but didn't get on with them and the tubes lay abandoned in their box, unused and unloved. However, after deciding I would have a go, I ferreted them out from the back of the cupboard all ready to try and create a background as per the video. Sad to say that they had mostly dried out, only a Crimson Alizerin one that was usable.

I did come across some DoCrafts acrylics I bought to paint an Advent calendar for my Grandson a few years ago but the colours were too dark, except for the white. Not willing to give up, I eventually came up with this card.


Having a limited palette made me think hard about how to get a colourful but cohesive background.
The blue is straight out of the bottle, the teal is a conifer green mixed with white and the lime is white added to Altenew's Bamboo ink!

The stripes were made by placing small dots of colour at the top of the panel, then dragging an old credit card down in a smooth motion. There must have been less of the lime paint to create the patchy effect but I didn't really mind, I think it adds to the arty effect.

When dry, the sentiment and flowers were stamped in black and heat embossed with clear EP. Love the fresh look of these colours.

My second card used some of the crimson acrylic and some Mustard Seed Distress Paint, which is also classed as an acrylic. The DP is rather chalky compared to the other acrylics I used so tends to dull the overall brightness of the finished panel.


This time I tried to blend the three stripes together to create my background panel and used white heat embossing for the stamping. The finished panel was mounted on a slightly larger piece of card, edged with a YG18 Copic marker to match the orange of the background. A few sequins add a little bling to the proceedings.

So that's it from me for this month. Hope I've encouraged you to have a go, you could even enter the stripes in our latest challenge if you add a few spots or dots!

Keep smiling.

Saturday, 22 June 2019

DT Inspiration - Inky Foliage Silhouettes and Resist

Hello there, it's Sarah P here with my June DT Inspiration post.

I've spotted some gorgeous inky backgrounds with silhouettes on Instagram recently and I couldn't resist having a go myself, especially as those Distress Oxides blend so beautifully and they are always my Go-To product if I'm stuck with Mojo!

The first 2 feature a Heat Resist technique where I've stamped the images with Versamark ink then heat-embossed with Hero Arts White powder before inky blending over the top.

The Uniko sets are: Just Because, Natures Treasures I and Pure Florals: Cosmos for the 'May all your birthday wishes come true' sentiment. The Celebrate die is from Sugar Pea Designs


These next 2 use the same colour combos and same 'Just Because' set but adding 'Home Sweet Home' for the sentiments. 


I hope you like my cards and thank you for stopping by the blog today.