Showing posts with label Festive Sentiments. Show all posts

Tuesday, 20 May 2025

Brand Ambassador Inspiration - Alphabet and Animals!

Good morning, 

Steph her today. Did I mention how much I loved the Uniko Alphabet Solid stamp set during the February birthday release? So, I have used this stamp set as my focus for my Uniko Brand Ambassador inspiration post this month and teamed it with Uniko's animal themed stamps, creating some 'play on words' sentiments to add even more fun! 

First we have a 'Hoppy' birthday card using the bunny from the Uniko Hoppy Easter stamp set and the birthday from the Uniko WILD stamp set (currently unavailable).

I'm particularly pleased with this daft sentiment! The cat stamp is from the Uniko Mid Century Modern Purrfect Day stamp set. The rest of the sentiment is made from parts from the 'From our home to yours' in the Uniko Festive Sentiments stamp set. 

And finally, also a slightly daft sentiment teamed with the paw print from the Uniko Paw Print Hearts stamp set and a heart from the Uniko Falling Hearts Serenade stamp set. 

For all these cards I used VersaMagic chalk inks which give a nice effect to the silhouette style of these cards.

Thanks for visiting today.

Much love

Steph x

Tuesday, 14 November 2023

Brand Ambassador Inspiration - Holly

Morning! 

Steph here and I welcome you to my Nov Uniko Brand Ambassador Inspiration post. This month I wanted to focus on Holly.

My first card uses Uniko Framed Holly stamp set and Uniko Most Wonderful stamp set for the sentiment.


I stamped the large frame stamp using very light ink and drew over the lines with an alcohol marker, colouring in the leaves as I went. I have coloured the background in light grey and added Wink of Stella all over for sparkle. I used the extra stamps in the set to stamp individual holly leaves, fussy cut and adhered these to the card front using foam pads. 


My second card uses Uniko Snowflake Serenade stamp set and inked it in light blue. I then used alcohol markers to draw in the holly and berries. The sentiment for this card is from Uniko Christmas Sentiments stamp set. Again I added some Wink of Stella to the holly leaves for sparkle. 


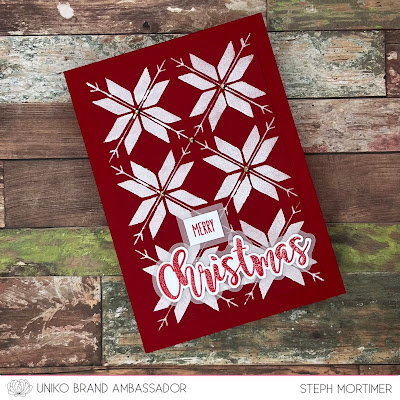
Finally I have used the holly stamps from the Uniko Winter Foliage stamp set and Uniko Festive Sentiments stamp set for the lovely large sentiment. I have added snowflakes from the Uniko Stunning Snowflakes stamp set and used the Wink of Stella on these. 

How are you all getting along with your Christmas crafting? The final card here today is very quick and easy to make if you need to get a few cards done in a short amount of time. 

Much love
Steph x

Tuesday, 15 November 2022

Brand Ambassador Inspiration - Background Blocks Scandinavian Christmas

Morning all, 

Thanks for joining me, Steph, today as I showcase another great festive stamp from Uniko. For this month I decided to use Uniko Background Blocks Scandinavian Christmas because it has been sat in my stash unused and I just knew it would look great with some heat embossing. 

So straight on to my first card:

Who doesn't love a bit of gold and blue?! Here I have heat embossed the stamp using gold embossing powder on dark blue card. I have picked out the details by colouring in shades of blue which has given a really lovely elegant look to the card. The sentiment, from Uniko Festive Sentiments stamp set, is also heat embossed in gold and adhered over the background. I have used a mat of gold mirror card to frame centre panel and I felt a Kraft card base would look rustic, although a white one would work too. 

My second card is similar in layout however I went for red card and clear embossing powder this time.


To add some variety I use various colours for the details this time and felt the sentiment would be better in white.

Finally I had a little play about with my third card.


I heat embossed the Background Blocks Scandinavian Christmas using clear embossing powder on white watercolour card (my original plan was to use watercolour paints but I changed my mind). I then stamped Uniko Background Blocks Diagonal Stripes over the top alternating the colours between red and green ink. I was aiming for a candy cane look! Again the sentiment strip was added and the panel was framed with green card before being adhered to a red card base. 

So, which is your favourite?! 

Hope you are all getting along ok with your Christmas crafting and maybe I just inspired you to dig out the Background Blocks Scandinavian Christmas stamp (or stencil!) and have some fun! 

Much love
Steph x


Tuesday, 11 October 2022

Uniko Brand Ambassador Inspiration - Christmas Stencils

Hello everyone, 

I hope October finds you well. Steph here today with my Uniko Brand Ambassador post and I am still very much on the Christmas crafting wagon! I do think Christmas craft might be my favourite.

This month I have focussed on stencils because I think you can make cards pretty quickly with stencils (if you exclude the paste drying time!), you can usually get two cards out of one run of the stencil (A6 size cards) and they add interest without adding bulk for lower postage costs.

For my first two cards today I used the Uniko Christmas Folk Snowflake stencil and white stencil paste. 


Once the stencil paste had dried I cut down the panel to make two and adhered to the card bases. I started off with the Kraft card but I definitely prefer the one mounted onto a red card base. To this, I added a heat embossed sentiment from the Uniko Festive Sentiments stamp set which I fussy cut, mounted onto velum and fussy cut again.

My next cards use the Uniko In The Forest stencil, one with white stencil paste and one with glitter stencil paste.


As the stencils are detailed and the focal point on the card I didn’t want to add anything more than a simple sentiment, again from the Uniko Festive Sentiments stamp set and also heat embossed, fussy cut and layered onto velum.

I hope these designs have given you some ideas for quick Christmas cards and ignite your passion for stencils! 

Much love

Steph x


Monday, 11 July 2022

Merry Monday, BA Inspiration with Winter Foliage Stamps and Matching Dies

Good morning, Julie here with some more ideas and inspiration to encourage you to make a start on your Christmas makes. Today I'm using the Winter Foliage stamps and matching dies and a new to me technique I stumbled across on You Tube recently. Here's a look at the three designs I came up with.


I was looking at a Marion Emberson video and she was raving about a video of a technique she'd just seen, so I went to look too. In the You Tube video, Ann Melvin uses Kitchen paper to die cut foliage to give a 3D effect. You Tube also suggested another video here that pre dates the first by the Memory Box guy. Thinking this looked something I could use for my post I had a play. 
I wont go into the process of making the die cuts as the video does it much better but I will explain how I made each card!

My first card uses a couple of the pine branches and pine cones, together with a text panel I made a couple of years ago.


Once I had cut out my elements, I added some water colour paint to the die cuts and left to dry. Using the left over from the die cutting, I placed it in my MISTI to use as jig to stamp my elements with the matching stamps. The boughs I stamped with Evergreen Bough DI and the cone with Ground Espresso DI. Now in the video there was no mention of the layers parting from one another which happened to mine, but a little dab of glue secured them back together! To make it more Christmassy, I added in some Inka Gold wax watered down with a little plain water, with a fine paint brush.
My panel was made for this BA post a couple of years ago, the process is quite involved so I made a load at the same time and kept them for use later! I trimmed the background panel, clear embossing on kraft, then added stamped and die cut elements. The finished panel was finished with a twine bow and added to my off white, A6, base card.

This second card uses two of the holly leaves and one of the berry clusters over another sentiment stamped background. This time I kept it very simple and just added a circle from the bits box, stamped with Season's Greetings from Christmas Sentiments and the holly and berries. 


My text panel was slightly too small for an A6 base card, so I trimmed it down to leave a thin, white border down both sides. The holly was painted as before with watercolour, then stamped in Pine Needles DI and the berries I left unstamped, just watercoloured and a few dots of white gel pen. This time I added some Wink of Stella to the die cut and stamped elements.

My final card uses the last of the holly leaves and berry cluster in a more contemporary slimline design.


After adding water colour and stamping the leaves as before, this time I added some Versamark and clear EP and heat embossed. It took a couple of goes as the paper towel is very absorbent. The definition on the leaves was lost in the embossing process, so I scored in the veins carefully, with a craft knife.
On a panel of white card I stamped the large sentiment from Festive Sentiments in black and added the embossed leaves and berries. A doodled border using a black fine liner completes this element. 
When I'd finished the panel and placed it on the plain white card, it looked a bit uninteresting, so I stamped a couple of the Background Blocks Wonky Stripes in black on another piece of card, then added that to my base card before the top panel.

Well I hope I've given you some ideas to kick start your Christmas makes, so for the moment, thanks for stopping by.

Stay safe and keep crafting!!   

Friday, 12 March 2021

Festive Friday - Brand Ambassador Inspiration

Good morning all, Julie here with another Festive Friday post featuring three cards on the same colour theme.

I'm still determined to get ahead with my Christmas makes in the hope that I wont need to be in a rush later in the year and this month I've been inspired by the colours over at CAS Christmas, so why don't you grab yourself a cuppa, sit back and check out these makes.

This first card uses the Christmas Pop trees as well as BB Falling Snow and a freebie snow stencil from a magazine. 
The two Christmas Pop trees were stamped and heat embossed with white EP before trimming down and edging them with red ink. The third snowflake one was made by tracing the shape of one of the others, cutting out from kraft card, then stamping with BB Falling Snow and embossing in white EP. On a scrap panel of kraft, I stenciled the snow using some Ranger Texture paste over the top 2/3rds and when dry added the strip of red, white and kraft coloured DP to the bottom. Arranging the trees over the DP, the finished panel was popped up on pads over a kraft base card, a trio of red gems complete. 


You can't get much simpler than this one layer card. Festive Sentiments Outlined and a holly sprig from Framed - Holly, stamped and embossed in white EP, 3 tiny red crystals for the red berries all on an A6 kraft base card. You could use any large sentiment here, such as Festive Sentiments, or even stamp it in black. A great design for mass production?


I've used Background Builders Christmas 2018 before to make a plaid pattern before, here and here. This time I've used a panel of kraft card, red ink, a white gel pen and a black fine liner to make a panel to cut my letters from. The kraft is obviously darker and very absorbent so the red is not as bright as it would be on white, but using my Misti I was able to go back a couple of times to deepen the colour.


You can see that I made a couple of mistakes with the stamping and line drawing but there was still enough left for me to cut out all the letters I needed, waste not want not!
The Wishing You is from Festive Sentiments and Christmas from Most wonderful were stamped onto the off white base card in black before the die cut merry was added on matching red foam letters.

So that's all from me for the moment, hope I've given you some ideas to get your Christmas stash rolling!
Stay safe and keep crafting 'til next time.

Friday, 22 January 2021

Festive Friday - Get more from your sentiments, some BA Inspiration

 Good morning, hope you are well and keeping safe and sane! Julie here with a little bit of Festive BA Fun this Friday. 

I have made a resolution to make Christmas cards all through the year, so that I'm not rushing around at the end of November making them like I was last year! Hopefully I won't have as much time on my hands this year, meeting up with friends and relatives will be at the top of my agenda, so I need to use this 'free' time to get ahead. So far I've made four!

So for my first Festive Friday post, I am concentrating on SENTIMENTS. Yup those little stamps that come with the more interesting stamp sets or the fab sentiments sets such as Festive Sentiments and Most Wonderful. 

Another resolution I made towards the end of last year was to use up my scraps and backgrounds that I have accumulated and it was after rummaging through these, that I got the idea for my theme for this post.

My first card uses a LOT of sentiments that I got together from my Uniko sets, some old and some new, some current, others sadly retired. I made them way back in 2019 but didn't use them all and in the spirit of waste not want not, here is my card design.

To make the panels, I started by laying an A5 panel of card in my MISTI, then arranged the stamps to cover the whole area. When satisfied with the arrangement I closed the MISTI door and inked up the stamps with Versamark and then stamped on to the card panel, added clear EP and heat embossed. I didn't remove the stamps and used a selection of different coloured card in festive colours to create multiple backgrounds which I can use later. A selection of little stamps were used to fill in any gaps too small for a sentiment.

For this card I took a bright red stamped panel and added it to an A6 card base, trimming off any overhang. The snowy landscape was cut twice using a Marianne die and added to the bottom of the card and excess trimmed away. A little Wink of Stella adds a bit of sparkle. No need for a sentiment as they are there in the background!

Here are a couple more ideas using the same technique that I made with the first of my panels, you may recognise them. 


Just click the image if you want to find out more.

Of course sentiments aren't just for Christmas, you can use any of your sentiments to create a background!

Keeping up the theme of making sentiments center stage, here is my second card. 


This uses a few sentiments in different fonts and sizes that I stamped onto card, heat embossed with fine white EP and trimmed down. The colour of the strips were chosen to match my backing which I stamped using Background Blocks Falling Snowflakes and the separate snowflake stamps from Snowflake Serenade in non traditional colours. I used a die cut funky Christmas tree as a template to create the centerpiece, adding each trimmed down strip starting from the bottom. A star punched from holographic card and a holographic gem on the red pot complete. The completed panel was then added to a red A6 note card. 

Here is the same idea from 2019 using a more traditional colourway.


So that's about it from me for today. I hope I've given you a few ideas for using those very useful sentiment stamps.

Stay safe and keep crafting!


Tuesday, 15 December 2020

Countdown to Christmas Day 15 - Time Hop Tuesday!

 Happy Tuesday!


Today I am deciding to go back in time and specifically I am Time Hopping to October 2017 and the Uniko Christmas release of that year! It was a small Christmas release that year, but it contained some firm favourites and what's not to love, reminiscing about Christmases past is a pastime I am sure.


This was the year Festive Sentiments was released, along with Background Blocks Wonky Stripes. Both of these are still fabulously on trend and this card, though long gone to a forever home is still a favourite make of mine.


This one card combined quite a few popular Uniko clear stamp sets, the flowers from Flower Power #1, the pine sprig from Winter Foliage & the green foliage stems from Organic Wishes.


As I usually have two cards on a Tuesday for you, I have another from this October 2017 Christmas Release to share with you.


This one again uses Festive Sentiments and Background Blocks Wonky Stripes. This time paired with the holly leaves and berries from Winter Foliage. I love this crisp colour scheme of white & black with the minimal Christmas red and green. 


That's all from me today, I hope you have enjoyed this hop back in time with me? 

If you were to hop back to a favourite Uniko product release, which would it be? Would it be a Christmas stamp set or an everyday / floral set? I'd LOVE to know.

Drop a comment below with your answer and I'll choose a random comment from across Social Media to win a prize :) 

Until tomorrow, thank you for stopping by. Crafty Hugs Bev x

Tuesday, 23 June 2020

Brand Ambassador Inspiration - English Country Garden

Good morning friends, Julie here with a little bit of Uniko summer inspiration.
I needed to make a card for my daughter's birthday, so decided to use the English Country Garden stamps and matching dies to create a floating frame design. I also ended up with an extra card from the left overs, definitely a win win!


So grab yourself a cuppa and settle down to a photo heavy post!

To start I die cut a stack of blanks of both the large and small butterflies before stamping them and colouring with Copics.
I find the best way to batch stamp is to use my MISTI and the waste from the first die cut to create a jig, so that I can place the blanks back in and then stamp away, replacing the blank after each stamping. I saved my jig from a previous project.
Once I had enough butterflies, I arranged them over a panel of copy paper trimmed to 41/2" by 61/2", not worrying if they hung over the edges. 
Using some Press n Seal, I overlaid the butterflies and pressed down especially between gaps. The Press n Seal allows you to lift the project up and then trim away the over hanging elements. 
This is how it looks part way.


This is it fully trimmed.


Without removing the Press n Seal, I cut a rectangle from the center with a die, it will cut through all layers if you take it steady!


Put the center to one side and flip the frame over and carefully remove the white copy paper, adding foam tape to the different elements.


After removing the backing from the tape, place on a 5 x 7 base card and press firmly once in position. Then very carefully remove the Press n Seal. You can stamp a sentiment directly into the center of the card but I chose to add a layered one to add some extra interest and bling. The sentiment is made up of bits from three different sets, You Are, Yes You, Birthday Sentiments and Festive Sentiments and heat embossed with platinum EP. A few holographic gems were added to complete.


Now back to the middle we put to one side. To frame the central panel, I decided to cut a thin frame using a rectangle of matching card and a slightly smaller rectangle die. I found that its easier that way than cutting the center out and trying trim down to size. If you do need to trim then I found replacing the die cut center works well in keeping the frame from distorting too much.

Instead of popping these butterflies up on foam, I simply glued them down flat onto a 5 x 7 card base, adding the frame and a simple sentiment strip from Simply Said. 


Here are the two finished cards together.


I do apologise for the photo heavy post but I hope it has inspired you to have a go yourself, its such an effective technique and you don't need to use butterflies, any die cut images will work.

So that's all from me, keep safe and sane 'til next time.


Thursday, 27 February 2020

Brand Ambassador Inspiration: Two more birthday themed cards

Morning all.
Julie here with some more cards to keep the birthday party running here at Uniko.


As you may know, we're celebrating Uniko's 8th Birthday.  We've had the Birthday Linky Party .....


...and there's the amazing Birthday Giveaway where one lucky winner will receive a fantastic prize.


Today I have a couple of birthday cards to share, one feminine and one more unisex.

Here's my first card using the recently released Hello Lovely and a sentiment made up from elements from both Birthday Sentiments and Festive Sentiments stamp sets. Yes I said Festive, Happy is not just for Christmas!


I thought I would include some pics of the make for this post, I usually forget until I have almost completed the card but this time I made a special effort, not so much for this card but for the second!

 Here are my elements, the peony cluster stamped and heat embossed with white EP, watercoloured and then fussy cut, a 5 x 7 white base card and a 61/4" x 4 1/4 " panel of matching card with an oval cut out.


I arranged my spray around the aperture and then placed the panel over the base card and traced the outline of the opening with a pencil. I then placed my base card in my MISTI and added the sentiment, stamping in black Memento. You need to rub the pencil out now!


To finish I popped the panel up on pads over the base and added a few sequins.


Now for my second card. 
(Just to warn you, this is a photo heavy description)
It's an interactive one, inspired by this this video on You Tube.


I started by inking a 9.5cm x 14.2cm white card panel with the Scattered Polka Hexagons stencil in bright colours, then cut a slot in it 11/4" x 1/4" as shown below. I also cut a strip of card 1" wide from A4 and scored at 2" and 21/2". From some scrap card I also die cut some balloons and inked them with bright colours. You could of course use coloured card if you have it.


You need to ensure that your central balloon is the largest and you have a slightly smaller balloon in the same colour.
Now comes the assembly, looks way more complicated than it is.
The die cut balloons were added onto the stenciled panel, mainly around the edge and trimmed back to the edges of the panel. 
On the 2" end of the long strip I added some strong double-sided tape and then the smaller of the pink balloons which was stamped with a sentiment from the Anniversaire Arts set, the edge of the balloon is just touching the fold. I did have to trim the excess white card away, you can take away but never add!


On the large balloon, I stamped the sentiment from Birthday Wishes and then added it over the top of the first onto the 1/2" space on the strip with just the widest part hanging over the fold.


Now its time to add this mechanism to the card. 
The long section of the folded strip was slipped through the slot and secured to the base with more strong tape, just on the edge of the smaller balloon, making sure the large balloon was central on the panel.


Flipping the panel over I added more tape, keeping it away from the mechanism.


Then added it to an A6 black card which I had trimmed down by 1cm so that there was room for the pull element in an envelope.


By pulling the end of the strip the top balloon flips back to reveal the hidden sentiment.
I trimmed the excess card from the mechanism and added a pull instruction, some hi-lights with a white gel pen onto the balloons and some strings for the balloons with a black fine-liner.


And breath, told you it was a photo heavy post!
Well you may need a lie down in a darkened room after that but hope I've inspired you to have a go and perhaps join in with our birthday theme, you've only got a few days left!

Thanks for stopping to read until the end, see you back soon.