Showing posts with label Framed - Floral Vines. Show all posts

Thursday, 31 August 2023

Brand Ambassador Inspiration - Fantastic Foliage


Good morning, crafters

Anita here, and today I have two cards for you, both using different Uniko foliage sets.  I've had these sets in my stash for a while but this is the first outing for both of these!  Two very different stamps and two very different cards.

First up, I've used a beautiful stamp set which is part of the Framed series, Framed - Floral Vines...


I chose to use a pale grey cardstock for my main panel.  I began by stamping the image in Antique Linen Distress Ink.  This is the ink colour that I always use for this technique, where I want to colour the image and then re-stamp and emboss after, as it is pale enough to disappear under the final embossed lines.  So after stamping I coloured the leaves and flowers with Copic markers.  Then, with the stamp still in the same position in my Misti, I re-stamped in VersaMark ink and heat embossed in white.  I added the sentiment in black, which is from the Birthday Wishes clear stamp set, before trimming down the grey panel and also the card base to fit the ratio of the framed image.


For my second card I've used the Large Background Sketched Foliage stamp...


This is a technique I've not used in a while - layered emboss resist.  A little time consuming but you can create some great effects with it.  I just used one layer on this example but you can use multiple layers if you choose inks with varying depths of colour, starting with the lightest.  I began with a white cardstock panel and roughly ink blended using Distress Oxide in Twisted Citron and Mowed Lawn.  I then left it to dry before stamping the image in VersaMark and heat embossing in clear.  The clear embossing powder ensures that the ink shades you've applied on the first blend are trapped under the embossing.  I then ink blended with the darker shade, Rustic Wilderness, over the entire panel.  The embossed areas then just need a buff with a soft cloth to wipe off any ink being resisted.  For a little interest I added some water droplets and blotted these away to remove some of the colour.  The panel was die cut with a stitched rectangle and I added a strip using a sentiment from the Simply Said clear stamp set.


I can't believe it will be September tomorrow, it doesn't feel like we've had summer yet here in the UK.  I'm not quite ready to start with the autumnal projects yet so let's hope September will bring summer back, at least for a little while!

Thanks for popping by today.  I have a little time off work next week so I may be back sooner with more inspiration for you.


Saturday, 17 April 2021

Brand Ambassador Inspiration - Birthday cards

 Bonjour !

Izzy here with inspiration cards combining products of the last release as well as older products. 

April is for me the busiest month in my agenda in terms of birthdays. I have at least one birthday to celebrate each week, so I really need to make cards !

As I still had all the products of the last release on my desk, I played with them again.


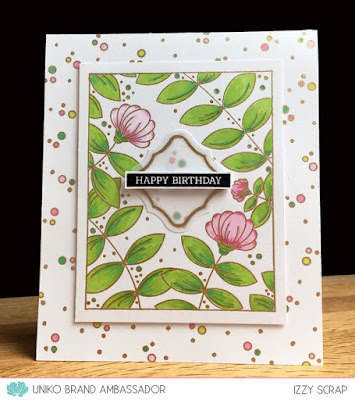
For my first card I used the Framed- Floral Vines set that I really love, it is so versatile. On a white card stock I stamped the frame and I heat embossed it with gold embossing powder. Then I coloured it with markers. 

When I wanted to mount this panel on the double white card, I found that something was missing so I played with the little circles from the Floral Vines set and I stamped and gold heat embossed them on the double white card and I coloured them with colour pencils. 

I foam mounted the framed panel on the double card. I stamped and gold heat embossed a little frame on a piece of Vellum. I fussy cut it and I glued it on the panel. To finish I stamped and I heat embossed the sentiment from Simply Said Blocks and I adhered it on top of the Vellum.


I went for a masculine look for my second card. If you know me, you know how much I love blue. So when I received the last release, I couldn't resist and I stamped the Background Blocks Solid Wonky Stripes in shades of blue. And of course I immediately saw some waves and I knew that I wanted to combine it with the Nautical Treasures sail boat. 

To make a visual game with lines, I also stamped some thin stripes on the sails with the Background Blocks Pinstripe

To finish my card, I stamped and white heat embossed the sentiment (from Simply Said). I foam mounted the wonky stripes background on a double card and I also foam mounted the sail boat previously fussy cut.


For my last card, I opted for old goodies : the Spring botanicals Tulip stamp set and the Broken Lines stencil.
Some time ago I received a gift card for a Art Supplies shop and I finally bought the Minc foil applicator machine. Only recently I bought some gel to use it with stencil. I decided to try it as a background for these beautiful tulips, and I really love the result.

I used the no-line colouring technique for the tulips and I played with my colour pencils to give them some dimension. The broken lines background is foam mounted on the double red card and I adhered the tulip with little adhesive foam squares.

Now here is a sneak peek of the birthday card I made for the Less is More challenge that starts today...


I hope that my cards will inspire you to make your birthday cards stash growing and/or to come and play along at Less is More.

Thanks so much for visiting today. Have a fabulous weekend, stay safe and get crafty !


Saturday, 27 February 2021

Introducing... Floral Vines and Framed - Floral Vines


Hello & Happy Weekend!

Welcome to Day 3 and the last of the 9th Birthday February 2021 Release product introductions. If you missed any of the sneak peeks, you can catch up HEREHERE and HERE. AND you can catch up HERE and HERE with the first two days of product introductions!

Today I am introducing the last two of the new clear stamp sets for this release, Floral Vines and Framed - Floral Vines.

So lets have a look at these in action...


First up is Floral Vines. This is a mini £5 set that contains one half of the floral vine frame and a mix of everyday sentiments in this fabulous font. 


For this one layer card I simply stamped the floral vine image to create a nice framed area for my sentiment to sit inside. I've coloured the flowers with a selection of bright Copic Markers which really makes this card pop.

Next I have a card using the next in the framed series, Framed - Floral Vines. I decided to make another one layer card.


For this I have simply stamped the frame and coloured with Copic Markers and used the same Happy Birthday sentiment from the Floral Vines set.


There is more to these two sets, some more sentiments contained in Floral Vines that I haven't shown and some accompanying images that I have yet shown from Framed - Floral Vines. To see those you will have to pop back tomorrow for the full reveal on RELEASE DAY! 


Short & sweet from me today as I prepare for the release tomorrow! Until then, I'd love to know what your thoughts are regarding these sets and how you might use them! might even select a random comment to win a prize.


Don't forget, there is still time to join in on the Birthday Linky Party HERE and also enter to WIN the HUGE Prize HERE!


Until tomorrow, thank you for stopping by.

Crafty Hugs