Showing posts with label Merry Christmas. Show all posts

Wednesday, 3 December 2025

Brand Ambassador Inspiration - Wednesday Wreaths

Morning all, 

Steph here today and for my Uniko Brand Ambassador post this month I thought I would focus on the Uniko Mid Century Modern Wreath Builder stamp set since we gave some love to the Uniko Mid Century Modern Baubles stamp set last month. 

On this card I have stamped the wreath outline twice, rotating a little between stamping, and coloured with alcohol markers. To this I added some stamped and fussy cut berries and bows. Finally I stamped the sentiment and adhered using foam pads. 

Here I have offset stamped the wreath using the outline and block stamps. I have added bows and berries stamped onto coloured card and shaded using alcohol markers. The sentiment has been stamped in blue and black ink giving and offset appearance. 

For my final card I stamped the wreath using the block stamp only and onto white card. This was fussy cut before holly leaves and berries were added. The berries also have glossy accents added. Finally I used a piece of green card to add the sentiment. 

I do love these mid century modern sets, there is so much possibility with them. I'd love to see what you are inspired to make and don't forget to tag Uniko in your projects too. 

Much love

Steph x

Tuesday, 12 November 2024

Brand Ambassador Inspiration - Fairy Lights

Good morning, 

Following on from the lovely new release from Uniko at the end of Oct, one stamp really called out to me and that was Uniko Framed - Fairy Lights. I have used this stamp for my Brand Ambassador inspiration post this month and found that it teams very nicely with Uniko Mid Century Modern Baubles. 


Here I have heat embossed the fairy lights using red glitter embossing powder and coloured the lights in using a green alcohol marker and silver and gold gel pens. The bauble and sentiment are also heat embossed. 


This card is similar to the last one but I have used green glitter embossing powder instead and also used the embossing powders for the bauble and sentiment. 


Switching to gold embossing powder and colouring the background in meant I could leave the bauble white to let it stand out. 


Finally I used the fairy lights stamp in a landscape setting and stamped using dye ink. I coloured the lights using alcohol markers and added some shimmer with a Wink of Stella brush pen. 

I hope you loved the new Uniko release as much as I did. Look back on the Uniko blog to see lots and lots of brilliant inspiration from the Brand Ambassadors during the release introductions.


Much love
Steph x

Saturday, 9 November 2024

Saturday Spotlight - Pure Florals Poinsettia

Happy Weekend.

Today I thought I would put Pure Florals Poinsettia in the spotlight. I started colouring this poinsettia during the week and finally I got to finishing it last night. 

As you know I am not an expert at colouring, I'm far from it. But now and then I like to dabble and have a play.


I decided that it would be less daunting to colour if I stamped the poinsettia onto a pink card stock base. So I had a look through my stash and found this old Stampin' Up! card. I'm not 100% sure what the colour is but it's a soft pretty pink. 

I stamped the poinsettia in C9 Cranberry ink and set to colouring using my Prismacolor Pencils. I used PC292 and PC195 and white for the centre. 


After I'd finished colouring, I decided to add a little detail and fussy cut along a few petals. I trimmed the card to fit my white card base and adhered using foam tape.

To finish I added a sentiment combination from the set onto a strip of white card and cut ribbon tails into one end. Lastly adding a few Cranberry enamel dots.


Before I go I thought I would share a couple more cards from the archives and the Pure Florals Poinsettia Pinterest page. 


On this first card I stamped the poinsettia in black onto white card and created this partial fussy cute panel, colouring the centre of the flower with gold ink. I then adhered the panel to the red card base using foam tape.


On this second card I went for a classic red, white and kraft colour combo. I heat embossed the poinsettia on red card and then die cut it using a circle die, layering it with this fun loopy scalloped die which is an old one from Papertrey Ink. Before layering on my card I added a layered ribbon banner. 


Lastly I am sharing this first card from the original release of Pure Florals Poinsettia. Here I simply stamped the flower on two shades of red card. I fussy cut the bottom layer and then for the top layer I partially cut the flower out to add depth and dimension. I finished with another of the sentiments and white gel pen to the centre of the flower.


That's all from me today, I hope you have enjoyed this little spotlight feature on Pure Florals Poinsettia.

Crafty Hugs
Bev


Monday, 25 December 2023

Merry Christmas & Uniko's Customer Top 10 of 2023 - Number 7

Merry Christmas! 

Wishing you all a wonderful day and sending much love from me here at Uniko. I am here continuing with Uniko's Customer Top 10 of 2023. Today we have the 7th most purchased clear stamp set, Mid Century Modern Frames. 


Seems as though there is a bit of a theme appearing within the TOP 10! So my card today as it is Christmas Day has a festive spin...


Mid Century Modern Frames joined the Uniko Mid Century Modern line up in January this year and it fits in just nicely. You might wonder where the large star is from & that is from the most recent Mid Century Modern Baubles. 

If you know me, I like Uniko products to compliment each other and that's what I did here. Mid Century Modern Baubles was designed with Mid Century Modern Frames in mind. I chose the same font for the sentiments and I added the star in a larger version from this frame.


With all the chaos of Christmas, I kept my card simple today. I used gold pigment ink on Midnight card to stamp the large stars and simply stamped the frame and sentiment, fussy cut it out and adhered using foam adhesive after adding a little colour.

That's all from me today, I am now off to veg out before I fall asleep with a full belly and a happy heart. I wish you peace & love whatever your Christmas Day is for you.

Thank you for joining me and Merry Christmas from my home to yours. 

Crafty Hugs


Tuesday, 19 September 2023

BA Inspiration - Mid Century Modern Baubles

Hi all, 

Steph here and this month I wanted to do a Christmas Uniko Brand Ambassador Inspiration post as even if you aren't Christmas crafting yet, you can always look back on these posts for some inspiration. I focused on the Uniko Mid Century Modern Baubles stamp set as I had so much fun playing with it for the Jul/Aug release and I liked the way some of the other BA's concentrated the smaller stamps.


First I went with a traditional bauble design but gave it a twist by using other Uniko stamp sets to 'decorate' my baubles. The yellow bauble uses Uniko Background Builders: Christmas 2018 to create the scandi pattern. The teal bauble uses Uniko Background Blocks Scandinavian Christmas to create the gorgeous Christmas pattern. The navy bauble uses Uniko Pattern Building Christmas Tree set to create the striped pattern and the sentiment is from the Uniko Christmas Sentiments set. 


For my next card I went with a similar colour set but used the smaller stamps from the set and a nifty tool called a Rotate Mate. This time I used the sentiments from the same set too.


My final card uses a different colour set and as I was adhering the Christmas sentiment I realised this could easily be a birthday card also. This card uses the one bauble to create a mandala or flower effect. I used orange, red and maroon to stamp the baubles.

That's it from me today but I hope you found something to inspire you to break out the Christmas stash! 


Much love
Steph x

Friday, 25 August 2023

Festive Friday Mix

Hello & Happy Friday.

Another week of the school holidays is almost over and in honest truth, I'm not quite ready for them to end. Just one more week and a couple of days to go. Plus a week tomorrow The Beans turn 9. THAT, I know I am not ready for! 

Firstly I am nowhere near prepared celebrations wise, a party to organise, cakes to make and everything in between. Secondly, they are growing up way too fast and it's like this instinct of wanting to keep them little for as long as possible.

Anyway, enough of my sentimental rabbling, let's get to my card....


Last week the most recent release restocks arrived along with a few other requested clear stamps. One of them was Rustic Wreath. So I had an inspirational creative moment and decided to pair the Rustic Wreath with sentiments and elements from Mid Century Modern Wreath Builder.


I'm pleased with how this turned out, I was unsure as to how the modern rustic look would pair with the quirky Mid Century style, but I like it. 


A bit of dimension on this card with the white stamped panel and the bow adhered with foam tape. But still it will get through normal post as my tape is the 1mm thick, so 2mm in total plus the card thickness. 

I hope I will get some time this evening to create once appointments, swimming lessons and dinner is done. The Beans are off to the PIL with their usual Friday night sleepover.

Have a lovely day! 

Crafty Hugs 

Saturday, 19 December 2020

Countdown to Christmas Day 18 - All Wrapped Up!

 Hey!


Still playing catch up, haha! 

Yesterday, Friday was a better day stress level wise, but it was a busy one. The last day of school for The Beans, so it was a day of 'get as many jobs done as possible' kind of day! I tell you something, those 6 hours they're at school flies by. 

My main task was to get the final Christmas gifts wrapped up & Christmas cards written and in the mail to ensure they will arrive before Christmas Day.

Normally I don't make much of a fuss about wrapping paper selection or gift tags, but this year I have put a little more thought into it. This year I have 2 categories, gifts wrapped from Santa and gifts wrapped from mummy and daddy! 

First up is the wrapping & tag design for the gifts from Santa! 


This year I have gone for the classic brown paper wrapping. I love the simplicity of brown paper wrapping and it gives you endless options as to what you choose to embellish with. As you can see I have chosen red & white gingham ribbon to tie the package up. 


And it only seemed fitting to choose the Santa from the Jolly Santa clear stamp set for my tags. As I have a few tags to make for the gifts from Santa, I have kept the design simple and fairly easily mass produceable. I've coloured with Copic Markers and added glitter to his hat and coat trim.


Next is the wrapping & tag for gifts from mummy & daddy and used for other members of the family too. These will be placed under the tree before Christmas Eve. 


My wrap choice was simply a roll I had leftover from last year! For the tag I decided to use the Christmas tree from Jolly Santa as I often neglect this stamp. Again with a few tags to make I have kept the design nice and simple.

I've still some wrapping to do for both categories and have boxes stacked in my studio with everything inside waiting! Looks like hubby and I have a few late nights ahead as we like to build some of the gifts from Santa so they are ready to be played with and we don't have the stress of impatient Beans waiting Christmas morning. This year it is Lego again with the final additions to their Super Mario Lego and now Minecraft.

How about you? Are you all wrapped up for Christmas? Do you wrap with a theme or colour scheme? I'd love to know :)

I'll be back later this evening with todays Countdown to Christmas and then I am all caught up! 

Thanks for sticking with me, Crafty Hugs Bev x

Monday, 7 December 2020

Countdown to Christmas Day 7 - Merry Monday!

 Happy Monday!


Welcome to day 7 of the Uniko Countdown to Christmas. Today I am in a Merry mood as I feel like I am almost caught up on various things in the studio & with Christmas! So I am following suit with my Merry mood and sharing some BIG & BOLD Merry Christmas cards with you...


My first card is super CAS and is really easy to make when you have a stamping platform, so even though it looks time consuming, it isn't. It is a design easy to mass produce and with the Altenew layering ink collections, the colour varieties are easy and effortless too!


For this card I used Rouge, Crimson & Velvet from the Red Sunset ink collection and I also stamped and embossed the last Velvet layer with my favourite Stardust embossing powder. The layers of coloured card are what I had in my scrap box and they match the ink colours really well.
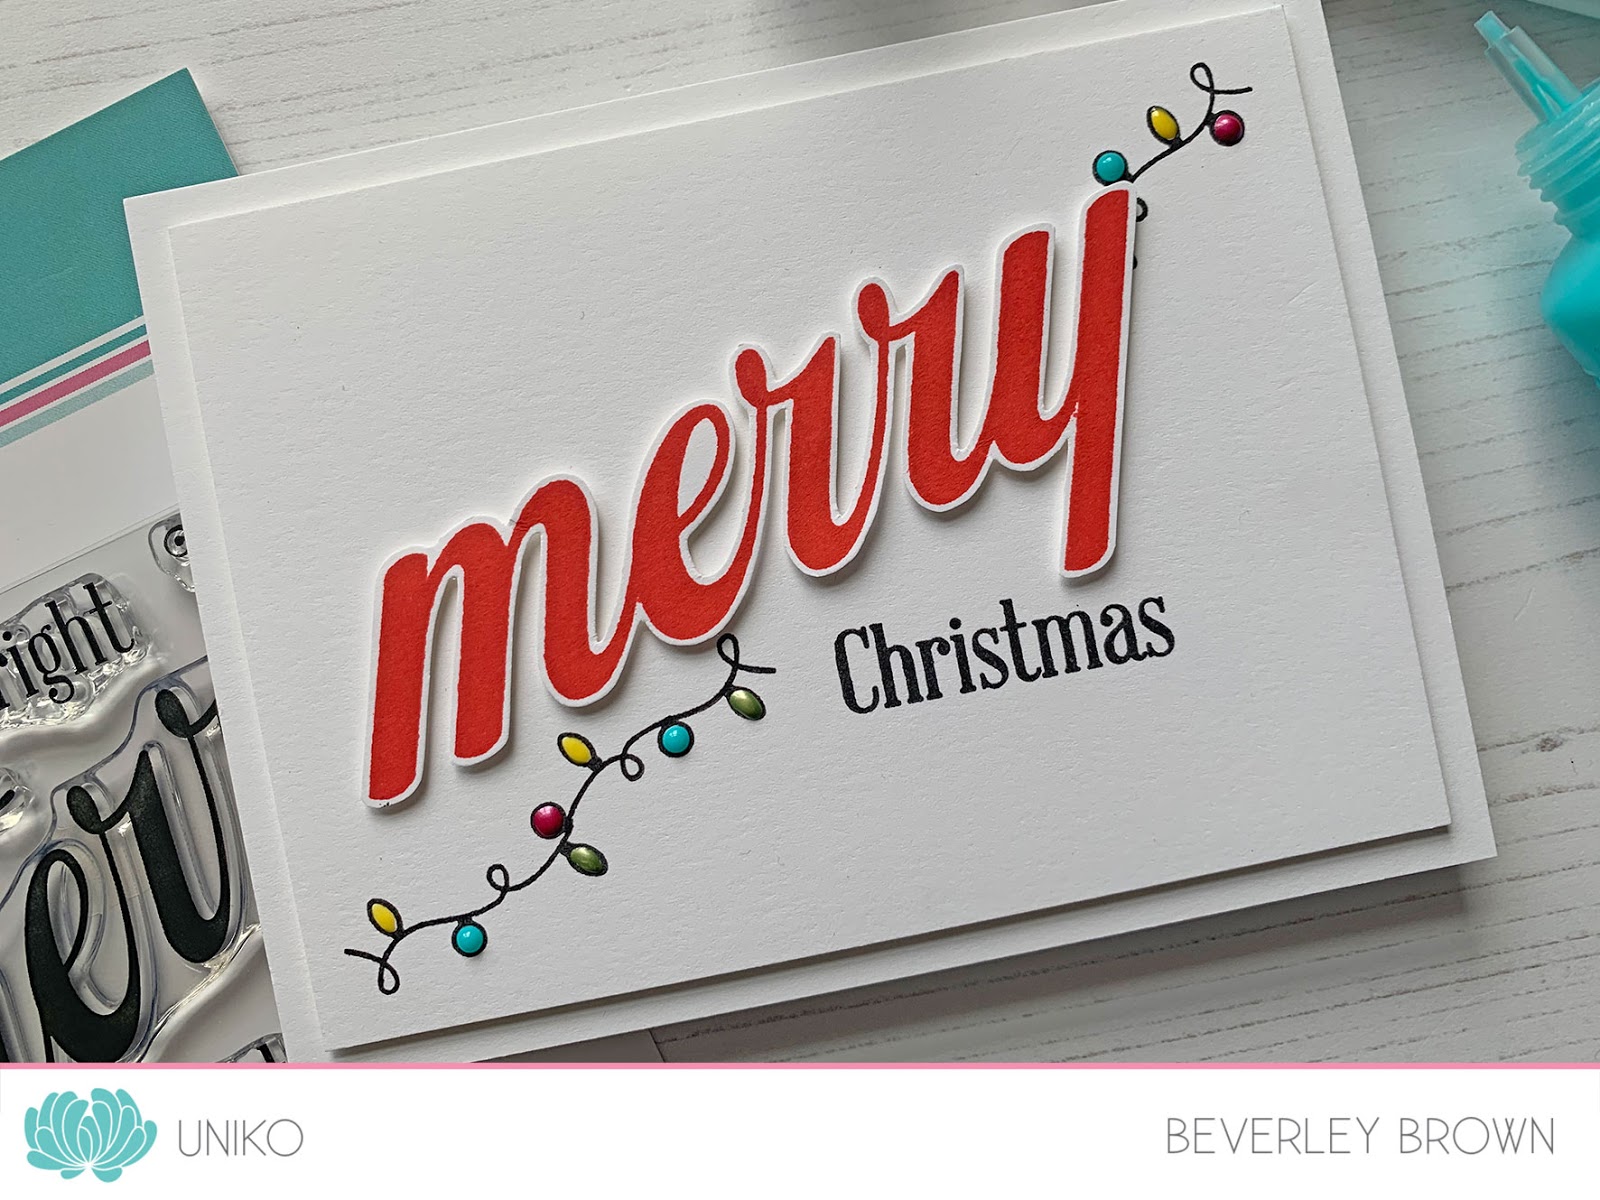

For my next card I again went CAS and this time with a non-traditional colour scheme. The BIG & BOLD Merry is stamped in Aqualicious ink from the Altenew Sweet Dreams collection. The coloured card stock layer is Concord & 9th Aqua Sky.


I drew two pencil lines to be able to stamp the little string of lights from the set and then used Nuvo Drops in pastel shades to colour the baubles.


That's all from me today, but I hope you're having a Merry Monday! I will be back again tomorrow with more to share.

Crafty Hugs Bev x


Tuesday, 1 December 2020

Countdown to Christmas - Day 1 Trimming the Tree

 Hey & Happy Tuesday! 


What a wonderful Release Day :) 


Thank you so much for all the lovely comments on the blog & around social media, they really make me smile and add that special touch to a release. Thank you too for all the amazing orders, I am working on getting your orders packed and posted as quick as I can.


Before I get to sharing my card for today, I have a couple of randomly selected winners of the £5 eGift to announce from the comments left on the Introduction posts on Saturday & Sunday. 

The first lucky comment selected by random.org is...

Lovely duo of festive cards. Really like the gold embossed version. Love how easy each leaf is to colour in different shades due to the centre stripe. Can't wait to see the whole set of new sentiments because the fonts look GREAT! 

Hugs, Sarn xxx


And the second comment selected by random.org is...

What a clever idea Bev with your 'pulled crackers. you have a wonderful imagination and I like the use of your polka dot paper and the clever stamping of your explosion. xx


Congratulations Sarn and Carole! Please send me an email to bev@uniko.co.uk to claim your eGift codes. 


Before I go today I managed to squeeze in a little creative time to make one CAS Christmas card. I ran out of day light to take photos, so I apologise in advance for the glare on the Nuvo Drops! 


I've had this card idea in my head ever since I designed the Stencil - Christmas Pop Trio. Don't you just love it when an instant idea comes to mind?! This is a fairly quick and flat design, which is perfect for mass producing and easily mailing.


I used Altenew Just Green ink to ink through the stencil. I then used the little string & lights from BIG & BOLD Merry clear stamp set for the tree lights. I added colourful Nuvo Drops to the lights and added a simple Merry Christmas sentiment from Simply Said II. 

I can't wait to find time to play with the other two Christmas tree designs on the stencil! I've made more Christmas cards than I normally have by the 1st of December, but I know I still need a few more. I think with not being able to meet up with people like previous years, I will be sending more this year.

That's all from me today! I will be back tomorrow with more to share. Until then, thank you for stopping by & don't forget to comment on the Release Day post HERE if you haven't already for the opportunity to win another eGift code.

Crafty Hugs Bev x


Monday, 14 October 2019

Merry Monday!

Merry Monday!

With Christmas only weeks away, I thought it was time to begin a 'Merry Monday' feature where I share projects using Uniko Christmas products. The hardest part of any blog post, is deciding what product to use and where to find inspiration.

Anyway, when the post arrived this morning the decision was kinda made for me today. My copy of Creative Stamping magazine arrived and I am super happy to share a peek of a product feature I am honoured to have in this issue.


The product I decided to focus on for the feature was one I didn't show enough inky love to last Christmas, BIG & BOLD Merry...


This clear stamp set, though it be a mini £5 set can pack a punch and has lots of creative possibilities when you get creating with it.


Here is a peek at just two of the cards I made using this stamp set and only this stamp set. The one below is one of my favourites and though it was fairly time consuming, it is one I hope to replicate in other colour ways for one of my Christmas designs this year.


For more information and to look at my bonus card, head on over HERE. And to not be a cop-out for my first Merry Monday feature I made a new card using the set to share with you...


Another clean and simple design with some festive colours, fussy cutting and colourful Nuvo Drops! I think this card took about 20 mins or so and the longest part was the fussy cutting of the bold merry. Why oh why haven't I got dies for this set yet?!


I just love this Cherry colour of ink from The Stamp Market and it stamps beautifully too. And just look at the colourful Christmas lights accented with Nuvo Drops, a match made in heaven! 


That's all I have to share today, I hope I have inspired you a little to get Merry this Monday and break out your Christmas supplies! 

Thanks for stopping by.
Crafty Hugs


Tuesday, 4 December 2018

CAS Colours & Sketches #301 - Seasonal Colours

Hello December!

The countdown to Christmas has begun and over at CAS Colours & Sketches the Design Team are getting into the festive spirit too. This week the challenge HERE is to choose a colour combo from 2018 and make it seasonal.


I chose to use the colours from challenge #264 seen HERE and below...


And here is how I made them festive...


I recently purchased the Tree Shaker die from Pretty Pink Posh and I couldn't wait to get using it! I decided to make a non shaker card and combine it with Background Builders Christmas 2018. I am just loving the Christmas fairy light trend and can't stop using this stamp either ;)

I stamped it on a white mat layer in VersaFine Onyx Black ink, used my Stampin' Up! markers in the colours I chose to colour the bulbs and then added some White Blizzard Glitter Nuvo Drops, another favourite! 


The tree is adhered to the card using foam adhesive and then the panel adhered to the card using foam adhesive too. 

This is my second to last Design Team post for CAS Colours & Sketches, as I took the decision to step down once we had finished the challenges for 2018 :( I am sad to be leaving, as it has been fun. But my time is needed in other areas of Uniko ;)

Anyway, there is more inspiration from the CC&S Design Team over HERE. Be sure to check out which colour combo they've all chosen to make seasonal :) I look forward to seeing you in the gallery and happy festive CAS card making! 

Hugs