Showing posts with label Uniko Clear Stamps. Show all posts

Monday, 29 January 2024

BA Inspiration Love theme cards

  Hello everyone!

Happy Monday!

Today I have two projects to share using some goodies from UNIKO! I had fun playing around with them. As you all know Valentine's Day is approaching soon.

First up I got all rainbow inky horizontal stripes paired with Love!

The Big & Bold love stamp set features a beautiful bold Love word accompanied by some accent images and sentiments and I paired it with Background Blocks Horizontal stripes and Pinstripes stamp set.

These rainbow theme stripes match and show off the fun striped heart image.


Firstly I inked my horizontal stripe image using some newly radiant neon inks set of 4 and I love the result. Then I purposefully stamped the pinstripe look on these stripes. I inked my striped heart and fussy cut it. Then I stamped bold love sentiment along with accompanying sentiment All my. 


For the next card, I combined Decorative doilies digital paper with scattered heart images in a soft radiant neon color.


Firstly I used all 3 sizes of the smaller hearts from the same set. I colored the largest small heart using my blue ZIG watercolour brush pen.
I created a pocket using the decorative doilies paper print. The love sentiment is hand-cut using berry wine pigment ink accompanied by always sentiment. I popped up the pocket above the scattered hearts. I also added some iridescent hearts for more interest.
That's just where my creativity flows! Hope I inspired you to make some Valentine's cards for your loved ones!

Happy crafting!

Wednesday, 2 August 2023

Introducing... Mid Century Modern Christmas

Welcome to Day 2 of the product introductions for our July/August Release. 

Hopefully you didn't miss yesterdays product introduction, but if you did you can catch up HERE. Today myself and the Brand Ambassadors are showcasing another of the new additions to the Mid Century Modern series with Mid Century Modern Christmas.

If you love the Mid Century Modern series as much as I do, I think you will love this new addition and I am sure you will have fun pairing it with lots of the current and new products in this series. 

Enough talk, lets have a look at it in action...


  Anita


A wonderful addition to the collection, don't you think?

We will be back tomorrow with more to share. This clear stamp set with all of the product we are introducing this week will be available 9am Sunday 6th August 2023. 


Crafty Hugs


Saturday, 6 May 2023

BA Inspiration cards using English Country Garden Butterflies set!

 Hello everyone!

Vinita here!

Today I wanted to showcase the English Country Garden Butterflies stamps and challenge myself to use the same color palette on both cards using Distress inks and oxides!

I used scattered straw, squeezed lemonade, carved pumpkin, dried marigold, stormy sky, salvaged patina and forest moss inks.


For my first card, I started by blending a white panel using salvaged patina DO and the stripes were stamped using forest moss inks. I blended stormy sky ink on another panel too and cut them into a strip.
Then stamped the butterfly on a white scrap piece using jet black archival ink and colored it with ZIG water brushes using the same color palette and die-cut it. On my white card base I stamped the sentiment from You are, Yes you stamp set. Added the stripe panel along with blue inked stripes. Adhered that flutterby with another inked butterfly for more interest and dimension. Compliment it with some sky blue and sea green pearl dots.


For the second card, I started with a white panel and placed my stylish floral stencil and inked it with the same color palette. After removing my stencil once again I lightly inked the panel using the same colors.
To be honest, the blending of this floral background was a kind of experiment. I wasn't sure how it would be turned out but I am loving it!


On a white scrap paper, I stamped the little butterflies 4 times and blended some DI and die-cut them.

In the centre, I stamped some tiny hearts and love sentiments from the Big & Bold Love set.
Adhere to that panel on my card base with a black panel underneath.
Compliment it with a ruffled shimmery ribbon and enhance the beauty of butterflies by adding some Nuvo crystal drops for some shimmer to match my gorgeous ribbon.

Hope you enjoyed today's inspirations!
Happy crafting!

Happy weekend!

Wednesday, 9 December 2020

Countdown to Christmas - Wednesday WINNER!

 Happy Wednesday!


I'm here today to announce the WINNER of the Cracking Christmas Prize from THIS blog post here! If you snooze you loose so they say ;) The odds were really good for these lucky entrants.


Anyway, without further ado, random number generator on Google selected No.10 as the winning entry. 


Congratulations too Dee Earnshaw!


Dee, please send an email to bev@uniko.co.uk along with your postal address so that I can get your goodies on their way to you.


Thank you to all who entered the giveaway, your continued support, comments & love here at Uniko are much appreciated. There is another chance to WIN Uniko goodies on Saturday with our 2020 Christmas Party, so be sure to stop by & join in on the fun.


Before I go today I do have a quick wintery Christmas card to share with you...


I'm still dreaming of that white Christmas! I was organising some of my non Uniko stencils and came across the MFT Square Extraordinaire stencil and decided to have a play with it. I used Distress Oxide Speckled Egg to ink through the stencil and then before removing the stencil I stamped the Background Block Falling Snowflakes over the top with the same colour.


The large snowflakes and sentiment are from Stunning Snowflakes and I stamped them in Altenew Dark Night ink. I finished the snowflakes off with a little White Blizzard Nuvo Drops to the centres. 

I hope you have a wonderful Wednesday! 

Crafty Hugs Bev x


Monday, 7 December 2020

Countdown to Christmas Day 7 - Merry Monday!

 Happy Monday!


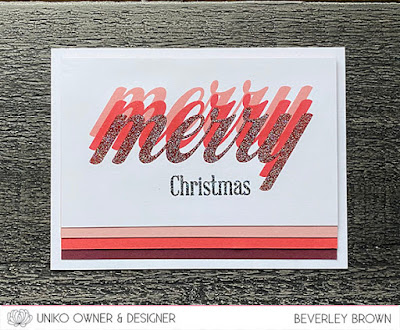
Welcome to day 7 of the Uniko Countdown to Christmas. Today I am in a Merry mood as I feel like I am almost caught up on various things in the studio & with Christmas! So I am following suit with my Merry mood and sharing some BIG & BOLD Merry Christmas cards with you...


My first card is super CAS and is really easy to make when you have a stamping platform, so even though it looks time consuming, it isn't. It is a design easy to mass produce and with the Altenew layering ink collections, the colour varieties are easy and effortless too!


For this card I used Rouge, Crimson & Velvet from the Red Sunset ink collection and I also stamped and embossed the last Velvet layer with my favourite Stardust embossing powder. The layers of coloured card are what I had in my scrap box and they match the ink colours really well.


For my next card I again went CAS and this time with a non-traditional colour scheme. The BIG & BOLD Merry is stamped in Aqualicious ink from the Altenew Sweet Dreams collection. The coloured card stock layer is Concord & 9th Aqua Sky.


I drew two pencil lines to be able to stamp the little string of lights from the set and then used Nuvo Drops in pastel shades to colour the baubles.


That's all from me today, but I hope you're having a Merry Monday! I will be back again tomorrow with more to share.

Crafty Hugs Bev x


Saturday, 5 December 2020

Countdown to Christmas Day 5 - Sparkling Snowflakes

 Happy Weekend!


I know we are only on day 5 of the Christmas Countdown (and I have just realised I got ahead of myself yesterday HERE and have now edited my post), but since advent started the days just seem to be going quicker for me and I keep thinking of all the Christmassy things that I still want and need to do - LOL! Anyone else feel the same?


Today I am sharing a snowflake anniversary card. One of my new fitness friends saw that I made cards & commissioned me to make a card for her 8th Anniversary with her fiancé. They are both HUGE Disney lovers, so she requested something with a little inspiration from the film Frozen. This is what I came up with and I am super happy to report that her fiancé loved it! 


If you don't know by now, I'll tell you again... I LOVE SNOWFLAKES! So I was in my element making this special card. 

Of course I used all Uniko products ;) The large snowflake is the Designer Die - Sparkling Snowflake and I paired it with the coordinating stamp from Stunning Snowflakes. I used Altenew inks in Dusk and Sea Glass to stamp the snowflakes and added some of my favourite White Blizzard Glitter Nuvo Drops.


The centrepiece snowflake is inked and embossed with Stardust embossing powder for a little extra impact. I also lightly ink blended the edges of the snowflake. The sentiment is from Simply Said II and embossed in white onto a strip of Pacific Point card from Stampin' Up! 


I have no doubt that you will be seeing some more snowflakes in the coming days as we continue the Countdown to Christmas ;) But for today, this is all I have to share!

Until tomorrow, thank you for stopping by today.
Crafty Hugs Bev x


Tuesday, 25 February 2020

Brand Ambassador Inspiration ........ Easy foiling with Uniko Stencils

Happy Tuesday .......

It's Linda here with my Brand Ambassador Inspiration post for February.
It's been a busy month, and it's not over yet! 
We're celebrating Uniko's 8th Birthday.  We've had the Birthday Linky Party .....


There's the amazing Birthday Giveaway ....... where one lucky winner will receive a HUGE prize .....


And of course there's the brand new February/Birthday Release which was launched at the weekend. 
As I said ..... a busy month!

Today I've got a few ideas for you using some simple foiling techniques with your Uniko Stencils.

Foiling seems to be one of the popular techniques at the moment, and there's a few different ways of adding the pretty, shiny foils to you cards, using stencils.

Stencil paste is one of them ......  I'm not sure if they all work in the same way but, I use the Sweet Poppy Stencil Medium and it works a treat .......


Simply apply the medium through your stencil design (Mid Century Modern Squares) and then let it dry completely.  I tend to leave it overnight but depending on the stencil design, and the temperature of your craft space an hour or so should be fine.
Once it's dry, lay your foil over the top, pretty side up, sandwich your card and foil between copier paper and then run it through a laminator.  It doesn't have to be anything fancy ..... mine is a cheap and cheerful one, bought years ago and works fine.


What I will say is ...... don't have the temperature too high, that way you'll avoid getting foil where you don't want it!

Use your finished pieces as backgrounds for your stamped images (Hello Lovely) ........


Add a touch of colour and a simple sentiment ......


Foil Transfer Gel works in the same way ........ apply the gel through your stencil (Party Confetti), let it dry and then add your foil.  Some gels work with heat ....... the laminator, and some also work with pressure.  Instead of using the laminator run the foil and card through your die cutting machine.


Deco Foil Duo Transfer Gel works with, or without heat ......... and gives great results eaither way.  I used my Big Shot ...... sandwiching the foil and card between copier paper and using the same plates as I would for cutting thin metal dies.  You may or may not need to add a shim, it depends on your machine.


I added a collection of sentiments (Simply Said Blocks & Simply said Blocks II)  on the top for a really simple but fun design


Another easy way of adding foil is to use the sticky embossing powder ......


This works just like any other embossing powder, except when you heat it, it goes tacky.

I inked through my stencil (Nature's Treasures II) using Distress Oxide ink ..... Oxides tend to stay wet a little longer so if you're quick you can get the powder on top before they dry.


Heat it as you would regular embossing powder, once it goes clear quickly lay the foil over the top, gently rub over the design and peel away the excess.  You don't always get a clean finish but, I quite like the distressed look.

Finally .... a really quick and easy way to add foiled accents is simply apply the foil over your double-sided tape


I like to use the Ultra Tacky stuff .... you know the one, with the red backing, gets everywhere!
I simply run the tape along the edge of my card and apply the foil over the top.  Give it a rub to burnish the foil onto the tape and then peel back the excess ...... so pretty!


Thanks for popping by .... enjoy the rest of your day.

I hope you've enjoyed the Birthday month celebrations, and as I've said they're not over yet.
There's still time to join in the fun ....... the Birthday Linky Party is still open,  there's still time to join the Huge Birthday Prize Giveaway  and the Blog Hop is still running.
Oh!  and don't forget ....... for the whole month of February you can save 10% on all your Uniko purchases.  Just add the code .... CELEBRATE8 before you check out.


Cheerio until next time ......