Showing posts with label Vellum. Show all posts

Friday, 22 August 2025

Festive Friday - Bright Snowflakes

Happy FriYAY!

Today I have a FLIPPIN' awesome Festive Friday card to share with you. It's an idea I've had floating round my head for a while, so it felt good to finally see it in real life.

I chose the Stencil - Ink & Flip Snowflake Pattern from the Christmas in July Release as I felt I had neglected it a little compare to the Stencil - Ink & Flip Christmas Tree Pattern


I chose two of my favourite brighter colours, Honeysuckle and Oceanside, but in hindsight could have gone even brighter. 

I love the frosted feel vellum gives to a card and added a panel over the top. Another reason why I chose bright colours as I knew the vellum would mute the colours a little. 


I adhered a Simply Said Blocks Christmas sentiment to the vellum using foam tape and adhered the panel to my stencilled card using glue behind the sentiment strip to hide the adhesive. I finished with a trio of Sunflower enamel dots. 

You can watch me make this card if you're unsure of how the Ink & Flip Snowflake Pattern works or you need a little reminder. I have a YouTube Short HERE

I'd love to know the colour combo you would use for this stencil.

Crafty Hugs


Saturday, 5 July 2025

Christmas In July - Vellum Frosted Christmas Trees


Happy Weekend. 

Today I am off south with Uniko for Stamperama Bracknell, the show is tomorrow and I am super excited to be going somewhere new. 

In between show prep and restocks arriving, I still managed to squeeze in a little creative time. On Thursday I shared a card on the Seven Hills Crafts blog HERE and seen below using the Kristina Werner Merry Trees, yes, I am doing Christmas in July over there too! 


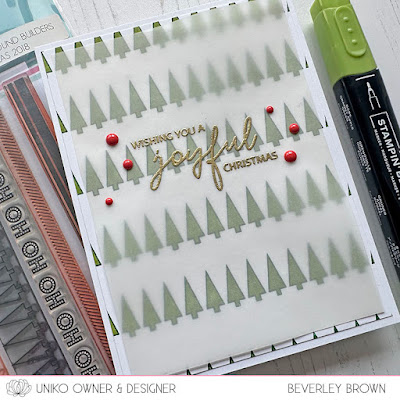
I stencilled the background, but wanted to add a sentiment. So I decided to add a vellum panel to do that. It adds a wonderful frosted feel to the card and perfect to stamp a gold heat embossed sentiment. 

Anyway, I thought I would replicate the look with Uniko products and this is how it turned out...


I decided to use Background Builders Christmas 2018 and stamped the line of trees in black ink up my card panel. I then coloured the trees with a Stampin' Up! Stampin' Blend. For the sentiment I used the popular Christmas Wishes and added a few Poppy enamel dots to finish. 


I love how you can use the same layout and similar supplies, but achieve different looks. Well, that's two more Christmas cards added to my stash. 

That's all from me today, but I will be back tomorrow with more to share. 

Crafty Hugs

Sunday, 13 April 2025

BA inspiration: Featuring Spring Botanicals Primrose

 Hello everyone!

Happy Sunday!


Vinita is here today to feature Uniko's new and gorgeous Spring Botanical Primrose stamp set. Let's get started with the details.


For the background, I ink-blended the picked raspberry distress oxide ink from top to bottom in an ombre pattern. I heat embossed the floral pattern on both edges using Carousel Wow EP and mounted the panel to my hot pink card base. 


Then I heat embossed the floral image on a scalloped vellum panel. I heat embossed the sentiment using Opaque Bright White EP from the Bright Butterflies set. I mounted it to the card front using transparent adhesive tape to add dimension to the floral pattern.

It's fun to come up with a completely different technique featuring an intense pink as the main color with metallic accents and a pop of sparkle!

Thanks much for stopping by today!

Happy crafting!

Sunday, 24 November 2024

Simple Festive Stencil Sunday

Hello & Happy Sunday.

Today has been a tidy up and a little reorganise in the studio. Mainly because I could hardly see my desk or the floor! But I did manage to squeeze in this card as inspiration came to me.


I've been loving vellum again recently. I love how it softens the background a little, but still makes the pattern behind visible. 

I dusted off the Stencil - Christmas Folk Snowflake and I love the design in this striking Cranberry colour. Not wanting to take too much focus from the pattern I added a simple sentiment trio from Christmas Sentiments (back in stock next week). I adhered the sentiments with foam adhesive onto the vellum. Then attached the vellum to my card using double sided tape and hidden behind the sentiments.


I finished the card with a simple holly cluster from Winter Foliage, which has yet to leave my desk. It is definitely one of my favourites for the season. 

That's all from me today, I've a bit more tidying and the roast to sort!

Crafty Hugs


Saturday, 1 July 2023

Hello July!

Hello July and welcome to...


This month myself and the Uniko Brand Ambassadors will be getting into the Christmas spirit and sharing inspiration using Uniko's current Christmas products in preparation for a NEW release, with countdown to release celebrations and inspiration starting 31st July. New products will be available Sunday 6th August.

Don't worry, if you're not quite ready for getting in the Christmas spirit, we will still be sharing other inspiration too! 

However, I'm kicking things off with a couple of cards using Framed - Holly as the main feature of may cards. 


As you can see, I am still on this vellum technique. It's fun trying out different stamps with this technique and this framed was calling for it.

I've stamped the frame in VersaMark and heat embossed in white. I then used just a trio of Stampin' Up! Stampin' Blends to colour on the reverse. I then adhered this to my card base using a fine tip glue and embellished the card with a sentiment from Christmas Wishes and a cluster of Winter Foliage. I finished off with a few red Nuvo drops.


The creative inspiration was flowing, so I went on to make a second card using Framed - Holly. 


This time I decided to stamp the frame in black ink and colouring with the same trio of markers. I then added the same sentiment stamped and embossed in gold. 


I decided the card needed a bit of dimension. So I stamped the image again and selectively coloured a few of the holly leaves, before fussy cutting them out and adhering them using foam tape. This creates a subtle raised spotlighting effect. 

I trimmed the frame and adhered it with double sided tape to a piece of Concord & 9th Poppy card before adhering to my card base using foam tape.

That's all from me today, thanks for stopping by.

Crafty Hugs 


Friday, 23 June 2023

Floral Friday


Hello & Happy Friday.

I'm back today with two floral cards. I've been wanting to recreate a card I made HERE back in 2018 using the Kindness Blooms clear stamps, but with some different florals. 

First I need to restock my stash with vellum and then I just needed to get round to making the new versions. Which I set to doing today when I finally cleared off my desk! 

I couldn't decided between the geranium flowers in Beautiful and the modern floral of Beautiful Blooms II. So I ended up making two cards.

First up is the card using Beautiful Blooms II. 


For both cards I used the same technique of stamping the flowers in VersaFine clear ink and heat embossing with WOW Opaque White embossing powder. I then fussy cut the flowers out along the top and bottom of my panel, so the middle is still joined by vellum.


Once cut I then coloured the flowers on the reverse using alcohol markers. I chose to colour on the reverse for a couple of reasons. One so the alcohol marker doesn't stain the embossed white lines and secondly, it gives a softer muted feel to the colours. 

I finished the card off with the Happy Birthday from Floral Vines, adhered using foam tape and some Pebble enamel dots.

Here is the same card using Beautiful.


The only difference with this card is I switched out the blue for purple and added a sentiment from Simply Said Blocks III. Also I used Sunflower enamel dots.


I'd love to know which is your favourite card. Beautiful Blooms II or Beautiful?

Such a fun technique and I am already thinking of stamps I could use to give this a masculine twist! Hope you are having a lovely day.

Crafty Hugs


Thursday, 2 June 2016

CAS Colours & Sketches #176

Hey!

I'm excited to say that for this month over at CAS Colours & Sketches I am the hostess, which means I have picked the colour combos and drawn the sketches to *hopefully* inspire you all. I do hope you like them and I really look forward to seeing you join in :)

Ok, so it's the first of the month which means it's a colour challenge. I think I have started things off with a pretty fun and simple combination...


With Summer just around the corner (for some of us & supposedly us in the UK!) I thought florally inspired combination would be fun.

Though I decided to go with butterflies for my card...


This set English Country Garden Butterflies is due back in stock over the weekend (available for pre order now along with other clear stamp sets) and so I thought I would dust my set off and give it some love.

I was also inspired by the current Freshly Made Sketches sketch seen HERE and below for the layout of my card. 


Iv'e been wanting to get some more ink blending practice in and so I masked a rectangle off and started blending the Rose Red to Blushing Bride and then to So Saffron, going back & forth between the colours blending until I was happy with the result! I still need a little more practice I think but I am enjoying the results.


The butterfly is stamped in VersaMark onto vellum and heat embossed with detail white embossing powder. After I fussy cut the butterfly out I decided to add some Wink of Stella to it for a little subtle sparkle. The sentiment also from the set is stamped in VersaFine Onyx Black ink.

I do apologise for being absent on the blogs recently, just when I think I am getting back into the swing of things I come down with a hacking cough and snuffles :( It's half term too which means all the playgroups we go to are closed and it's been a tough week keeping the beans entertained! 

Ok, that's all from me today, I do hope you will pop by the CAS Colours & Sketches blog HERE to check out the rest of the Design Team & Guest Designer Fiona's inspiration. I look forward to seeing you in the gallery & have fun!

Saturday, 12 April 2014

More Background Builders: Vines!

Hey & Happy Weekend!

WOW! What a release that was, you certainly kept me busy in the studio yesterday and it sure looks to me like Background Builders: Vines is a hit! There are a few left in store so if you've been thinking about purchasing them HERE I wouldn't hang around too long! If you missed the release you can catch up with it HERE and there is still time to comment & be in the chance of winning the giveaway.

How about some inspiration using the popular NEW set...


This is one of the cards that they will be making during the class at The Paperlane today. It features a little bit of reverse masking & lots of ditsy florals paired with some leaves from Natures Treasures I and a heat embossed vellum sentiment.


Ok, that's all from me today, I'll be back tomorrow though with more to share, until then, thank you for stopping by today, for all your support, custom & lovely comments. 


Supplies
Card Stock: White from stash
Ink: A Selection of colours from VersaMagic, Papertrey Ink & SU! 
Accessories: Sizzix Framelits Square Dies, Stampendous Detail White EP, SU! Vellum

Thursday, 27 March 2014

TIME OUT Challenge #2

Hey!

It looks like a lot of you enjoyed the new TIME OUT Challenge, it was lovely to see so many entries for the first challenge. I'm still working my way through to comment but I'll be stopping by all the lovely entries :)

Anyway, it's time for a new challenge and this week it is 'Home Sweet Home' a picture inspiration challenge. 


Photo Source: House Decorating Ideas


You can probably guess which direction I went in for my card. Most of you know I'm a sucker for butterflies!


Such a fresh & clean inspiration photo I decided to interpret this onto my card. I went for a textured white card base and a smooth white panel adhered to the base using foam adhesive. I dug through my patterned paper stash and found some lovely Pink Paislee paper. I die cut three patterned paper butterflies using the Designer Dies BRIGHT Butterflies and also three matching vellum butterflies and layered them as seen below.


As much as I love pattern & patterned paper being a surface pattern designer by 'trade', sometimes they can be over powering, especially on CAS cards. Adding the vellum butterfly over the top of the patterned butterfly softens the pattern & also adds depth.

Ok, that's all from me today, but there is SO much more inspiration from the FABulous Design Team  HERE and also all the details on the challenge & entering. I can't wait to see what you create for this challenge :)


Supplies
Card Stock: White from stash
Ink: SU! Peach Parfait (Retired)
Stamps: Uniko Studio Flower Power #1
Accessories: Uniko Studio Designer Dies BRIGHT Butterflies, Pink Paislee Prairie Hill Paper Collection, SU! Vellum, Pearls & Foam Adhesive.

Thursday, 10 October 2013

Crisp & Fresh!

Hey!

The title of this post could be describing the current weather here in the North East as it seems to have turned VERY cold & windy. The perfect kind of weather for snuggling up on the sofa with a hot chocolate & a good movie. Which is what I will be doing shortly!

My title also refers to my card I have to share with you this evening...


I combined a couple of challenges to help me create this little card. Firstly I used the current CASology theme of CRISP. I love white embossing & how crisp it looks on kraft. I'm also liking the white embossing on vellum which is popping up around blogland. 

The second challenge I incorporated is the current Freshly Made Sketch seen HERE and below for the layout of my card...


My card is super simple, I just stamped & embossed the poinsettia & sentiment on the kraft mat layer. I then stamped & embossed the poinsettia twice on vellum & fussy cut out just a small section of the flower. I adhered them to the kraft layer using double sided tape & added a few rhinestones to the centre. Then adhered the mat layer to the base card using foam adhesive.


That's all from me this evening, it's been a busy day here in the studio as I prepare all the soon to be released goodies! Also, a new shipment of Graphic Flowers from Time Dies arrived today & the website has been updated with their arrival! 

Thanks for stopping by today :)
Supplies
Card Stock: White from stash. SU! Crumb Cake
Ink: Versamark
Stamps: Uniko Studio Pure Florals: Poinsettia
Accessories: Cosmic Shimmer True White EP. Rhinestones. Foam Adhesive

Thursday, 16 May 2013

Blooming Vellum!

Hey!

Finally I found a little inky time this week & also time to finish a card I had started making on Saturday during the demo at The Paperlane...


I'm totally on a vellum kick at the moment and I am hooked on using the NEW Pure Florals: Chrysanthemum (Back in Stock 28th May). I used the same technique I did HERE on this card using Cosmic Shimmer EP and Copic markers. 


This little bloom is perfect for the current CASology challenge HERE, the code word being bloom!


This bloom was easy to fussy cut out as it's on vellum (no more fussy cutting soon *wink*) and I used small amounts of double sided tape to adhere it to the card, strategically placing it along the embossed lines so it can't be seen.

There is still time to join in on the CASE challenge HERE and don't forget the awesome prize up for grabs a £20 Uniko Studio gift certificate

Simply CASE one of the Design Teams cards shown in the May DT Blog Hop, blog about it or put it on your online gallery and link it up below so we can see :) Using Uniko Studio products is not a requirement, but we always LOVE to see them used! 

That's all from me today, I'll be back again in the morning with more to share :)
Thanks for stopping by

Supplies
Card Stock: White from stash, PTI Kraft
Ink: Versamark, VersaFine Onyx Black
Stamps: Uniko Studio Pure Florals: Chrysanthemum
Accessories: Corner Chomper & Kaisercraft Heart Button

Wednesday, 24 April 2013

Delicate Chrysanthemums...

Hey!

Today I've some delicate vellum Chrysanthemums to share with you...


This card was inspired by the Fusion #3 inspiration photo seen HERE and below. This time I kept the black & grey to a minimum & muted the raspberry pink.


I seem to LOVE playing with vellum at the moment! I had intended to adhere raspberry pink CS behind the vellum strip but really only wanted the flowers to be highlighted having embossed them with  Cosmic White EP. So, reached for my trusty Copic markers and did some more flat colouring to the reverse of the flowers.


Love the effect, colourful yet translucent! Looking at the sketch below my card there are similarities in the layout which weren't intended! Ha! 

There is some wonderful creations in the Fusion Gallery for this challenge HERE. It's well worth a gander even if you've not time to enter the challenge as it ends today. 

That's all from me today, I'll be back tomorrow with more to share and  most likely something other than Chrysanthemums, but I can't guarantee that it won't be! 

Thanks for stopping by today.
Supplies
Card Stock: WPlus9 White, PTI Soft Stone
Ink: VersaMark, VersaFine Onyx Black
Stamps: Uniko Studio Pure Florals: Chrysanthemum, Flower Power #1
Accessories: SU! Vellum, PTI Banner Die

Tuesday, 2 April 2013

Moments...

Not only do days pass so quickly but moments too and the sentiment on the card I have to share today is too true...


A bit late to join in on the current CAS(E) this Sketch challenge seen HERE and below but it was a great sketch! I am however, joining in on the return to using vellum & using patterned paper trend! 


I rarely use either vellum or patterned paper on my creations & usually find both really hard to incorporate. However, this evening this card came together really easily & relatively quickly! Below is a close up of the card detail...


I used the 'blank' Washi stamp from Wonderful Washi Christmas to create the patterned Washi ribbons, stamping them onto Teresa Collins Carolina Breeze DP & cutting them out. I used the same DP to die cut a layered BRIGHT Butterfly. All other supplies are listed below the post.

NOW, you are going to WANT to stop, hop, pop by the blog tomorrow as the April 2013 Release PARTY is starting tomorrow! YAY!! The Design Team & I have shook things up a little this month and your not going to want to miss out on a FABulous Release!! 

Hope to see you tomorrow 9am GMT! Until then, thanks for stopping by.

Supplies:
Card Stock: WPlus9 White
Ink: Memento Tuxedo Black
Stamps: Uniko Studio Wonderful Washi Christmas, Extra Time
Accessories: Uniko Studio Designer Dies BRIGHT Butterflies (Released April 2013) Teresa Collins Carolina Breeze DP, PTI Die, SU! Vellum, KaiserCraft Pearls & Foam Adhesive.